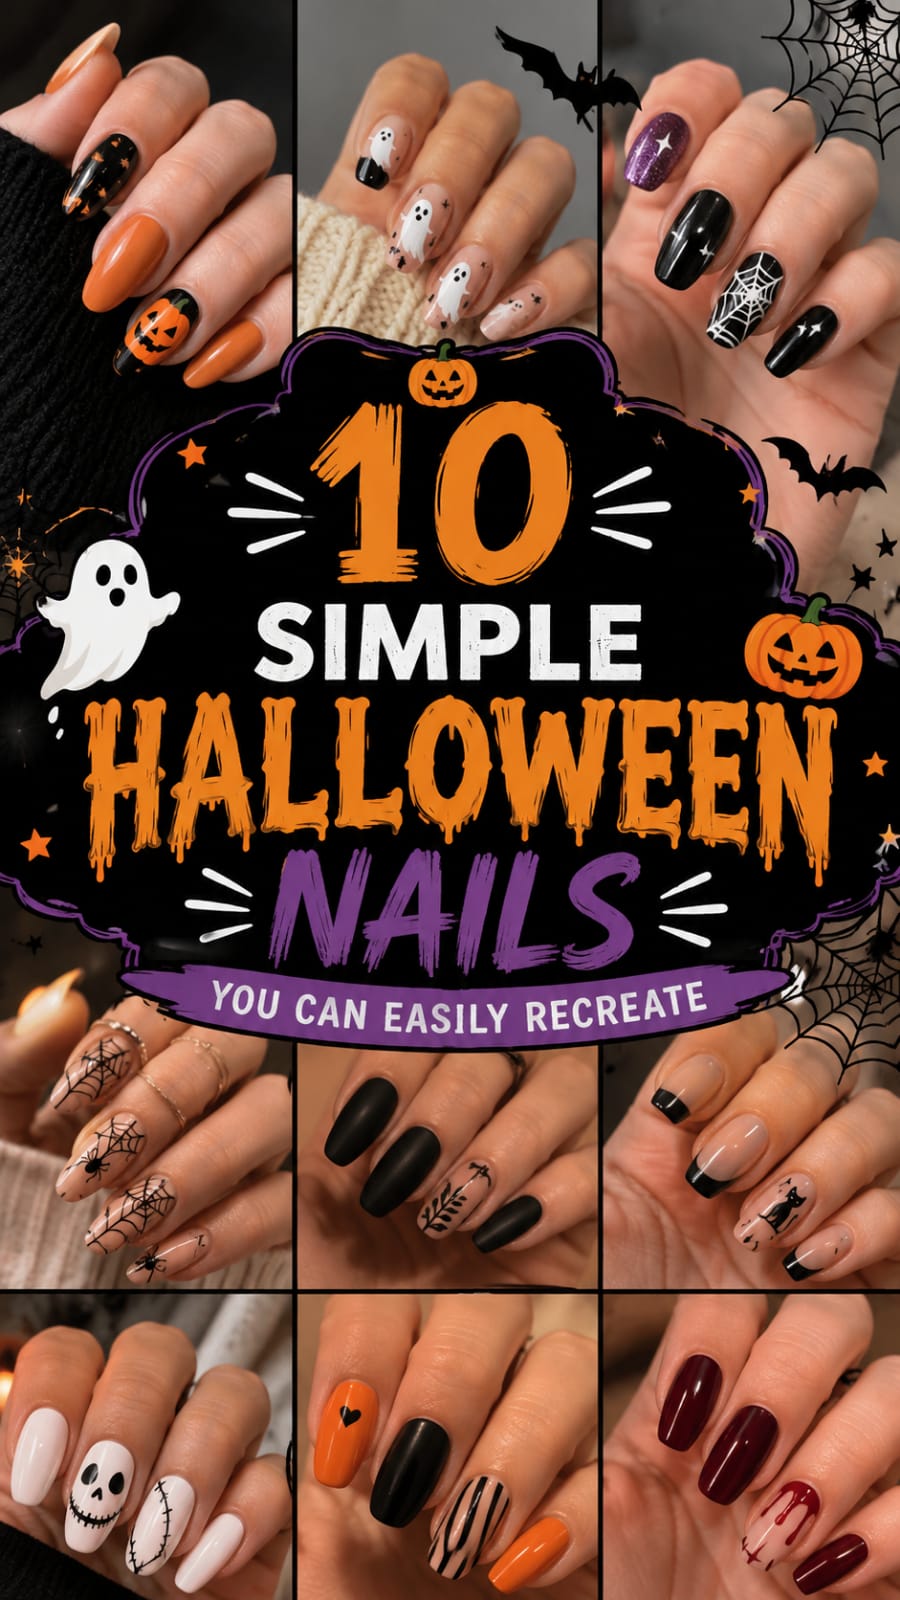
Autumn brings a distinct shift in fashion trends, personal aesthetics, and creative self-expression. As October approaches, planning your festive look becomes an exciting priority. Finding chic simple halloween nails allows you to celebrate spooky season with charm, elegance, and effortless ease.

Modern seasonal manicures have evolved beyond complex salon appointments that take hours to complete. Today, beauty enthusiasts prefer minimalist line art, negative-space designs, and elevated micro-details. You can create eye-catching sets right at home using basic tools and everyday polish formulas.
Short natural nails, elegant almonds, and clean square shapes all suit these modern October aesthetics. Incorporating subtle festive elements keeps your hands looking polished, fashionable, and ready for any occasion. These versatile looks transition seamlessly from professional workdays to cozy weekend pumpkin carving parties.
Whether you favor friendly ghost silhouettes, subtle blood drips, or chic spiderwebs, options abound. Exploring beginner-friendly nail techniques ensures you achieve salon-quality results without stress. Let these ten creative concepts inspire your next cozy autumn manicure session.
1. Floating Micro Ghost French Accent Tips
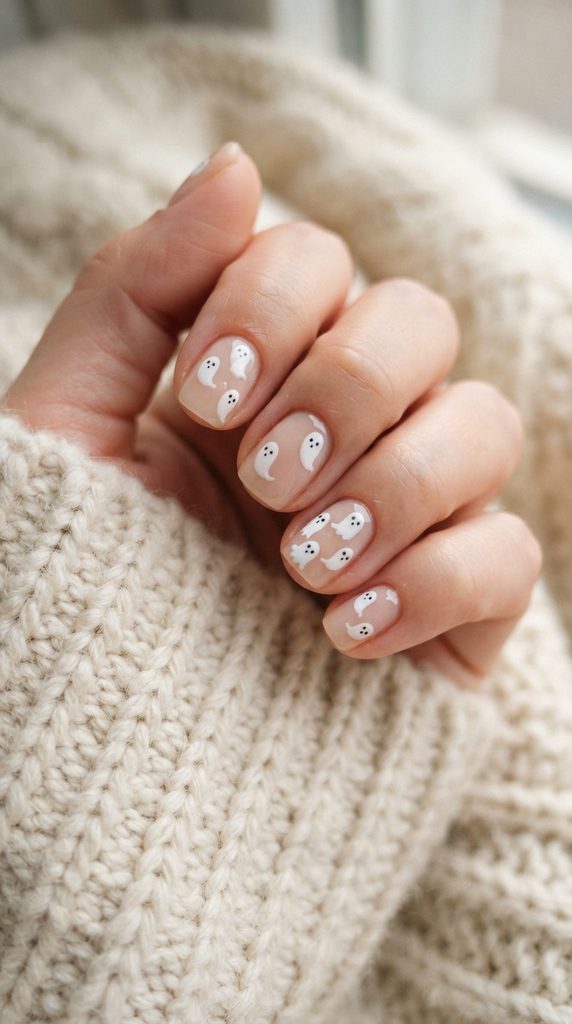
This look combines the timeless elegance of a sheer French manicure with playful, floating specters. It offers an understated approach that flatters all nail lengths and shapes effortlessly.
+-----------------------------------------------------------+
|             Micro Ghost Accent Profile                    |
+-------------------+---------------------------------------+
| Base Style        | Sheer Translucent Nude or Milky Pink  |
| Accent Art        | Hand-Painted Floating White Ghosts    |
| Ideal Shape       | Short Natural Squoval or Soft Almond  |
| Aesthetic Mood    | Minimalist Spooky, Clean Girl Chic    |
+-------------------+---------------------------------------+
Aesthetic Blueprint and Visual Storytelling
This design takes inspiration from minimalist Scandinavian art and vintage storybook illustrations. The sheer nude base keeps your natural nail beds looking clean, elongated, and healthy.
Tiny white phantom shapes float across chosen accent nails, replacing traditional smile lines. Leaving negative space around the ghost shapes ensures the manicure remains light, wearable, and elegant.
Two micro black dots create sweet, curious eyes that give each ghost personality. It is a subtle festive nod that feels chic rather than chaotic or loud.
This design pairs beautifully with chunky knit sweaters, gold rings, and hot lattes. It represents modern festive beauty that fits every lifestyle, office environment, and social gathering.
Essential Supplies and Preparation Methods
- Sheer jelly nude or pale pink base polish.
- Opaque chalk-white nail polish or painting gel.
- High-pigment jet-black nail art paint.
- Medium and micro dual-ended dotting tools.
- Ultra-fine five-millimeter detailer art brush.
- High-gloss, long-wearing clear topcoat.
- Isopropyl alcohol cleansing wipes.
Application Steps for Festive simple halloween nails
- File your natural nails into a neat, symmetrical squoval shape.
- Push back your cuticles gently using a wooden cuticle stick.
- Cleanse the natural nail plate with an alcohol wipe thoroughly.
- Apply a thin layer of smoothing base coat and allow to dry.
- Paint two thin, streak-free layers of sheer nude polish.
- Dispense a small drop of white polish onto foil.
- Use the larger dotting tool to place a white circle near the tip.
- Pull the wet polish downward using your detail brush into a wavy body.
- Add two tiny curved arm shapes on the sides.
- Allow the white ghost silhouette to dry completely for two minutes.
- Use the micro dotting tool to add two tiny black eyes.
- Seal the entire plate with a generous layer of high-gloss topcoat.
Professional Ways to Preserve Set Durability
Always cap the free edge of your nail with topcoat during every layer. Sealing the edge prevents keyboard friction from wearing the delicate white tips away prematurely.
Apply nourishing cuticle oil around your nail folds twice every single day. Consistent hydration prevents natural nails from curling away from the polish base during autumn.
Reapply a fresh layer of quick-dry topcoat every four days to maintain gloss.
2. Minimalist Crimson Blood Drip French Manicure
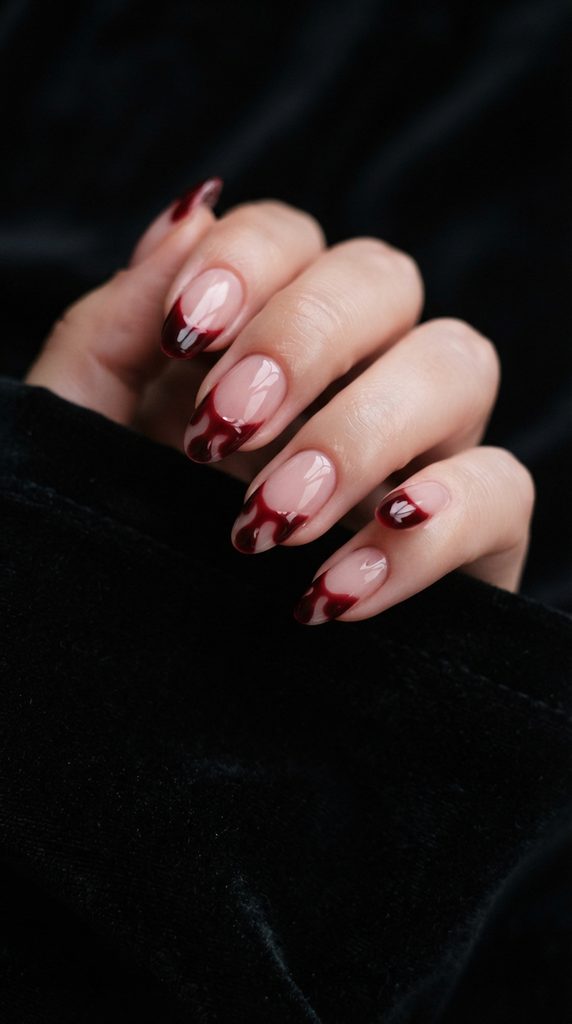
Dripping crimson tips bring gothic drama and vampiric elegance to your hands with ease. This design balances sheer negative space with rich, high-gloss ruby red droplet shapes.
+-----------------------------------------------------------+
|             Blood Drip French Profile                     |
+-------------------+---------------------------------------+
| Base Style        | Translucent Glass Nude or Soft Blush  |
| Accent Art        | Deep Burgundy-Red Glossy Liquid Drips |
| Ideal Shape       | Tapered Oval, Almond, or Natural Round|
| Aesthetic Mood    | Gothic Romance, Seductive Vampire     |
+-------------------+---------------------------------------+
Aesthetic Blueprint and Dark Elegance
This concept draws inspiration from classic vampire literature, gothic romance, and runway manicures. A translucent base provides a clean, neutral foundation that lets the vibrant red shine.
Glossy oxblood or crimson drips flow downward from the free edge toward the cuticle. Varying the height of each droplet creates an organic, fluid appearance across your hands.
The rich red tone catches ambient light, mimicking the luxurious shine of polished rubies. It offers an artistic, high-fashion take on traditional holiday horror themes without looking messy.
Pair this dramatic set with tailored black blazers, dark velvet tops, and silver jewelry. It delivers an unforgettable festive statement suitable for cozy dinners and holiday evening parties.
Essential Supplies and Preparation Methods
- Sheer pink-tinted builder base or translucent nude lacquer.
- Deep crimson or burgundy red creme nail polish.
- Dual-ended dotting tool with varied sphere sizes.
- Slender striper art brush with long synthetic bristles.
- Acetone cleanup brush for refining messy edges.
- Plumping high-gloss clear gel or lacquer topcoat.
- Lint-free cotton cleansing pads.
Application Steps for Festive simple halloween nails
- Shape nails into smooth ovals or elegant almonds using a file.
- Remove natural surface oils with a quick swipe of cleanser.
- Apply a single coat of strengthening base coat to plates.
- Apply two thin coats of translucent blush-pink lacquer.
- Dispense a drop of crimson red polish onto your palette.
- Dip your dotting tool into the red polish generously.
- Place three red dots at different heights across the nail plate.
- Use your fine striper brush to drag lines from dots to tips.
- Connect the tops of all lines along the free edge smoothly.
- Fill in the tip area solid to form a curved French smile.
- Smooth any uneven transitions between droplets and connecting lines.
- Top with a thick layer of plumping clear topcoat to seal.
Professional Ways to Preserve Set Durability
Red pigments can sometimes stain skin if flooded into cuticles during art application. Use a flat brush dipped in acetone to clean lines immediately before they dry.
Wear rubber gloves while handling household cleaning products or washing greasy dishes. Hot water softens the nail plate, causing premature chipping along dripping tips.
Keep your hands hydrated with rich shea butter cream every night before bed.
3. Dainty Obsidian Spiderweb Corner Accents
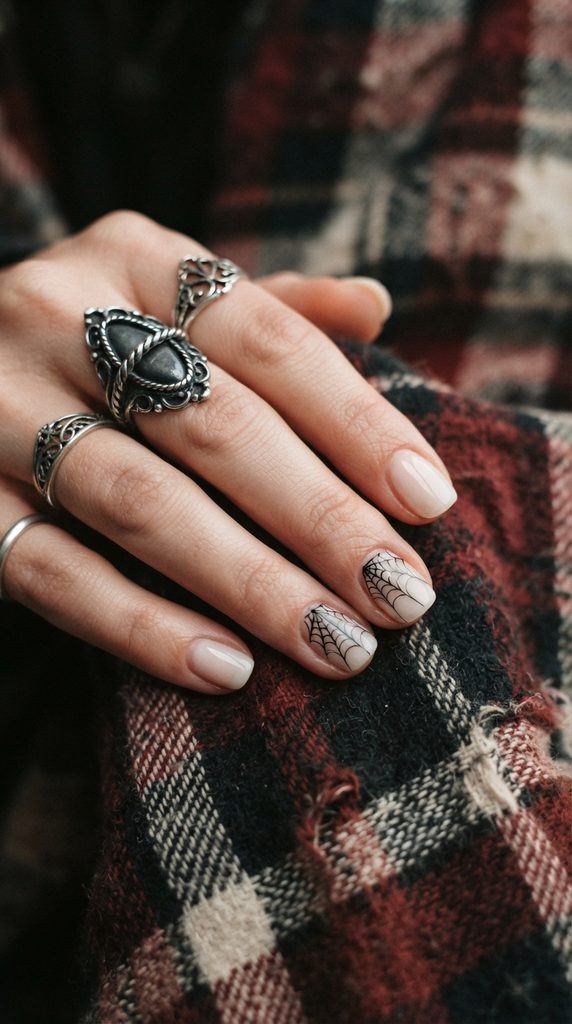
Spiderwebs represent delicate architecture, mystery, and historic gothic folklore across the autumn season. Framing fine-line cobwebs in nail corners preserves negative space while delivering intricate holiday style.
+-----------------------------------------------------------+
|             Spiderweb Corner Accent Profile               |
+-------------------+---------------------------------------+
| Base Style        | Sheer Milky Base or Pale Neutral Taupe|
| Accent Art        | Fine-Line Black or White Cobweb Vines |
| Ideal Shape       | Short Natural Square, Oval, or Squoval|
| Aesthetic Mood    | Vintage Gothic, Delicate Witchcraft   |
+-------------------+---------------------------------------+
Aesthetic Blueprint and Dark Elegance
This style takes visual cues from antique lace patterns, Victorian architecture, and moonlit gardens. Placing the web in the corner prevents the design from overwhelming short nail beds.
Fine, razor-thin lines radiate outward from one corner of chosen accent nails gracefully. Delicate connecting arches link the spokes together, mimicking dewy gossamer threads in autumn mist.
The high-contrast lines look sharp against sheer milky or soft taupe background bases. It feels refined, understated, and artistic, appealing to lovers of minimalist dark aesthetics.
Style this delicate manicure alongside oversized flannel coats, silver rings, and leather boots. It provides an effortless way to celebrate October with timeless gothic sophistication.
Essential Supplies and Preparation Methods
- Sheer milky white or pale oat foundation polish.
- Opaque jet-black or crisp white nail art painting lacquer.
- Ultra-fine five-millimeter striper brush with flexible bristles.
- Palette ring or smooth glass tile for holding paint.
- Matte and high-gloss topcoat formulas for finish options.
- Pure acetone and angled flat cleanup brush.
- Soft foam buffing block.
Application Steps for Festive simple halloween nails
- Shape nails into clean, balanced squovals or natural ovals.
- Buff the natural nail surface lightly to remove uneven ridges.
- Apply a bonding base coat and allow it to dry fully.
- Paint two coats of sheer milky white polish across all nails.
- Apply a quick coat of matte topcoat to make drawing easier.
- Dip the tip of your fine striper brush into black paint.
- Paint three straight anchor lines radiating outward from one corner.
- Connect the straight anchor lines using gentle inward-curving arches.
- Add a second row of arches further outward to expand the web.
- Place a tiny dot in the center of the web for dew.
- Allow the fine linework to dry completely for three minutes.
- Seal the entire design with your choice of matte or glossy topcoat.
Professional Ways to Preserve Set Durability
Fine linework requires a smooth, non-greasy surface to prevent paint from beading up. Wiping the base with alcohol before painting ensures clean, sharp lines every time.
Double-coat your topcoat over detailed hand-painted lines to protect them from abrasions. Multiple topcoat layers shield the delicate line art from daily keyboard typing wear.
Massage sweet almond oil into your cuticles daily to preserve surrounding skin softness.
4. Glowing Pumpkin Orange Micro French Lines
Micro French tips are a staple for modern manicures, offering an elongating, clean visual line. Swapping traditional white tips for warm pumpkin orange creates an instant festive transformation.
+-----------------------------------------------------------+
|             Pumpkin Micro French Profile                  |
+-------------------+---------------------------------------+
| Base Style        | Sheer Nude Pink or Translucent Beige  |
| Accent Art        | Ultra-Thin Warm Pumpkin Orange Smile Line|
| Ideal Shape       | Short Square with Soft Rounded Edges  |
| Aesthetic Mood    | Harvest Warmth, Autumn Pumpkin Patch  |
+-------------------+---------------------------------------+
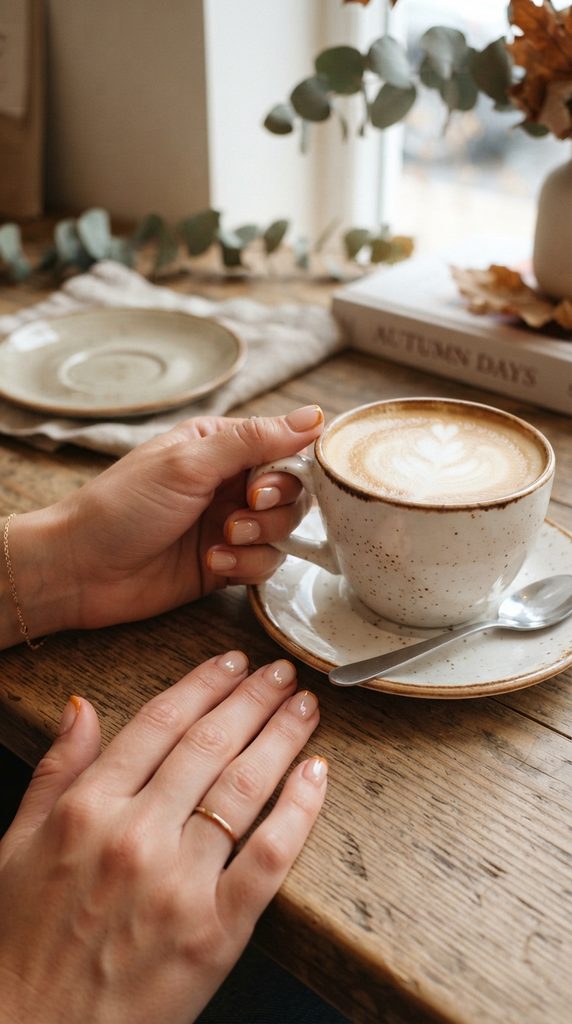
Aesthetic Blueprint and Visual Storytelling
This cheerful concept celebrates autumn harvest festivals, glowing porch lanterns, and crisp foliage. A warm pumpkin orange hue provides vibrant seasonal energy without overpowering your hands.
The micro smile line measures barely one millimeter across the very top free edge. This thin placement draws the eye outward, creating the illusion of longer nail beds.
A sheer pink-nude foundation keeps the overall set balanced, clean, and workplace-friendly. It is an elevated, minimalist choice for those who love subtle seasonal nods.
Wear this crisp manicure alongside cozy knit scarves, corduroy jackets, and warm apple cider. It captures autumn warmth while maintaining timeless, low-maintenance beauty every single day.
Essential Supplies and Preparation Methods
- Sheer pink-nude base lacquer that matches your undertone.
- Creamy, opaque pumpkin orange nail polish.
- Long-hair nine-millimeter striper brush for smooth sweeps.
- Flat angled cleanup brush for carving clean smile lines.
- High-gloss quick-dry clear topcoat.
- Non-acetone polish remover or alcohol cleanser.
- Conditioning base coat formula.
Application Steps for Festive simple halloween nails
- File natural nails into a neat square shape with softened corners.
- Cleanse the nail beds thoroughly to remove surface oils and dust.
- Apply a smoothing base coat and let dry for two minutes.
- Paint two thin layers of sheer pink-nude foundation polish.
- Dispense a drop of pumpkin orange polish onto a clean palette.
- Dip the tip of your long striper brush into the orange paint.
- Trace an ultra-thin line along the natural smile line of the nail.
- Connect the line smoothly down toward the lateral nail sidewalls.
- Use a clean brush dipped in remover to sharpen the lower edge.
- Allow the thin orange tips to dry for two full minutes.
- Add an optional tiny green dot at one corner for a stem.
- Finish with a durable, scratch-resistant glossy topcoat to seal.
Professional Ways to Preserve Set Durability
Because micro tips sit directly along the edge, cap the tip carefully with clear topcoat. Capping creates a protective seal that prevents daily typing friction from chipping orange paint.
Avoid soaking hands in hot water for long periods without protective gloves. Prolonged heat softens the natural nail plate, which can cause polish layers to separate.
Apply rich cuticle balm every evening to keep the skin around tips hydrated.
5. Chic Matte Jet-Black with Glossy Bat Silhouettes
Playing with contrasting matte and glossy finishes creates subtle, high-fashion tactile intrigue. This design pairs an all-black matte foundation with shiny, light-catching flying bat silhouettes.
+-----------------------------------------------------------+
|             Glossy Bat Silhouette Profile                 |
+-------------------+---------------------------------------+
| Base Style        | Velvet Matte Pitch-Black Lacquer      |
| Accent Art        | Glossy Topcoat-Painted Bat Silhouettes|
| Ideal Shape       | Medium Almond, Coffin, or Oval        |
| Aesthetic Mood    | Midnight Gothic, High-Fashion Noir    |
+-------------------+---------------------------------------+
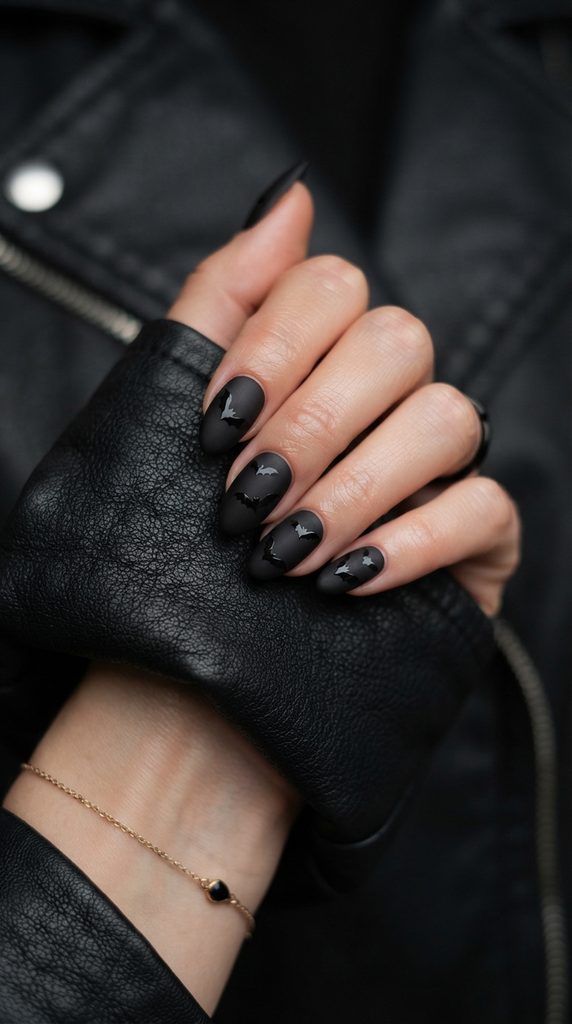
Aesthetic Blueprint and Dark Elegance
This look channels nocturnal creatures, starry midnight skies, and runway monochrome aesthetics. An all-black color scheme looks sleek, modern, and undeniably powerful across all nail lengths.
The contrast between the velvety matte base and shiny bats creates subtle texture. In direct light, the glossy bats reflect shine while the background absorbs it completely.
It offers an elevated, tone-on-tone approach that feels sophisticated rather than loud. This manicure is perfect for fashion lovers who prefer dark, minimalist styling during October.
Pair this sleek set with leather motorcycle jackets, dark sunglasses, and chunky silver accessories. It delivers an effortless, cool-girl aesthetic for nighttime concerts and autumn parties.
Essential Supplies and Preparation Methods
- Highly pigmented, opaque black creme nail polish.
- Velvet-finish matte topcoat lacquer.
- High-shine, plumping clear glossy topcoat.
- Fine five-millimeter detailer art brush.
- Small dotting tool for shaping bat bodies.
- Isopropyl alcohol wipe for cleansing matte surfaces.
- Cuticle pusher and gentle glass nail file.
Application Steps for Festive simple halloween nails
- File nails into an elegant almond or rounded silhouette smoothly.
- Apply an adhesive base coat across all prepared nail plates.
- Paint two coats of opaque black polish, ensuring full color depth.
- Allow the black lacquer to dry completely for three minutes.
- Apply a smooth coat of velvet matte topcoat over all nails.
- Let the matte topcoat dry until all shine disappears completely.
- Dispense a drop of glossy clear topcoat onto a palette.
- Dip your dotting tool into the glossy topcoat to place a body dot.
- Use your fine detail brush to pull two curved wings outward from the dot.
- Add two tiny pointed ears atop the bat head with the brush tip.
- Add two scalloped arches along the bottom of each wing shape.
- Allow the glossy bats to dry naturally without adding overall topcoat.
Professional Ways to Preserve Set Durability
Matte topcoats can absorb natural skin oils over time, appearing slightly shiny. Wipe your nails with an alcohol pad to restore the velvety matte finish instantly.
Avoid applying lotion directly over the glossy bats to keep their shine distinct. If the bats lose luster, touch them up carefully with a tiny dot of topcoat.
Keep cuticles moisturized with lightweight jojoba oil applied around the skin borders.
6. Whimsical Candy Corn Geometric Negative Space
Candy corn provides a nostalgic, cheerful nod to classic trick-or-treating traditions. Translating this sweet into modern geometric negative-space color blocks creates a fresh, playful aesthetic.
+-----------------------------------------------------------+
|             Candy Corn Negative Space Profile             |
+-------------------+---------------------------------------+
| Base Style        | Sheer Translucent Nude or Bare Plate  |
| Accent Art        | Yellow, Orange, & White Triangle Blocks|
| Ideal Shape       | Short Squoval, Natural Square, or Round|
| Aesthetic Mood    | Sweet Nostalgia, Cheerful Autumn Fest |
+-------------------+---------------------------------------+
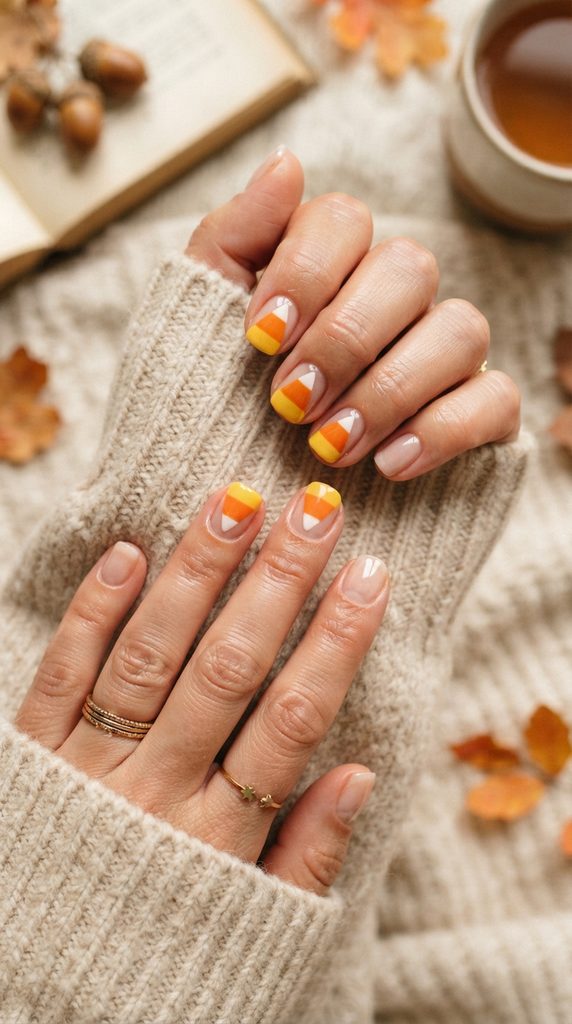
Aesthetic Blueprint and Visual Storytelling
This design takes inspiration from retro autumn sweets, carnival games, and modern geometric art. Leaving bare negative space around the candy triangles keeps the look light and chic.
Warm marigold yellow, bright pumpkin orange, and creamy white form crisp horizontal bands. The geometric triangle shape mimics the classic silhouette of the beloved Halloween confection.
Featuring the design on accent nails keeps the manicure tasteful and wearable. The remaining nails can wear matching solid neutral tones or sheer glossy glazes.
Style this vibrant set alongside cozy knit beanies, graphic sweaters, and relaxed corduroy jackets. It adds a cheerful pop of nostalgic color to casual weekend outings.
Essential Supplies and Preparation Methods
- Opaque nail lacquers in marigold yellow, pumpkin orange, and white.
- Sheer neutral base coat polish.
- Self-adhesive nail art striping tape.
- Flat angled brush for cleaning straight lines.
- Quick-dry glossy clear topcoat.
- Acetone-soaked cotton pads.
- Precision tweezers for placing tape.
Application Steps for Festive simple halloween nails
- Trim natural nails into a balanced squoval silhouette with smooth edges.
- Apply an adhesive base coat and allow it to dry completely.
- Apply two strips of tape in a V-shape on chosen accent nails.
- Paint the bottom section inside the V with sunny marigold yellow.
- Paint the middle horizontal section with bright pumpkin orange.
- Paint the pointed tip section with opaque chalk white polish.
- Remove the striping tape immediately while the polish is still wet.
- Clean any jagged edges using an angled brush dipped in acetone.
- Paint non-accent nails with sheer nude or solid creamy white polish.
- Allow all painted color blocks to dry for three full minutes.
- Seal all nails with a generous layer of high-gloss clear topcoat.
- Cap the free edges thoroughly to lock the geometric lines securely.
Professional Ways to Preserve Set Durability
Color-blocked designs can have slight thickness differences along the painted seams. Applying a plumping topcoat smooths the surface, creating a seamless, glass-like finish.
Keep hands protected from hot water by wearing rubber gloves during household chores. Hot water softens natural nail keratin, leading to premature edge lifting.
Massage organic cuticle balm into nail margins daily to keep skin healthy and soft.
7. Celestial Witchy Moons and Gold Starbursts
Mystical celestial themes bring sophisticated witchcraft charm to autumn manicures with ease. Tiny metallic gold stars and crescent moons over sheer moody bases look effortlessly chic.
+-----------------------------------------------------------+
|             Celestial Witchy Profile                      |
+-------------------+---------------------------------------+
| Base Style        | Sheer Smoky Charcoal, Indigo, or Nude |
| Accent Art        | Metallic Gold Foil Moons & Starbursts |
| Ideal Shape       | Medium Almond or Natural Oval         |
| Aesthetic Mood    | Esoteric Magic, Starlit Midnight      |
+-------------------+---------------------------------------+
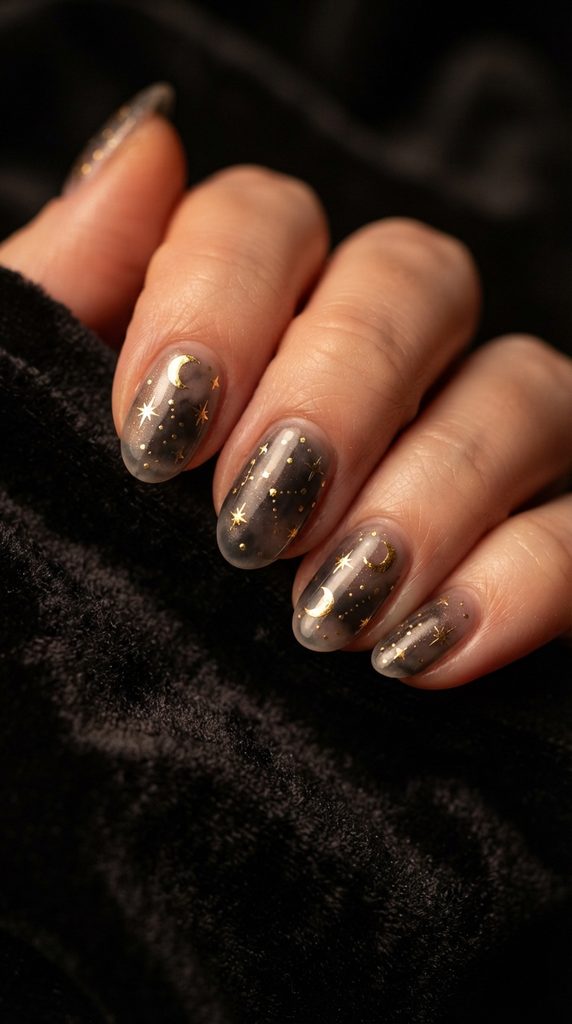
Aesthetic Blueprint and Dark Elegance
This enchanting concept draws inspiration from antique grimoires, starry night skies, and cosmic astrology. A sheer smoky charcoal or deep midnight blue base provides an infinite, starry backdrop.
Delicate gold crescent moons and four-point starbursts twinkle across the nail surface effortlessly. Keeping the celestial accents small and daintily placed flatters all nail lengths beautifully.
The combination of dark moody tones and reflective metallic gold creates luxurious contrast. It feels poetic, intellectual, and wonderfully atmospheric for chilly autumn evenings.
Style this mystical set alongside dark velvet blazers, raw crystal jewelry, and woolen scarves. It provides an elevated, artistic alternative to traditional cartoon-style holiday designs.
Essential Supplies and Preparation Methods
- Sheer smoky gray, navy blue, or sheer nude base lacquer.
- Metallic gold liquid nail art paint or foil pen.
- Ultra-fine three-millimeter detailer art brush.
- Self-adhesive gold celestial star decals or studs.
- Fine tweezers for placing delicate nail stickers.
- High-gloss, protective clear topcoat.
- Isopropyl alcohol cleansing wipes.
Application Steps for Festive simple halloween nails
- File natural nails into an elegant oval or softly rounded almond shape.
- Apply a protective base coat and let dry for two minutes.
- Paint two sheer coats of smoky charcoal or deep navy blue polish.
- Allow the background color to dry completely before starting art.
- Dip your fine detail brush into metallic gold painting lacquer.
- Paint a slender crescent moon curve on the center of chosen nails.
- Add a tall vertical line crossed by a short horizontal line for a star.
- Add tiny diagonal rays extending from the star center for sparkle.
- Place microscopic gold dots around the starbursts to mimic galaxies.
- Use tweezers to place an optional miniature gold star sticker on accents.
- Allow the metallic gold artwork to dry for three full minutes.
- Encapsulate with a generous layer of high-gloss topcoat to seal.
Professional Ways to Preserve Set Durability
Encapsulate metallic foils and stickers thoroughly beneath a plump layer of topcoat. Thorough encapsulation prevents metallic accents from snagging on knit sweaters and scarves.
Clean around nail sidewalls with an alcohol wipe to maintain high-gloss clarity. Regular wiping removes everyday lotion films, restoring brilliant gold sparkle instantly.
Massage vitamin E oil into cuticles daily to maintain natural nail flexibility and health.
8. Cute Black Cat Peeking Silhouette Cuticle Accents
Black cats are iconic symbols of autumn folklore, midnight magic, and Halloween charm. Painting subtle peeking cat silhouettes along the cuticle creates an adorable, low-maintenance look.
+-----------------------------------------------------------+
|             Peeking Black Cat Profile                     |
+-------------------+---------------------------------------+
| Base Style        | Milky White, Soft Oat, or Sheer Nude  |
| Accent Art        | Glossy Black Cat Ears & Glowing Eyes  |
| Ideal Shape       | Short Squoval or Round Silhouette     |
| Aesthetic Mood    | Whimsical Folklore, Cozy Autumn Vibe  |
+-------------------+---------------------------------------+

Aesthetic Blueprint and Visual Storytelling
This design captures the whimsical mystery of nocturnal felines exploring moonlit gardens and rooftops. A soft, milky white base provides a clean, neutral canvas for high-contrast artwork.
A sleek black cat head peeks upward from the bottom cuticle line of chosen accent nails. Two tiny pointed triangular ears frame wide, curious eyes painted in vibrant green or yellow.
Placing the artwork near the cuticle keeps the tip clear, which flatters short nail proportions. It looks sweet, understated, and delightfully festive for everyday wear throughout the month.
Wear this adorable set with chunky cream knitwear, casual denim, and cute autumn boots. It brings a smile to your face while keeping your beauty routine practical and stylish.
Essential Supplies and Preparation Methods
- Opaque jet-black creme nail polish.
- Milky white or creamy oatmeal foundation lacquer.
- Bright chartreuse green or sunny yellow polish for eyes.
- Medium and micro dual-ended dotting tools.
- Fine five-millimeter detailer art brush.
- High-gloss clear topcoat formula.
- Clean wooden cuticle sticks.
Application Steps for Festive simple halloween nails
- Shape natural nails into a neat squoval or round contour smoothly.
- Apply an adhesive bonding base coat and let dry for two minutes.
- Paint two smooth coats of milky white polish across all fingers.
- Dip your larger dotting tool into opaque black polish generously.
- Place a half-circle along the bottom cuticle line of chosen accent nails.
- Use your fine detail brush to pull two sharp triangular ears upward.
- Allow the black cat silhouette to dry for two full minutes.
- Dip a micro dotting tool into bright green or yellow polish paint.
- Place two tiny dots inside the black silhouette to create glowing eyes.
- Add microscopic black vertical slit lines in the eyes for pupils.
- Allow all facial details to dry completely before applying topcoat.
- Finish with an ultra-glossy topcoat and seal the free edges thoroughly.
Professional Ways to Preserve Set Durability
Artwork painted close to the cuticle requires clean borders to avoid premature peeling. Always leave a tiny hairline gap between the black polish and your skin fold.
Apply nourishing cuticle oil morning and night to keep the surrounding skin hydrated. Well-moisturized cuticles frame the peeking cat art cleanly without dry peeling edges.
Avoid using harsh acetone-based household cleaners without wearing protective cleaning gloves.
9. Minimalist Jack-o’-Lantern Negative Space Accent
Carving pumpkins brings warmth, joy, and glowing candlelight to cool October evenings. Painting a minimalist jack-o’-lantern face over a bare nail bed creates an effortless festive statement.
+-----------------------------------------------------------+
|             Jack-o'-Lantern Negative Space Profile        |
+-------------------+---------------------------------------+
| Base Style        | Translucent Pink Jelly or Bare Glaze  |
| Accent Art        | Black Geometric Triangle Eyes & Smile |
| Ideal Shape       | Short Natural Square, Squoval, or Oval|
| Aesthetic Mood    | Modern Graphic, Playful Harvest Vibe  |
+-------------------+---------------------------------------+
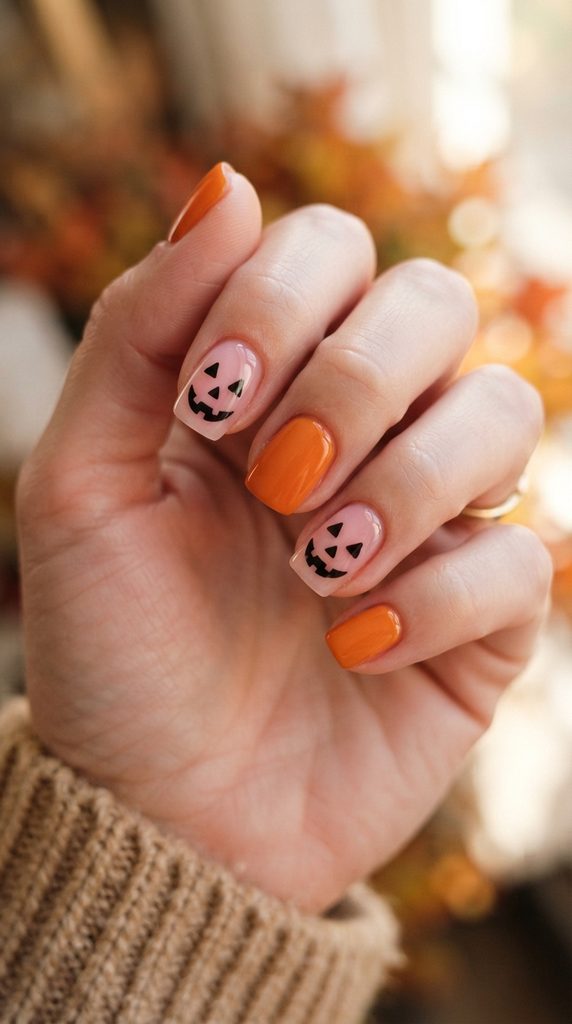
Aesthetic Blueprint and Visual Storytelling
This design takes visual cues from carved front-porch pumpkins and modern graphic art. Leaving the nail bed translucent keeps the manicure feeling fresh, light, and contemporary.
Simple geometric black shapes—two triangle eyes, a triangle nose, and a jagged smile—form the face. The clean lines pop crisply against your natural nail, creating high-contrast charm.
You can paint the remaining nails in solid pumpkin orange, deep black, or warm cream. It is one of the quickest, easiest ways to achieve festive nails at home without special skills.
Pair this cheerful set with flannel shackets, denim overalls, and visits to local pumpkin patches. It brings classic Halloween fun to your beauty routine with zero fuss or hassle.
Essential Supplies and Preparation Methods
- Sheer jelly pink or clear smoothing base coat.
- Opaque jet-black nail art paint or gel polish.
- Ultra-fine five-millimeter detailer art brush.
- Warm pumpkin orange polish for non-accent nails.
- High-gloss clear topcoat lacquer.
- Acetone cleanup brush for refining lines.
- Lint-free nail cleansing wipes.
Application Steps for Festive simple halloween nails
- File natural nails into a clean squoval or short square shape.
- Apply a smoothing base coat across all nails and let dry.
- Paint non-accent nails with two coats of warm pumpkin orange polish.
- Paint accent nails with one coat of sheer jelly pink lacquer.
- Dispense a drop of black painting polish onto your palette.
- Dip your fine detail brush into the black paint carefully.
- Paint two small inverted triangles in the center of the accent nail for eyes.
- Add a tiny triangle between and slightly below the eyes for a nose.
- Paint a curved line with small jagged zig-zag teeth for the smiling mouth.
- Allow the black geometric shapes to dry for three full minutes.
- Clean up any accidental smudges using a brush dipped in acetone.
- Seal all nails with a generous layer of high-gloss clear topcoat.
Professional Ways to Preserve Set Durability
Negative-space manicures require clean, well-prepped natural nail plates for the best appearance. Buff away any surface discoloration before applying your sheer base coat layer.
Cap the free edge of every nail with topcoat to prevent premature tip wear. Regular capping extends the life of your polish through daily chores and typing.
Keep cuticles soft and nourished by applying sweet almond oil every evening.
10. Textured White Mummy Linen Bandage Wraps
Mummy wraps bring playful tactile texture, ancient mystery, and cozy character to autumn nails. Crossing off-white textured lines over shadowy peeking eyes creates an adorable, creative look.
+-----------------------------------------------------------+
|             Textured Mummy Wrap Profile                   |
+-------------------+---------------------------------------+
| Base Style        | Inky Black Base with Glowing Eyes     |
| Accent Art        | Diagonal Textured White Bandage Lines |
| Ideal Shape       | Short Natural Squoval, Square, or Oval|
| Aesthetic Mood    | Storybook Monster, Cozy Textured Chic |
+-------------------+---------------------------------------+
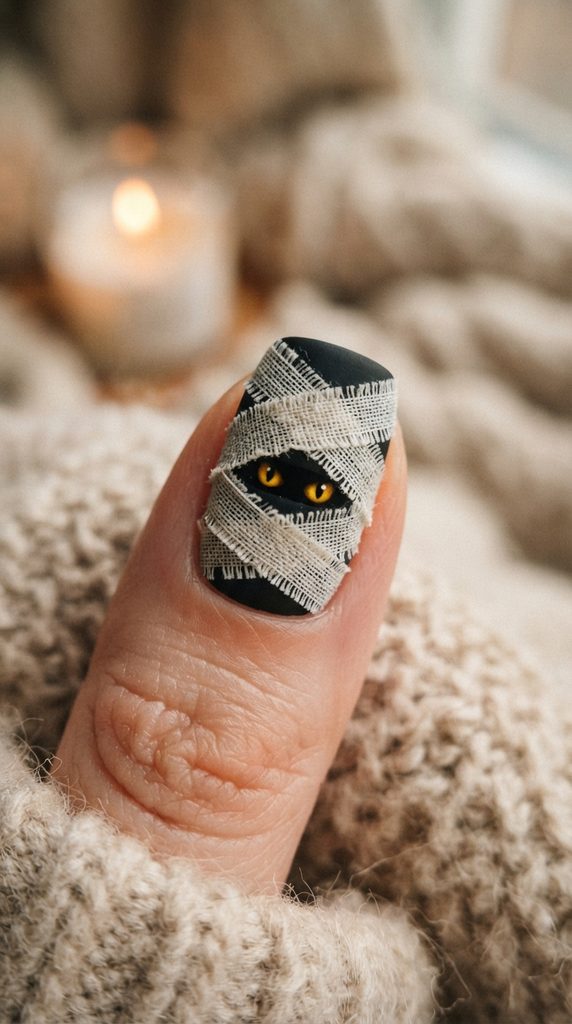
Aesthetic Blueprint and Dark Elegance
This creative concept takes visual cues from ancient archaeology, storybook mummies, and cozy textiles. A shadowy black foundation represents the dark interior beneath antique linen wrapping cloths.
Two glowing yellow or neon green eyes peek through a narrow horizontal slit between bandages. Layered off-white bandage lines cross over each other at dynamic angles across the plate.
The textured lines provide an authentic, touchable appearance that feels festive and cozy. It serves as an instant conversation starter at autumn gatherings and Halloween events.
Pair this textured manicure with oversized corduroy jackets, flannel scarves, and warm knitwear. It delivers classic holiday fun while remaining surprisingly easy to execute at home.
Essential Supplies and Preparation Methods
- Opaque jet-black creme nail polish.
- Opaque chalk-white or creamy linen nail polish.
- Bright yellow or chartreuse green polish for eyes.
- Long-hair nine-millimeter striper brush for bandage lines.
- Micro dotting tool for placing glowing eye dots.
- Quick-dry matte and glossy topcoat formulas.
- Clean glass palette for mixing polish drops.
Application Steps for Festive simple halloween nails
- Trim natural nails into a neat squoval shape with smooth borders.
- Apply an adhesive bonding base coat and let dry for two minutes.
- Paint two smooth coats of jet-black polish across all fingers.
- Allow the black base to dry completely for three full minutes.
- Use a micro dotting tool to paint two tiny yellow dots in the center.
- Add microscopic black dots inside the yellow circles for pupils.
- Dip your striper brush into creamy white polish generously.
- Paint diagonal intersecting bandage lines across the plate.
- Leave a narrow horizontal gap exposing the glowing yellow eyes.
- Add overlapping white lines across the top and bottom sections.
- Allow the layered bandage lines to dry for three minutes.
- Finish with a layer of matte topcoat to give bandages a realistic cloth texture.
Professional Ways to Preserve Set Durability
Layering multiple white lines can create slight thickness on the nail plate. Allow each white stripe thirty seconds to set before painting intersecting lines over top.
Wipe matte surfaces with an alcohol pad periodically to remove natural skin oils. Regular wiping preserves the velvety, authentic linen texture throughout the week.
Apply organic argan oil around cuticles daily to maintain healthy surrounding skin.
Best Nail Shapes for Festive Autumn Manicures
Choosing the right nail shape enhances the visual impact of simple halloween nails significantly. Different silhouettes highlight specific linework and flatter your natural hand proportions uniquely.
+-----------------------------------------------------------+
|             Nail Shape Selection Matrix                   |
+-------------------+---------------------------------------+
| Soft Squoval      | Balances structure with soft, durable corners        |
| Natural Oval      | Elongates compact fingers; ideal for blood drips    |
| Neat Round        | Ultra-low maintenance; perfect for micro ghost art  |
| Modern Almond     | Elegant and slender; suits celestial stars and moons|
+-------------------+---------------------------------------+
Flattering Squoval and Round Silhouettes
Soft squoval shapes combine the clean lines of square nails with softened, rounded corners. This prevents sharp edges from catching on chunky knit sweaters, scarves, and coats.
Squoval shapes provide a balanced canvas that flatters micro French tips and candy corn blocks. They offer exceptional structural strength, making them ideal for active daily routines at home.
Natural round shapes mirror the contour of your fingertips, creating an ultra-clean appearance. They are virtually snag-free and require minimal filing maintenance throughout busy weeks.
Round silhouettes look sweet when paired with floating micro ghosts and peeking black cats. They provide an understated foundation that keeps short manicures looking neat and intentional.
Elongating Oval and Almond Silhouettes
Short oval shapes taper gently toward the tip, creating an elegant, elongating visual line. This contour guides the eye outward, making compact nail beds appear longer and more slender.
Oval shapes work beautifully with dripping blood French tips and spiderweb corner accents. The curved tip provides a graceful frame that softens wider natural nail plates effortlessly.
Modern almond shapes feature tapered sides that culminate in a soft, rounded point. This structured geometry creates an editorial, high-fashion feel that suits celestial stars and bats.
Almond shapes highlight delicate linework and metallic accents with unmatched elegance. Choosing the right silhouette ensures your festive manicure feels comfortable and stylish all month.
Daily Maintenance and Nail Care Checklist
Maintaining healthy natural nails ensures your seasonal artwork lasts without chipping or peeling. Autumn weather brings dry air and sudden temperature shifts that dehydrate hands and cuticles quickly.
+-----------------------------------------------------------+
|             Daily Autumn Nail Care Checklist              |
+-------------------+---------------------------------------+
| Morning Habit     | Apply Pure Organic Jojoba Oil to Cuticles|
| Daytime Protection| Wear Rubber Gloves for Dishes and Chores |
| Evening Ritual    | Massage Rich Shea Butter Cream into Hands|
| Weekly Refresh    | Reapply Clear Glossy Topcoat to Free Edges|
+-------------------+---------------------------------------+
Preventing Dehydration and Edge Peeling
Cool autumn winds and indoor heating strip moisture away from your natural nail beds. When natural nails lose hydration, they become brittle and curl away from polish layers.
Make applying pure jojoba oil around cuticles a non-negotiable habit twice every day. Jojoba oil molecules are small enough to penetrate deeply, maintaining natural plate flexibility.
Follow your oil application with a thick, nourishing hand cream packed with shea butter. Creating a protective lipid barrier locks moisture deep inside the skin and nail margins.
Well-hydrated natural nails withstand daily keyboard typing and chores without premature chipping.
Safe Daily Habits for Long-Lasting Manicures
Always wear protective rubber gloves when washing dishes, scrubbing sinks, or handling cleaners. Harsh detergents and prolonged hot water exposure weaken polish adhesives and natural nail keratin.
Treat your natural nails as delicate jewels rather than everyday utility tools at home. Avoid using your tips to scrape stickers, open aluminum cans, or pry objects open.
Use the flat pads of your fingers or proper tools to perform everyday tasks easily. These small habit adjustments extend the lifespan of your seasonal manicures significantly.
Store a gentle glass nail file in your handbag to smooth accidental catches immediately.
Troubleshooting Common At-Home Nail Art Issues
Even with careful application, at-home manicures can occasionally encounter minor imperfections. Knowing how to resolve small problems quickly prevents full set removal and keeps art fresh.
+-----------------------------------------------------------+
|             Manicure Troubleshooting Guide                |
+-------------------+---------------------------------------+
| Smudged Fine Lines| Let base dry 3 minutes before painting linework       |
| Dull Matte Surface| Wipe clean with isopropyl alcohol to remove oil film  |
| Jagged Smile Lines| Clean edges with flat brush dipped in acetone remover |
| Chipped Free Edges| Cap the tip thoroughly with topcoat during every layer|
+-------------------+---------------------------------------+
Fixing Fine Line Smudging and Detail Bleeding
Intricate line art can smudge if underlying polish layers have not dried completely. Always allow your base color three full minutes of drying time before drawing details.
Use high-pigment nail art paints or gel liners that achieve opacity in a single stroke. High-pigment formulas eliminate the need to trace over lines multiple times, reducing smudging risks.
Use a flat cleanup brush dipped in acetone to sharpen borders before applying topcoat. Clean brushes allow you to sculpt razor-sharp lines and perfect circles effortlessly.
Taking your time during detail work ensures a crisp, salon-quality finish directly at home.
Restoring Luster and Smoothing Rough Catches
Matte topcoats naturally absorb daily facial lotions and cooking oils over busy weeks. If your matte finish appears greasy or uneven, wipe the surface with an alcohol wipe.
Alcohol removes surface oils instantly, restoring the velvety soft-touch matte look in seconds. For glossy manicures, a quick alcohol wipe removes dust and restores mirror-like shine.
If a painted edge develops a tiny chip, do not peel or pick at the remaining polish. Gently buff the chipped spot smooth and dab a tiny drop of color over the gap.
Seal the repaired area with a fresh layer of topcoat to blend the patch seamlessly.
Embracing these simple halloween nails brings festive joy, effortless style, and seasonal elegance to your hands. From minimalist floating ghosts to textured mummy wraps, options are truly boundless. Treat your hands to an adorable seasonal refresh and celebrate autumn with confidence, creativity, and flair.
Leave a Reply