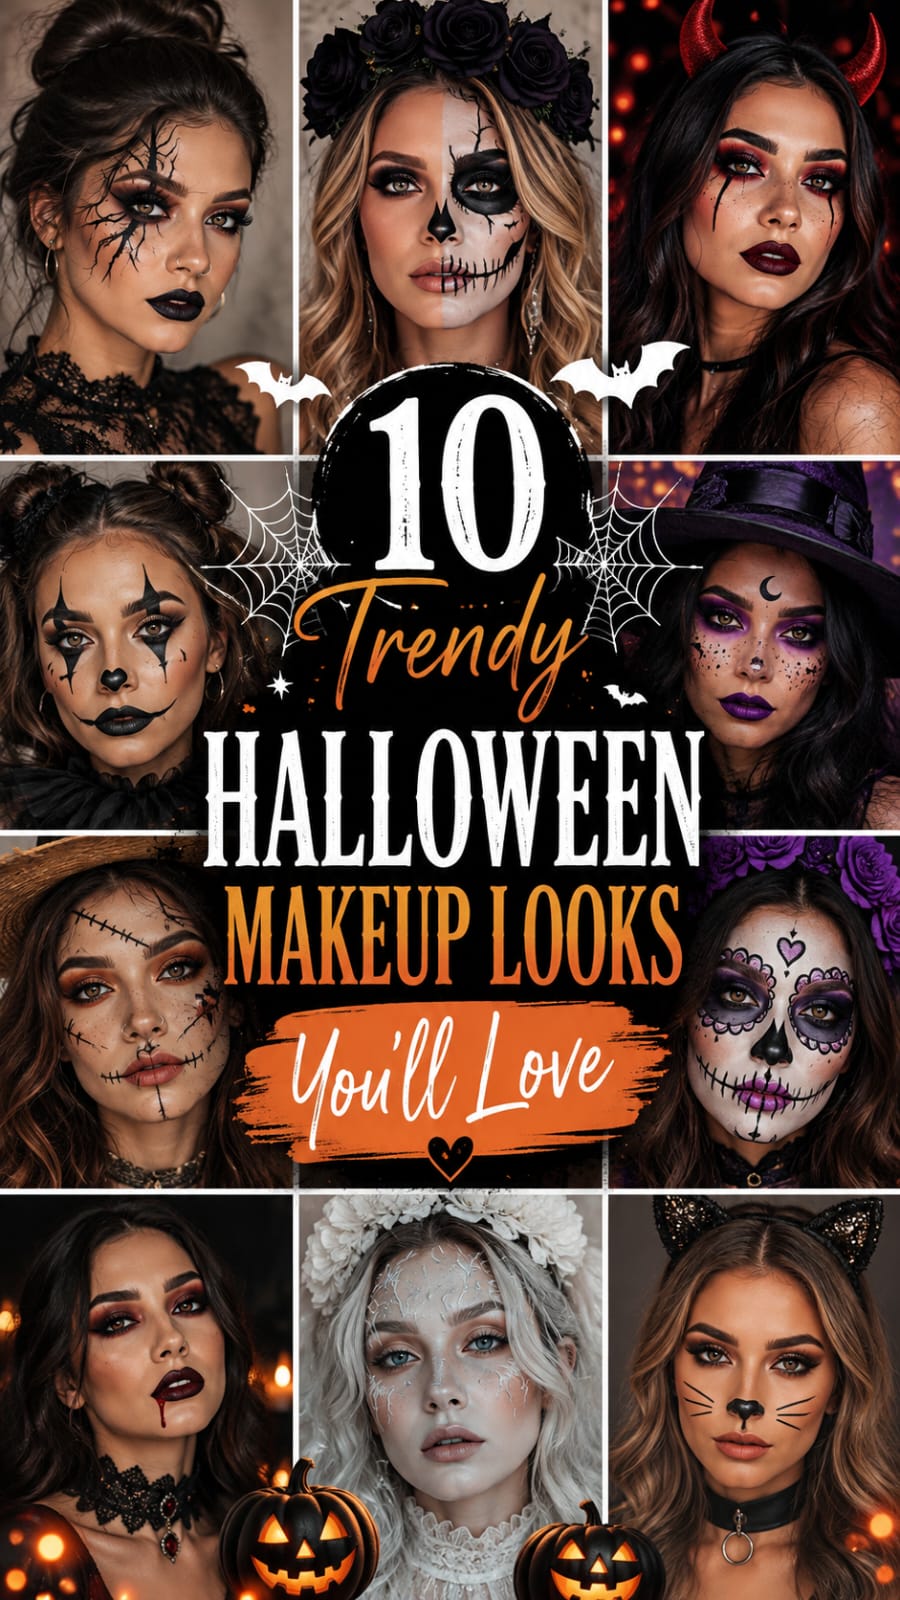
Autumn brings a distinct shift in beauty routines, artistic experimentation, and personal style. As the spooky season approaches, planning your festive transformation becomes an exciting priority. Finding an elevated halloween makeup concept allows you to express your imagination with elegance and theatrical flair.

Modern holiday beauty has evolved far beyond basic novelty face paints. Today, beauty lovers blend runway contouring with special effects artistry seamlessly. You can combine velvet matte finishes, multichrome pigments, and graphic liners to create unforgettable looks.
Whether you favor subtle gothic glamour or full illusion transformations, inspiration is completely endless. Rich berry tones, deep pitch blacks, and iridescent highlights dominate contemporary seasonal palettes. Every curated style turns your face into a captivating canvas of autumn storytelling.
Executing a long-lasting look requires understanding proper skin preparation, pigment layering, and setting methods. Quality cosmetic formulas ensure your creation stays vibrant through evening celebrations and photoshoots.
Below, explore ten trendy, captivating concepts designed to elevate your seasonal style. Each section provides aesthetic blueprints, required tools, step-by-step application methods, and essential durability ways.
1. Seductive Gothic Vampire with Bleeding Ombré Lips
This concept combines Victorian dark romance with modern beauty contouring techniques. It features porcelain skin, smoked-out burgundy eyes, and glossy ombré lips dripping with crimson.
+-----------------------------------------------------------+
|             Vampiric Siren Style Breakdown                |
+-------------------+---------------------------------------+
| Core Aesthetic    | Victorian Seduction, Dark Glamour     |
| Primary Palette   | Oxblood Red, Inky Black, Alabaster    |
| Key Techniques    | Ombré Lip Blending, Smokey Cut-Crease |
| Target Setting    | Candlelit Dinners, Masquerade Galas   |
+-------------------+---------------------------------------+

Aesthetic Blueprint for a Striking halloween makeup Look
This look draws direct inspiration from vintage vampire cinema and high-fashion autumn runways. A porcelain base foundation provides a stark, clean canvas for rich berry pigments.
The eyes feature a deep burgundy cut-crease blended softly into the temples. Extended black winged eyeliner adds feline drama, commanding attention across low evening lighting.
The focal point remains an ombré lip transitioning from black to deep crimson. Clear gloss layered over the center gives a wet, blood-stained finish.
It pairs effortlessly with black velvet dresses, lace chokers, and garnet jewelry. This look guarantees a dramatic, elegant entrance at any upscale holiday gathering.
Essential Supplies and Pigment Selection
- Full-coverage porcelain matte foundation.
- Translucent setting powder with a velour puff.
- Deep burgundy, plum, and matte black eyeshadows.
- Waterproof black gel eyeliner pot.
- Jet-black lip liner pencil.
- Deep crimson matte liquid lipstick.
- High-shine clear lip lacquer.
- Synthetic flat concealer and blending brushes.
Application Steps for Festive halloween makeup Looks
- Cleanse and prep skin with a gripping hydrating primer.
- Apply full-coverage foundation evenly using a damp beauty sponge.
- Set the T-zone thoroughly with finely milled translucent powder.
- Sculpt cheekbones sharply using a cool-toned contour powder.
- Blend plum eyeshadow through the crease up toward brow bones.
- Pack deep burgundy pigment across the entire mobile eyelid.
- Cut the crease cleanly using full-coverage concealer and a flat brush.
- Draw a sharp, extended black winged eyeliner along lash lines.
- Outline the outer perimeter of lips with a jet-black pencil.
- Fill the inner lip center with rich crimson liquid lipstick.
- Blend the colors inward using a precision lip brush gently.
- Top the lip center with clear lacquer for glass-like shine.
Professional Ways to Preserve Set Durability
Prevent dark lipstick from bleeding by dusting translucent powder around outer lip lines. A clean border keeps your dark ombré look crisp all night.
Use a waterproof setting spray misted in two light, even layers. Setting locks the creamy pigments in place, resisting party heat and humidity.
Keep a compact mirror and clear lip gloss handy for quick touch-ups.
2. Cracked Vintage Porcelain Doll Illusion
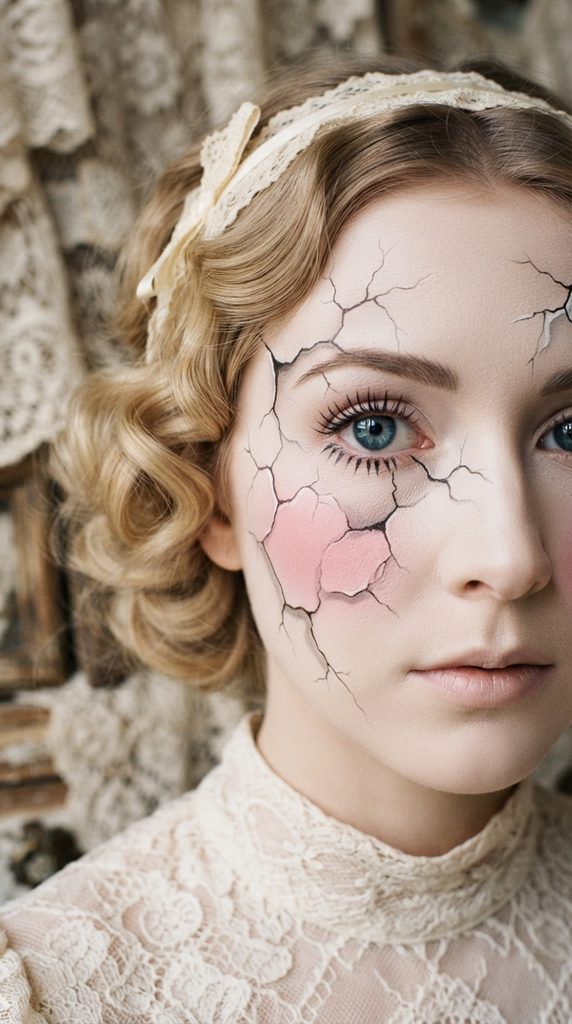
The cracked porcelain doll transforms delicate vintage beauty into an eerie, fragile illusion. Realistic trompe l’œil cracks and missing porcelain shards reveal dark hollows beneath porcelain skin.
+-----------------------------------------------------------+
|             Cracked Doll Aesthetic Profile                |
+-------------------+---------------------------------------+
| Core Aesthetic    | Antique Toybox, Eerie Fragility       |
| Primary Palette   | Chalk White, Pastel Rose, Charcoal    |
| Key Techniques    | 3D Trompe L’œil Shading, Painted Lash |
| Target Setting    | Themed Parties, Spooky Photoshoots    |
+-------------------+---------------------------------------+
Aesthetic Blueprint and Antique Character
This illusion plays with childhood nostalgia, antique oddities, and delicate vintage porcelain. The face is painted to mimic smooth, glazed ceramic with oversized circular doll eyes.
Delicate, jagged fracture lines web across the cheeks, forehead, and jawline. Charcoal drop-shadowing along one side of each crack creates convincing depth and dimension.
Exaggerated bottom lashes and circular pink blush on apple cheeks enhance doll innocence. The contrast between sweet innocence and shattered ceramic delivers an unforgettable theatrical statement.
Style this look with vintage lace dresses, Mary Jane shoes, and ringlet curls. It is an impressive visual project for beauty enthusiasts who love fine-line painting.
Essential Supplies and Pigment Selection
- White water-activated face paint cake.
- Full-coverage pale ivory foundation.
- Soft baby-pink matte powder blush.
- Jet-black liquid brush-tip eyeliner pen.
- Matte charcoal and medium grey eyeshadows.
- High-volume doll-style false strip lashes.
- Matte pastel pink liquid lipstick.
- Ultra-fine three-millimeter miniature detailer art brush.
Step-by-Step Application Steps
- Apply pale ivory foundation over the face and neck completely.
- Set the entire face with translucent powder for a velvet finish.
- Apply circular doll blush high on the apples of your cheeks.
- Fill brows into thin, high, rounded vintage arches with brown pencil.
- Apply white eyeliner across the entire lower waterline and lash line.
- Draw a new false lower lash line two millimeters below eyes.
- Paint thick, separated doll lashes along that newly drawn lower line.
- Apply dramatic top strip lashes to open the eyes wide.
- Dip your fine detail brush into water-activated black face paint.
- Paint branching, jagged fracture lines across one cheek and temple.
- Blend matte grey eyeshadow along the inner edge of each crack.
- Paint a small, rounded doll mouth using matte baby-pink lipstick.
Professional Ways to Preserve Set Durability
Water-activated paints can run if exposed to perspiration or rain outdoors. Spray an aerosol barrier setting spray over painted cracks to waterproof lines.
Avoid touching painted fracture zones to keep the fine grey shading crisp. Clean detail lines ensure the 3D depth remains convincing in flash photography.
Use oil-based cleansers at the end of the night to remove paint gently.
3. Celestial Witch with Liquid Gold Astrology
Step into high-glamour mysticism with a celestial witch aesthetic. This look pairs deep midnight indigo eyeshadow with glowing metallic gold constellations and astrological symbols.
+-----------------------------------------------------------+
|             Celestial Witch Aesthetic Profile             |
+-------------------+---------------------------------------+
| Core Aesthetic    | Esoteric Magic, Cosmic Radiance       |
| Primary Palette   | Midnight Navy, Metallic Gold, Purple  |
| Key Techniques    | Halo Eye Blending, Metallic Line Art  |
| Target Setting    | Tarot Evenings, Autumn Festivals      |
+-------------------+---------------------------------------+

Aesthetic Blueprint for a Striking halloween makeup Look
This concept channels ancient astrology, moon phases, and cosmic witchcraft lore. The complexion glows with dewy gold highlighter, radiating an ethereal, otherworldly aura.
Deep midnight navy and amethyst eyeshadows create a dramatic halo eye shape. A shimmering gold pigment packed onto the center of lids catches every beam of light.
Hand-painted golden crescent moons, sunbursts, and constellation maps drift across temples. Fine-line gold detailing makes the look feel poetic, intellectual, and exquisitely high-fashion.
Pair this mystical design with crushed velvet capes, crystal jewelry, and wide-brimmed hats. It brings an elevated, magical energy to your holiday festivities.
Essential Supplies and Pigment Selection
- Dewy luminous liquid foundation.
- Metallic gold liquid eyeliner pen.
- Midnight navy, amethyst, and violet eyeshadows.
- Loose metallic gold cosmetic pigment flakes.
- Self-adhesive face star rhinestones.
- Dark navy or black cream lipstick.
- Golden cream highlighter palette.
- Precision flat shader and liner brushes.
Application Steps for Festive halloween makeup Looks
- Apply luminous foundation, blending seamlessly down the neck and chest.
- Highlight cheekbones, brow bones, and bridge of nose with golden cream.
- Blend deep violet eyeshadow through the eye crease smoothly.
- Pack midnight navy shadow onto the inner and outer lid corners.
- Press metallic gold pigment directly onto the center of the mobile lid.
- Blend the shadow edges for a seamless, glowing halo effect.
- Line upper and lower waterlines with waterproof black gel liner.
- Shake your metallic gold liquid liner pen thoroughly before drawing.
- Paint a delicate crescent moon vertically on the center of the forehead.
- Draw four-point starbursts and fine constellation lines across both temples.
- Adhere tiny crystal rhinestones at major astrological star intersection nodes.
- Apply deep navy or plum lipstick, topping the center with gold shimmer.
Professional Ways to Preserve Set Durability
Lock loose gold pigment flakes in place using a clear glitter adhesive primer. A dedicated glitter primer prevents fallout from scattering across your cheekbones during wear.
Set the cream highlighter base with a matching gold powder illuminator lightly. Layering powder over cream ensures the radiant glow lasts through the night.
Store metallic liner pens tip-down to prevent the liquid formula from drying out.
4. Classic Sugar Skull Calavera with Floral Filigree
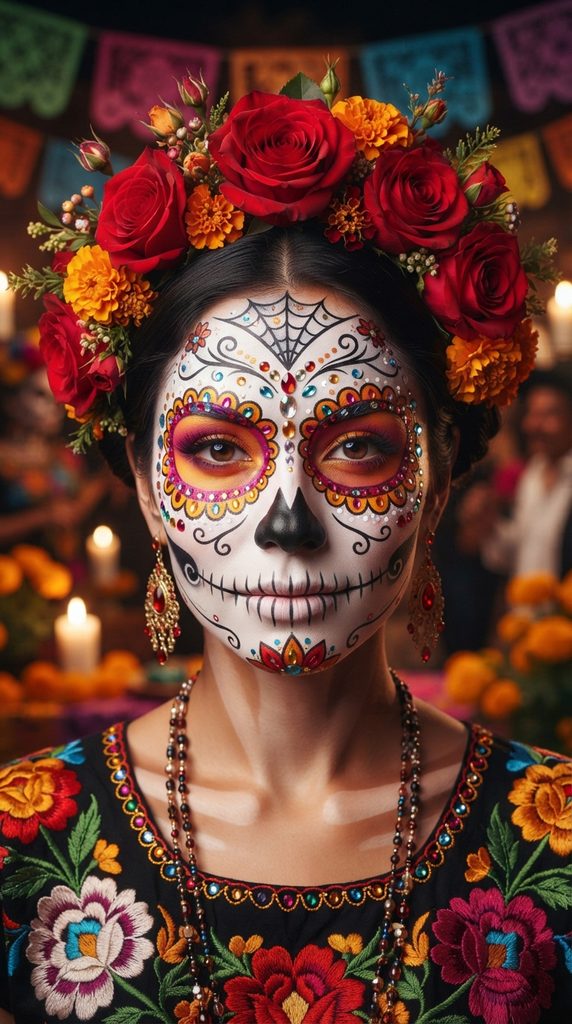
Celebrate joyful remembrance and rich folk art traditions with a classic Calavera look. Intricate black filigree, vibrant marigold eye rings, and floral motifs frame the face.
+-----------------------------------------------------------+
|             Sugar Skull Calavera Profile                  |
+-------------------+---------------------------------------+
| Core Aesthetic    | Mexican Folk Art, Joyful Celebration  |
| Primary Palette   | Bone White, Marigold, Cyan, Magenta   |
| Key Techniques    | Scalloped Eye Sockets, Skeletal Teeth |
| Target Setting    | Cultural Festivals, Costume Parties   |
+-------------------+---------------------------------------+
Aesthetic Blueprint and Cultural Celebration
Drawing from Dia de los Muertos traditions, this look celebrates remembrance and beauty. A smooth white foundation covers the face, serving as a bright artistic canvas.
Large circular eye sockets are outlined in vibrant turquoise, magenta, and marigolds. Scalloped petals surround each socket, creating the appearance of blooming flowers.
Delicate black spiderwebs, floral scrollwork, and an inverted heart nose complete the skull. Vertical stitch lines extend across the lips, creating a cheerful skeletal grin.
Wear this colorful design with floral headpieces, embroidered garments, and colorful shawls. It represents an uplifting, artistic alternative to traditional spooky themes.
Essential Supplies and Pigment Selection
- White cream face paint and setting powder.
- Highly pigmented eyeshadows in orange, turquoise, and magenta.
- Waterproof black gel eyeliner pot.
- Bright self-adhesive colorful facial gems.
- Synthetic round painting brushes (sizes 1, 2, and 4).
- Flat-top kabuki foundation brush.
- Red rose floral headband accessory.
- Translucent setting powder with a puff.
Step-by-Step Application Steps
- Apply white cream face paint evenly across the entire face.
- Set the white base thoroughly with translucent powder using a puff.
- Map out large circles around both eye sockets using brown pencil.
- Fill the interior circles with bright orange and magenta eyeshadow.
- Draw black scalloped petals around the outer rim of both circles.
- Place colorful adhesive gems inside each scalloped petal along the border.
- Paint the tip of the nose black, creating an inverted heart shape.
- Draw black vertical lines across the lips extending onto the cheeks.
- Paint delicate spiderweb scrollwork radiating outward across the forehead center.
- Add flourishing floral swirls and dots across both cheekbone areas.
- Apply false lashes to add depth and glamour to the eyes.
- Secure a vibrant red and yellow artificial rose crown in hair.
Professional Ways to Preserve Set Durability
Set cream face paint with generous translucent powder before drawing fine black lines. A dry, set surface prevents black gel liner from dragging or smearing.
Use water-resistant gel liners rather than standard kohl pencils for lip stitches. Gel liner sets firmly, resisting smudging while talking, eating, or drinking.
Keep a small container of translucent powder ready for midday shine control.
5. Slime Queen Toxic Zombie with Neon Green Drippings
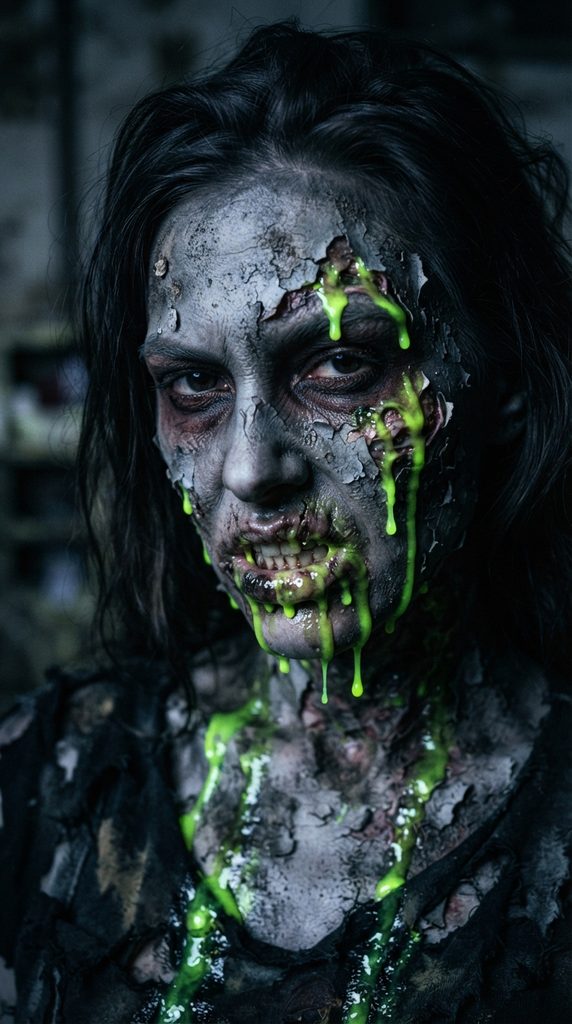
This look pairs distressed, decaying zombie textures with high-voltage neon green toxic slime. It brings a modern, radioactive twist to classic Halloween monster aesthetics.
+-----------------------------------------------------------+
|             Toxic Slime Zombie Profile                    |
+-------------------+---------------------------------------+
| Core Aesthetic    | Cyber Horror, Radioactive Apocalypse  |
| Primary Palette   | Toxic Chartreuse, Muted Slate, Black  |
| Key Techniques    | Liquid Latex Peeling, 3D Slime Glaze  |
| Target Setting    | Haunted Houses, Horror Movie Marathons|
+-------------------+---------------------------------------+
Aesthetic Blueprint and Cybernetic Horror
This concept reimagines the classic undead zombie through a futuristic, radioactive lens. Muted, desaturated skin features dark hollows under the eyes, cheekbones, and temples.
Peeling skin textures created with liquid latex reveal glowing neon green tissues beneath. Glossy, UV-reactive toxic slime drips downward from the mouth, eyes, and collarbones.
The contrast between decayed grey skin and luminous chartreuse creates shocking visual impact. Under blacklights, the neon pigments glow with intense, radioactive brightness.
Style this gruesome look with distressed streetwear, combat boots, and neon jewelry. It is a show-stopping design for horror enthusiasts who enjoy tactile special effects.
Essential Supplies and Pigment Selection
- Liquid latex and single-ply facial tissue paper.
- Pale slate grey cream body paint.
- UV-reactive neon green face paint and cosmetic pigment.
- Clear high-viscosity styling gel or clear lip gloss.
- Matte black, dark olive, and charcoal eyeshadows.
- Coarse stippling sponge.
- Non-toxic green temporary mouth dye.
- Palette knife and mixing tray.
Step-by-Step Application Steps
- Apply a thin layer of liquid latex onto the cheek area.
- Lay torn single-ply facial tissue over the wet latex immediately.
- Coat the tissue with a second layer of latex and let dry.
- Gently tear open the center of the dried latex with tweezers.
- Paint the surrounding skin with pale slate grey cream makeup.
- Darken eye sockets and cheek hollows using charcoal and olive shadows.
- Stipple dark brown and purple tones around the torn latex edges.
- Paint the exposed skin inside the tear with bright neon green paint.
- Mix clear styling gel with neon green pigment on a clean palette.
- Drip the thick neon slime mixture from the wound using a spatula.
- Add dripping slime trails running from the corner of the mouth.
- Rinse mouth with safe green temporary coloring for an infected look.
Professional Ways to Preserve Set Durability
Perform a patch test with liquid latex forty-eight hours before application. Testing ensures you have no sensitivity or allergic reactions to natural rubber latex.
Seal the surrounding grey body paint with setting spray to prevent transfer onto clothing. A barrier spray keeps the dry skin portions matte while the slime shines.
Avoid placing heavy liquid slime too close to clothing collars to prevent staining.
6. Siren of the Deep Sea with Pearlescent Scales
Dive into dark coastal folklore with an alluring deep-sea siren transformation. Iridescent fish scales, shimmering pearl accents, and teal gradients create an oceanic masterpiece.
+-----------------------------------------------------------+
|             Deep Sea Siren Profile                        |
+-------------------+---------------------------------------+
| Core Aesthetic    | Dark Coastal Myth, Aquatic Glamour    |
| Primary Palette   | Emerald Teal, Deep Indigo, Pearl White|
| Key Techniques    | Fishnet Scale Stenciling, Pearl Drops |
| Target Setting    | Themed Galas, Coastal Evening Events  |
+-------------------+---------------------------------------+

Aesthetic Blueprint for a Striking halloween makeup Look
This look captures the dangerous beauty of mythical sirens dwelling in ocean depths. Dewy, luminous skin provides the backdrop for aquatic teal and emerald scales.
Using fishnet stockings as a stencil creates uniform, shimmering scale patterns along temples. Hand-placed self-adhesive pearls and sea glass rhinestones frame the forehead and cheekbones.
The eyes feature dramatic cut-creases in deep indigo, turquoise, and sparkling seafoam green. High-gloss, holographic lip gloss reflects light like wet water glistening on ocean rocks.
Pair this nautical look with seashell headpieces, flowing skirts, and loose beach waves. It offers an enchanting, high-fashion aesthetic that feels magical and sophisticated.
Essential Supplies and Pigment Selection
- Fishnet stockings or mesh fabric scrap.
- Metallic turquoise, emerald green, and deep indigo eyeshadows.
- Flat synthetic kabuki and contour brushes.
- Self-adhesive half-pearls in varied sizes.
- Iridescent white chrome cosmetic pigment.
- Waterproof black liquid eyeliner.
- Holographic blue-green lip lacquer.
- Lash adhesive for applying pearl accents.
Application Steps for Festive halloween makeup Looks
- Apply luminous hydrating foundation, setting lightly through the center face.
- Hold a section of clean fishnet stocking firmly against your temple.
- Dust metallic emerald and turquoise eyeshadow through the mesh firmly.
- Lift the fishnet away cleanly to reveal the printed scale pattern.
- Repeat the scale stenciling along jawlines, collarbones, and forehead sides.
- Blend deep indigo shadow through eye creases, cutting lid with concealer.
- Pack seafoam green shimmer onto lids, adding black winged eyeliner.
- Apply voluminous faux lashes topped with subtle silver glitter tips.
- Use lash glue to adhere varied pearls along cheekbones and brow bones.
- Sweep iridescent chrome pigment across the nose bridge and high cheeks.
- Apply deep teal lip liner around lips, blending inward softly.
- Coat lips with holographic blue-green gloss for a drenched wet look.
Professional Ways to Preserve Set Durability
Hold fishnet fabric completely motionless while dusting pigment to prevent blurry scales. Firm tension against the skin produces sharp, photographic fish scale patterns every time.
Use strong latex-free eyelash adhesive to anchor larger half-pearls securely in place. Quality adhesive ensures decorative pearls do not fall off during lively celebrations.
Mist your face with dewy setting spray to unify powder scales and skin.
7. Haunting Victorian Ghost with Translucent Veining
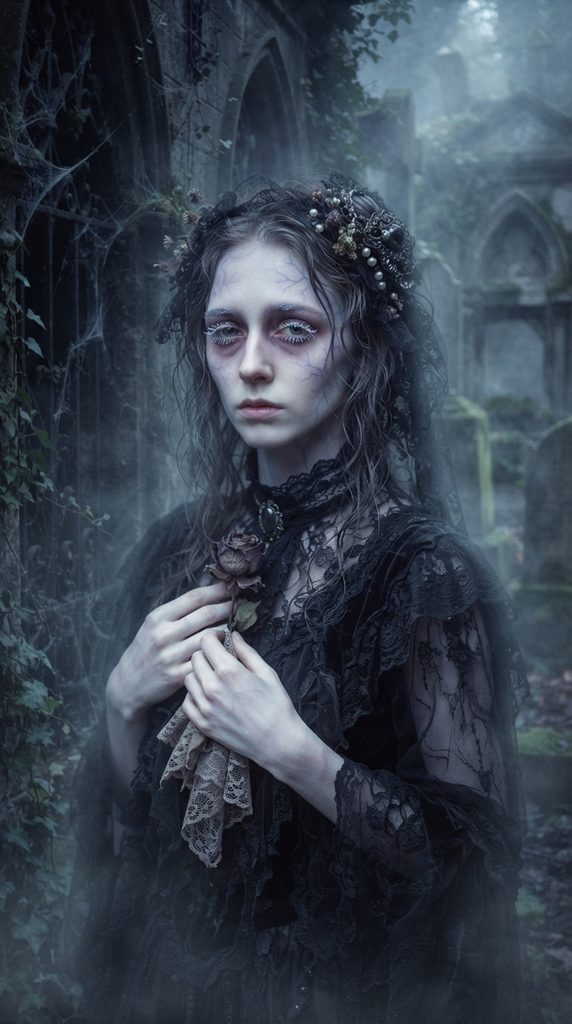
The haunting Victorian ghost pairs sheer, ethereal translucence with delicate blue and purple veining. It creates an unsettling, beautiful portrait of a phantom wandering moonlit halls.
+-----------------------------------------------------------+
|             Gothic Ghost Aesthetic Profile                |
+-------------------+---------------------------------------+
| Core Aesthetic    | Victorian Phantom, Ethereal Spectral  |
| Primary Palette   | Translucent White, Dusty Lilac, Blue  |
| Key Techniques    | Fine Vein Detailing, Sunken Eyes      |
| Target Setting    | Haunted Mansion Tours, Spooky Evenings|
+-------------------+---------------------------------------+
Aesthetic Blueprint and Spectral Romance
This concept evokes melancholy ghosts drifting through abandoned Victorian estates. The skin is made to look translucent, pale, and cold, lacking natural warmth.
Delicate, branching veins in shades of soft blue and muted lilac trace temples. The eyes appear sunken and sorrowful, contoured with dusty lavender and cool grey shadows.
A sheer, blurred berry lip mimics cold lips drained of natural color and warmth. The overall effect feels fragile, haunting, and deeply artistic without relying on gore.
Wear this ghostly makeup with antique lace gowns, sheer veils, and silver jewelry. It creates an unforgettable, poetic mood that stands out across crowded gatherings.
Essential Supplies and Pigment Selection
- Ultra-pale or sheer white foundation formula.
- Dusty lilac, slate grey, and cool taupe eyeshadows.
- Water-activated face paint in navy blue and soft violet.
- Ultra-fine two-millimeter striper detail brush.
- Translucent setting powder with a soft puff.
- Sheer matte berry lip stain.
- White mascara and light-colored eyebrow gel.
- Setting mist with a soft matte finish.
Step-by-Step Application Steps
- Apply ultra-pale foundation across the face, ears, neck, and chest.
- Set the pale base thoroughly with translucent powder to eliminate shine.
- Hollow out eye sockets with dusty lilac and cool grey shadows.
- Extend the purple shading downward under eyes to create tired hollows.
- Coat natural eyelashes with white mascara for a frosty spectral look.
- Brush light grey eyebrow gel through brows to mute their color.
- Mix water-activated blue and violet paint to a thin watercolor consistency.
- Paint branching, organic vein lines extending from temples down cheeks.
- Soften the vein edges with a dry blending sponge to create depth.
- Contour beneath cheekbones and jawlines with cool slate grey powder.
- Dab sheer berry lip stain onto the center of lips, fading edges outward.
- Mist the face with matte setting spray to lock the ghostly base.
Professional Ways to Preserve Set Durability
Keep fine vein paint diluted properly so lines look sub-dermal rather than painted on. Translucent watercolor layers create a realistic illusion of cold, thin skin.
Avoid using warm bronzers or peachy blushes that introduce unwanted life to skin. Stick strictly to cool greys and dusty lilacs to maintain the spectral illusion.
Touch up the under-eye contour with a fluffy brush if fading occurs.
8. Enchanted Forest Dryad with Botanical Bark Textures
Embody ancient woodland spirits with an enchanted forest dryad transformation. This look blends realistic wood bark textures, living green moss, and golden botanical vine detailing.
+-----------------------------------------------------------+
|             Woodland Dryad Aesthetic Profile              |
+-------------------+---------------------------------------+
| Core Aesthetic    | Organic High Fantasy, Earth Guardians |
| Primary Palette   | Moss Green, Bark Brown, Warm Bronze   |
| Key Techniques    | Wood Grain Shading, Moss Prosthetics  |
| Target Setting    | Fantasy Gatherings, Autumn Walkways   |
+-------------------+---------------------------------------+

Aesthetic Blueprint and Fantasy Folklore
Dryads are legendary spiritual guardians of ancient forests, root systems, and winding branches. This look merges human features with textures of aged tree bark and foliage.
Rich soil browns, warm bronze highlights, and deep moss greens frame the face. Hand-painted wood grain patterns sweep across forehead, neck, and shoulders organically.
Small clusters of preserved craft moss and golden leaves adhere along the jawline. It feels ancient, magical, and grounded, evoking classic illustrations of enchanted fairy woods.
Style this look with linen tunics, antler headpieces, and woven twig accessories. It is a rewarding project for artists who love organic, natural creature designs.
Essential Supplies and Pigment Selection
- Warm olive and bronze cream foundation base.
- Deep forest green, olive, and chocolate brown eyeshadows.
- Dark brown and tan water-activated face paints.
- Small pieces of preserved green craft moss.
- Skin-safe spirit gum or latex-free eyelash adhesive.
- Gold metallic leaf flakes and liquid adhesive.
- Synthetic flat contour and angled detail brushes.
- Warm copper metallic liquid lipstick.
Step-by-Step Application Steps
- Apply warm olive foundation, buffing smoothly into skin and neck.
- Contour forehead and cheekbones deeply using chocolate brown eyeshadow.
- Blend forest green and gold eyeshadows across lids in a wide wing.
- Draw wood grain lines across forehead and temples with brown paint.
- Highlight along the top of each bark line using tan paint for 3D depth.
- Dab lash glue along the jawline and outer temple regions carefully.
- Press tiny pieces of green craft moss into the tacky adhesive gently.
- Adhere delicate gold leaf flakes between moss clusters for magical glow.
- Line lower waterlines with metallic bronze gel pencil for bright eyes.
- Apply warm copper metallic lipstick across lips with clean borders.
- Add fine gold vine lines trailing down the neck and collarbones.
- Mist with setting spray to lock all painted bark lines securely.
Professional Ways to Preserve Set Durability
Ensure skin is clean and oil-free before applying adhesive for moss clusters. Oil-free skin creates a strong bond that holds organic materials firmly in place.
Press moss firmly with dry fingers for thirty seconds until glue sets completely. Proper adhesion prevents moss from dislodging during active conversations and movement.
Remove prosthetics gently using warm water and oil cleanser at night.
9. Modern Cyberpunk Android with Exposed Wiring
Step into a futuristic metropolis with a sleek cyberpunk android transformation. Exposed faceplates reveal glowing metallic circuits, microchips, and neon wiring beneath synthetic skin.
+-----------------------------------------------------------+
|             Cyberpunk Android Profile                     |
+-------------------+---------------------------------------+
| Core Aesthetic    | Sci-Fi Dystopia, Industrial Cyberware |
| Primary Palette   | Gunmetal Silver, Neon Cyan, Obsidian  |
| Key Techniques    | Geometric Cutouts, 3D Trompe L’œil    |
| Target Setting    | Nightclub Galas, Modern Tech Parties  |
+-------------------+---------------------------------------+

Aesthetic Blueprint for a Striking halloween makeup Look
This concept explores synthetic biology, artificial intelligence, and futuristic street styling. Impeccably smooth, matte skin creates the appearance of synthetic silicone plating.
Sharp geometric cutout lines reveal internal titanium frameworks and fiber-optic wiring. Metallic silver chrome paint and electric cyan highlights simulate glowing electronic power conduits.
Sleek graphic black eyeliner and metallic lips reinforce the sharp, robotic aesthetic. It delivers a powerful, confident look that stands out in modern party lighting.
Pair this tech look with tactical clothing, holographic jackets, and LED visors. It provides an innovative, contemporary alternative to traditional fantasy monsters.
Essential Supplies and Pigment Selection
- Full-coverage matte liquid foundation.
- Liquid chrome silver face paint and powder.
- Neon cyan and electric blue liquid eyeliners.
- Waterproof black gel eyeliner pot.
- Fine three-millimeter synthetic detailing brushes.
- Self-adhesive micro metal studs and circuit decals.
- Matte charcoal and medium grey contour shadows.
- Metallic gunmetal liquid lipstick.
Application Steps for Festive halloween makeup Looks
- Apply full-coverage matte foundation for an airbrushed, synthetic finish.
- Set with translucent powder to eliminate natural skin texture and shine.
- Map out a geometric rectangular panel on one cheek with grey pencil.
- Paint the interior of the cutout solid metallic chrome silver.
- Draw black shadow lines inside the cutout edges to create depth.
- Paint fine neon cyan circuit lines running through the chrome panel.
- Add tiny metallic studs at panel corners to mimic industrial screws.
- Paint matching circuit lines trailing down one side of the neck.
- Draw sharp, double-winged graphic black eyeliner across both eyelids.
- Add bright neon cyan dots along the eyeliner wings for digital flair.
- Apply metallic gunmetal lipstick, lining edges with black pencil.
- Seal the entire design with an ultra-matte setting mist.
Professional Ways to Preserve Set Durability
Use a ruler or stencil edge to map straight panel lines with precision. Straight, sharp borders are essential for maintaining a convincing machine-built illusion.
Allow chrome paints to dry completely before layering neon circuit lines on top. Drying prevents colors from blending into a muddy, dull silver-blue tone.
Avoid applying thick face creams under panel areas to prevent paint cracking.
10. Gothic Black Widow Spider with 3D Creepy Crawlers
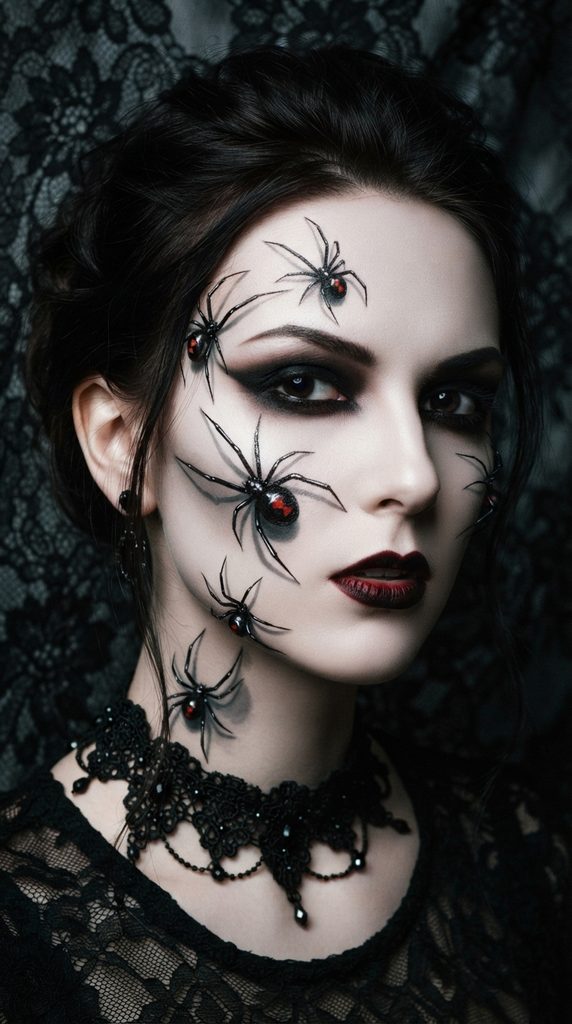
The gothic black widow combines dark evening glamour with realistic arachnid illusions. Multi-dimensional 3D spiders painted across the face appear to crawl over porcelain skin.
+-----------------------------------------------------------+
|             Black Widow Aesthetic Profile                 |
+-------------------+---------------------------------------+
| Core Aesthetic    | Dark Gothic Arachnid, High Suspense   |
| Primary Palette   | Velvet Black, Crimson Red, Pale Ivory |
| Key Techniques    | 3D Drop Shadowing, Crimson Accents    |
| Target Setting    | Halloween Bashes, Theatrical Galas    |
+-------------------+---------------------------------------+
Aesthetic Blueprint and Tactile Suspense
This design takes inspiration from dangerous arachnids, gothic lace, and theatrical suspense. A clean, porcelain base provides a stark canvas for hand-painted three-dimensional spiders.
Each spider features realistic legs, highlighted bodies, and accurate cast drop-shadows. The shadows trick the human eye into believing real spiders are crawling on the skin.
A signature crimson hourglass emblem painted on chosen spiders adds iconic recognition. Smoked-out black eyeliner and blood-red lips complete this dangerous, high-fashion presentation.
Style this creepy look with black lace dresses, spiderweb veils, and silver jewelry. It creates an unforgettable, spine-chilling impression wherever you go.
Essential Supplies and Pigment Selection
- Pale ivory long-wear foundation.
- Opaque jet-black painting gel and face paint.
- Water-activated crimson red face paint.
- Translucent grey shading powder and fine brush.
- Pure white liquid highlight pen.
- Ultra-fine five-millimeter striper art brush.
- High-drama winged false strip eyelashes.
- Deep blood-red matte liquid lipstick.
Step-by-Step Application Steps
- Apply pale ivory foundation, setting fully with translucent powder.
- Sculpt cheekbones with cool-toned grey contour for a hollowed frame.
- Create an intense black smokey eye, blending outward into dramatic wings.
- Apply thick, winged false lashes to add depth and drama to eyes.
- Dip your fine striper brush into opaque black painting gel.
- Paint a small oval body and round head on your cheekbone.
- Paint eight bent, jointed legs extending outward from the spider body.
- Add a tiny crimson hourglass marking on the back of the spider.
- Place white highlight dots on the body to simulate light reflection.
- Use grey shading powder to paint soft shadows beneath each leg.
- Repeat the process to paint two smaller spiders on neck and temple.
- Apply deep blood-red matte lipstick to complete the look.
Professional Ways to Preserve Set Durability
Position cast shadows consistently on the same side of every spider body. Consistent shadow direction aligns with natural ambient lighting, making 3D spiders look real.
Use transfer-proof black gel paints that do not smudge when touched accidentally. High-viscosity gels keep thin, delicate spider legs sharp and distinct all night.
Keep skin dry and cool before drawing fine spider lines for clean adhesion.
Essential Complexion Prep and Setting Methods
Flawless, long-lasting holiday beauty begins with proper skin preparation and professional setting techniques. Prepping your complexion ensures smooth blending, intense pigmentation, and hours of wear.
+-----------------------------------------------------------+
|             Master Complexion Prep Routine                |
+-------------------+---------------------------------------+
| Step 1: Prep      | Gentle Exfoliation + Oil-Free Hydration|
| Step 2: Prime     | Gripping Primer on High-Movement Zones|
| Step 3: Base      | Full-Coverage Foundation + Concealer  |
| Step 4: Lock      | Translucent Setting Powder + Barrier Mist|
+-------------------+---------------------------------------+
Skin Cleansing and Oil-Free Hydration
Exfoliate gently twenty-four hours before application to remove dry, flaky surface skin. Smooth skin provides an even canvas that prevents body paints from clinging to dry patches.
Apply a lightweight, oil-free moisturizer thirty minutes before starting your beauty routine. Letting moisturizer absorb completely ensures gripping primers adhere firmly without slipping or pilling.
Avoid heavy face oils directly before applying water-activated or cream face paints. Oils break down makeup binders quickly, causing premature creasing and color separation.
Clean, hydrated skin ensures vibrant pigment payoff and comfortable, flexible wear all evening.
Multi-Layer Setting for Maximum Longevity
Set all cream makeup and high-coverage foundations with finely milled translucent setting powder. Press powder firmly into skin using a velour puff rather than sweeping with brushes.
Pressing locks the foundation into skin pores, creating a matte, transfer-resistant barrier. Dust away excess powder gently using a soft, fluffy powder brush before painting details.
Finish your entire look with three light mists of a professional waterproof setting spray. Allow each mist layer to air dry completely before stepping into the evening air.
Proper multi-layer setting prevents smudging, sweat breakdown, and costume staining throughout your events.
Complete Safety and Removal Guidelines
Special effects makeup and rich pigments require safe application practices and gentle removal methods. Caring for your skin before and after events prevents irritation and breakouts.
+-----------------------------------------------------------+
|             Skin Safety & Post-Party Care                 |
+-------------------+---------------------------------------+
| Pre-Application   | 48-Hour Patch Test for Latex & Glues  |
| Eye Safety        | Cosmetic-Grade Glitters Only          |
| First Cleanse     | Oil-Based Cleansing Balm / Micellar Water|
| Second Cleanse    | Hydrating Foaming Cleanser + Barrier Cream|
+-------------------+---------------------------------------+
Eye Safety and Cosmetic-Grade Pigments
Never use craft glitters, industrial paints, or non-cosmetic adhesives on your delicate face. Craft glitters have sharp glass-cut edges that can cause corneal scratches and eye injuries.
Always choose cosmetic-grade glitters, body paints, and FDA-approved skin-safe adhesives. Look for products labeled non-toxic, hypoallergenic, and formulated specifically for skin contact.
When applying paints near lash lines, use waterproof gel products designed for eye zones. Keeping harsh pigments outside the waterline prevents burning, tearing, and redness during parties.
Prioritizing safe cosmetic products ensures your holiday beauty experience remains fun and irritation-free.
Gentle Double-Cleansing and Skin Recovery
Heavy face paints, liquid latex, and waterproof adhesives should never be scrubbed off aggressively. Scrubbing damages your delicate skin barrier, leading to redness, flaking, and painful breakouts.
Begin removal by massaging a nourishing, oil-based cleansing balm across your dry face. The oils break down heavy waxes, silicones, and waterproof pigments effortlessly within minutes.
Wipe away dissolved makeup using a warm, damp microfiber cloth in gentle circular motions. Follow with a gentle foaming cleanser to remove residual oils, finishing with a rich ceramide moisturizer.
Double-cleansing leaves your skin fresh, calm, and ready for your next creative adventure.
Embracing these ten creative concepts brings excitement, theatrical glamour, and boundless artistry to your celebrations. From seductive vampires to mystical sirens and robotic androids, options are truly limitless. Step into your favorite aesthetic with confidence and showcase an unforgettable holiday transformation.
Leave a Reply