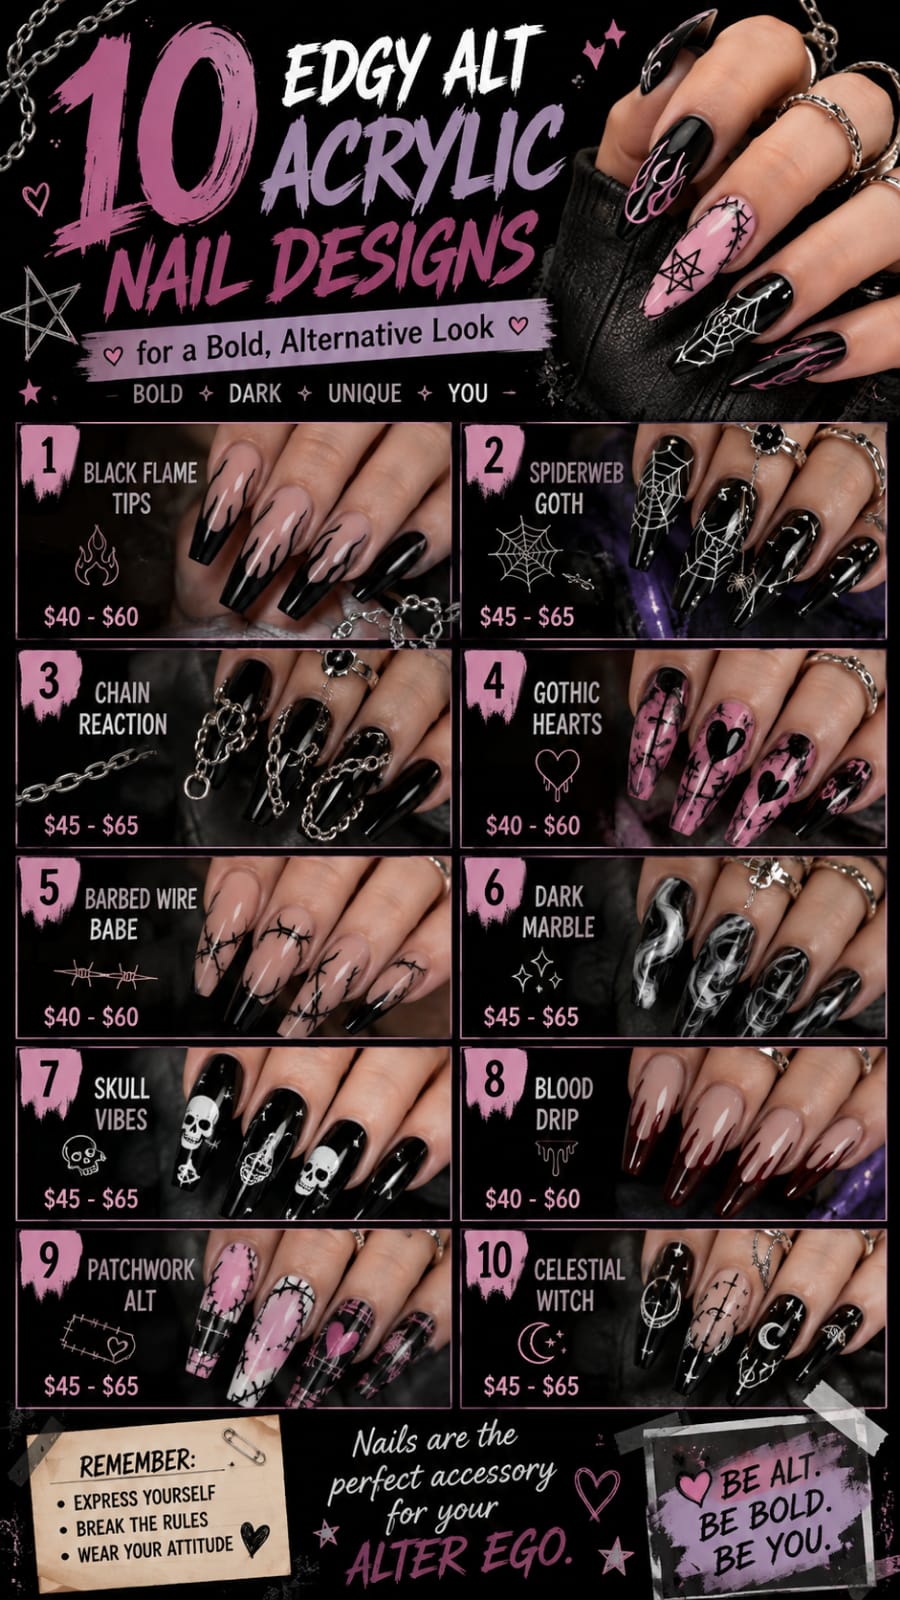
Alternative fashion is about expressing individuality, breaking conventions, and embracing raw artistic creativity. Your manicure serves as an extension of your unique personality and rebellious aesthetic. Choosing an edgy acrylic style nail instantly transforms your everyday look into a striking visual statement.
Modern alternative beauty draws inspiration from diverse subcultures across fashion history. From nineties grunge and classic goth to futuristic cyber sigilism, inspiration is boundless. These distinct designs celebrate dark textures, metallic hardware, and fearless sculptural shapes.
Long-lasting acrylic extensions provide the perfect strong canvas for intricate 3D nail art. Whether you favor sharp stilettos, tapered coffins, or squared edges, extensions offer structural stability. High-impact finishes like chrome powders, liquid metals, and piercings elevate your daily wardrobe effortlessly.
Exploring bold styles invites you to experiment with unexpected color combinations and textures. You can balance deep obsidian shades with chrome accents, vibrant neon acid drips, or vintage tartan.
Below, you will discover ten edgy acrylic concepts crafted for an unapologetic, alternative look. Each section covers aesthetic inspirations, material choices, application steps, and essential maintenance methods.
1. Cyber Sigilism and Molten Chrome Drops
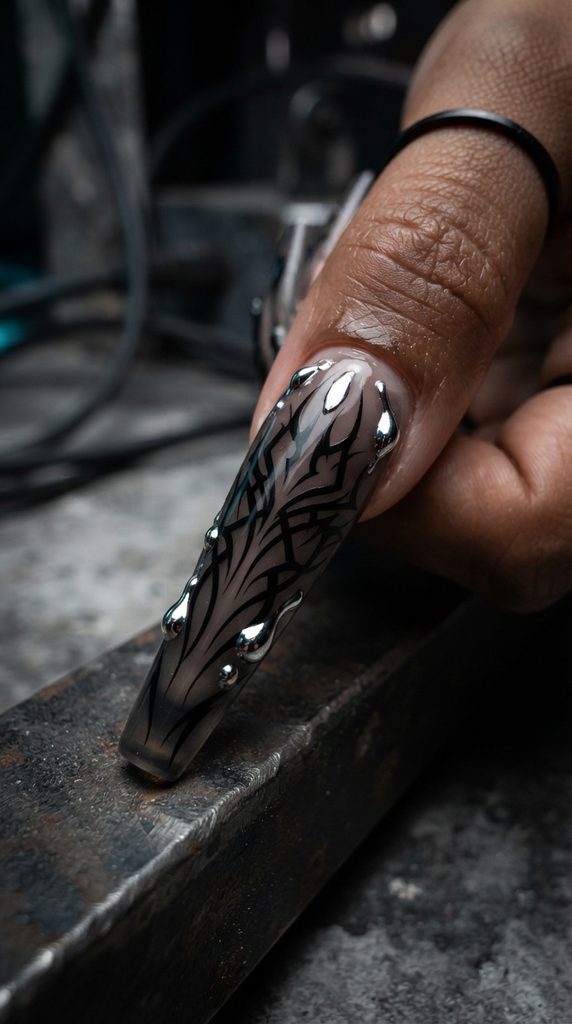
Cyber sigilism merges futuristic techno aesthetics with intricate tribal line work. This design combines sharp, chrome-plated vector lines with liquid metal drops over a moody base.
+-----------------------------------------------------------+
|             Cyber Sigilism Style Breakdown                |
+-------------------+---------------------------------------+
| Base Foundation   | Sheer Smoky Charcoal or Jelly Black   |
| Accent Art        | 3D Chrome Sigils & Molten Silver Drops|
| Extension Shape   | Extra-Long Tapered Coffin or Stiletto |
| Target Aesthetic  | Cyberpunk, Industrial, Dark Techno    |
+-------------------+---------------------------------------+
Aesthetic Blueprint and Alternative Nail Elements
This aesthetic takes visual cues from early digital graphics, biomechanical art, and modern tattoo subcultures. Intricate tribal sigils sweep across the acrylic plate, featuring razor-sharp curves and barbed points.
Raised 3D liquid chrome droplets sit on top of the intricate vector lines. They mimic beads of molten mercury resting over dark titanium armor.
A sheer, smoky black jelly base provides depth without overpowering the silver chrome. The contrast between high-shine liquid silver and dark jelly creates dynamic visual movement.
This cutting-edge manicure pairs effortlessly with industrial streetwear, chunky silver rings, and oversized leather jackets.
Essential Materials and Polish Selection
To craft this set, choose a clear acrylic base and smoky black jelly gel. You will need a mirror-finish silver chrome pigment powder and non-wipe topcoat.
A high-viscosity 3D builder gel is required to sculpt the raised molten droplets. An ultra-fine five-millimeter striper brush ensures sharp precision on delicate tribal sigil points.
Keep a silicone chrome buffing tool ready for smooth, mirror-like powder transfer. Quality lint-free wipes and pure alcohol ensure your canvas stays clean between stages.
Using dense black art gel guarantees clean, opaque line work that never bleeds.
Step-by-Step Sculpting and Acrylic Nail Methods
- Prep the natural beds by removing shine and applying dehydrator smoothly.
- Apply acrylic forms and sculpt tapered stiletto extensions using clear powder.
- Shape the sidewalls with a coarse hand file to ensure sharp edges.
- Paint two coats of sheer smoky jelly gel, curing each layer completely.
- Dip your fine striper brush into black painting gel carefully.
- Paint sweeping cyber sigil lines radiating from the cuticle toward the tip.
- Cure the line art under your LED lamp for sixty seconds.
- Apply 3D builder gel along the tribal nodes to create raised droplets.
- Apply non-wipe topcoat over the 3D drops and cure for thirty seconds.
- Buff silver chrome powder onto the raised gel and seal with topcoat.
Professional Ways to Preserve Set Durability
Because 3D chrome details have raised surfaces, seal them with two thin topcoats. Double-coating protects the chrome powder from scratching off during daily computer typing.
Avoid using your fingertips to pry open heavy metal cans or clasps. Apply sweet almond cuticle oil twice daily to keep the surrounding skin supple.
Smooth hydration prevents lifting along the acrylic perimeter during cool, dry weather snaps.
2. Gothic Cathedral Stained Glass and Matte Obsidian
Gothic architecture offers dramatic arches, stone gargoyles, and ornate cathedral windows. This design translates historical European masonry into a dark, romantic manicure.
+-----------------------------------------------------------+
|             Gothic Cathedral Style Breakdown              |
+-------------------+---------------------------------------+
| Base Foundation   | Deep Matte Obsidian & Sheer Wine Jelly|
| Accent Art        | Black Velvet Baroque Ribs & Red Glass |
| Extension Shape   | Dramatic Long Almond or Gothic Arch   |
| Target Aesthetic  | Trad Goth, Romantic Dark Academia     |
+-------------------+---------------------------------------+

Aesthetic Blueprint and Alternative Style Notes
This dramatic manicure draws inspiration from medieval basilicas and ornate iron cemetery gates. It pairs velvety matte black frames with translucent, ruby-red stained-glass window panes.
Intricate baroque filigree lines arch gracefully across the center of each extension. Light passes through the sheer red sections, producing an alluring, luminous jewel glow.
The surrounding matte black acrylic frames the glowing glass inserts with architectural drama. The tactile contrast between soft matte and glossy jelly mimics ancient stonework and glass.
It is an exquisite, theatrical choice for lovers of classic Victorian gothic fashion.
Essential Materials and Polish Selection
Select a deep jet-black acrylic powder, rich crimson jelly gel, and black liner gel. A velvety matte gel topcoat provides the stone-textured contrast around the perimeter.
You need a clear builder gel to fill and dome the glass sections. An ultra-slender detailer brush is essential for drawing fine cathedral window tracery.
Keep an LED curing torch handy for flash-curing intricate line segments quickly. A damp lint-free wipe soaked in cleanser removes residual dispersion layers effortlessly.
High-grade matte topcoats ensure your stone frame retains its soft finish for weeks.
Step-by-Step Sculpting and Acrylic Nail Methods
- Sculpt long, tapered almond extensions using premium black acrylic core powder.
- File the surface smooth and buff with a fine-grit sponge buffer.
- Paint the center of the plate with sheer crimson stained-glass gel.
- Cure the sheer red window pane for sixty seconds under LED.
- Paint pointed gothic cathedral arches framing the red section with black gel.
- Add delicate intersecting trefoil tracery within the arch using your fine brush.
- Flash-cure each intricate line section to prevent the paint from spreading.
- Coat the black exterior borders with a velvety matte gel topcoat.
- Apply a plump drop of clear gloss topcoat over the red window.
- Cure for sixty seconds to lock in the textured stone-and-glass contrast.
Professional Ways to Preserve Set Durability
Matte finishes can pick up daily oils, so cleanse them regularly with alcohol. A quick swipe restores the authentic velvet stone appearance in just seconds.
Wear protective rubber gloves when working with harsh household cleaning agents or bleach. Consistent protection prevents the sheer red jelly from clouding or yellowing prematurely.
Keep your sidewalls reinforced by scheduling maintenance fills every three to four weeks.
3. Grunge Plaid and Pierced Coffin Tips
Nineties alternative grunge fashion celebrates distressed textiles, flannel shirts, and industrial metal piercings. This design brings that raw attitude directly to your hands.
+-----------------------------------------------------------+
|             Grunge Pierced Coffin Breakdown               |
+-------------------+---------------------------------------+
| Base Foundation   | Weathered Tartan Red & Distressed Gray|
| Accent Art        | Draped Silver Chains & Dangle Hoops   |
| Extension Shape   | Sharp Coffin or Squared Tapered Edge  |
| Target Aesthetic  | Riot Grrrl, 90s Grunge, Punk Rock     |
+-------------------+---------------------------------------+

Aesthetic Blueprint and Alternative Style Notes
This look captures the rebellious energy of underground basement shows and vintage markets. Distressed red-and-black tartan plaid patterns create an authentic, raw textile texture.
Real metallic hoop piercings and dangling silver safety pins pass through the acrylic. They swing freely with your hand gestures, creating eye-catching kinetic movement.
Faded charcoal and muted white gridlines give the plaid a worn-in, vintage feel. The sharp coffin silhouette adds clean, geometric structure to the rugged design.
It pairs naturally with ripped vintage denim, distressed band tees, and platform combat boots.
Essential Materials and Polish Selection
Gather scarlet red gel, charcoal gray polish, and high-pigment white striping paint. You will need a manual hand drill tool designed specifically for acrylic extensions.
Prepare miniature silver jump rings, tiny metal charms, and precision jewelry pliers. A matte topcoat gives the tartan its signature soft flannel fabric look.
Keep extra piercing rings in your kit in case of accidental loss. Fine striper brushes allow you to pull straight, intersecting fabric gridlines cleanly.
High-density acrylics ensure the free edge remains strong enough to support drill holes.
Step-by-Step Sculpting and Acrylic Nail Methods
- Sculpt medium-length coffin extensions using high-strength clear acrylic powder.
- File the side walls and free edge into crisp, parallel lines.
- Paint two smooth coats of scarlet red gel on accent fingers.
- Use a long striper brush to draw wide charcoal vertical bands.
- Paint intersecting horizontal charcoal lines across the nail to form plaid.
- Add thin, delicate white and yellow accent lines through the plaid centers.
- Seal the design with a soft-touch matte topcoat and cure fully.
- Align the manual hand drill tool half a millimeter from the tip.
- Twist the drill gently until it penetrates through the acrylic plate.
- Insert a small silver jump ring through the hole using jewelry pliers.
- Attach a mini silver safety pin charm and pinch the ring shut.
Professional Ways to Preserve Set Durability
Be mindful when pulling on thick knit sweaters to avoid catching the piercings. If a chain snags, gently unhook it rather than pulling forcefully.
Clean around the pierced hole with an alcohol wipe to remove debris. Regular cleaning keeps the metallic hardware bright and shiny without grime buildup.
Apply cuticle oil generously around the perimeter to maintain flexibility across the bed.
4. Vampiric Blood Drips and French Stiletto
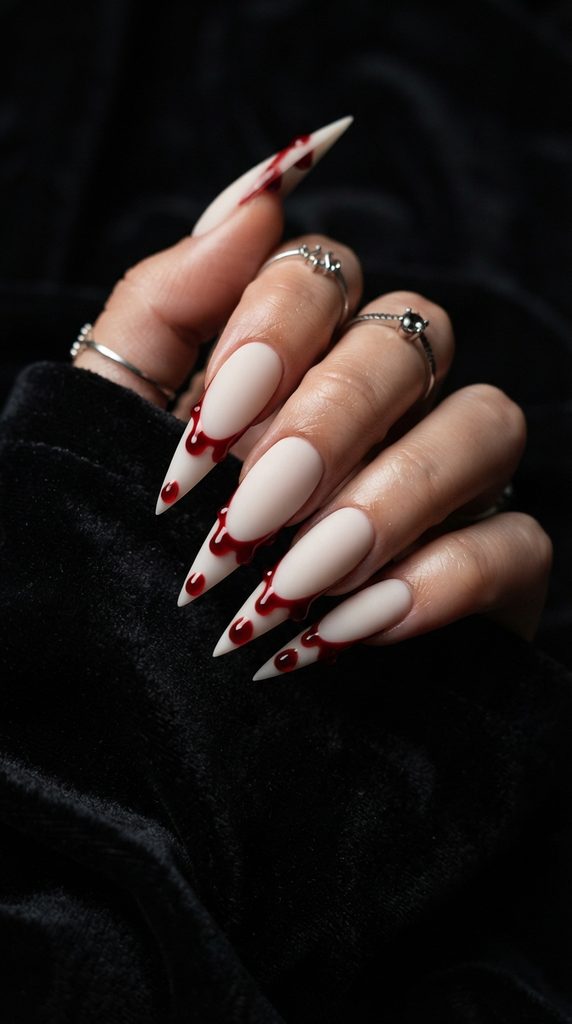
Vampiric glamour merges deep romantic seduction with striking, macabre imagery. This design features sharp stiletto tips dripping with thick, glossy crimson blood.
+-----------------------------------------------------------+
|             Vampiric Stiletto Breakdown                   |
+-------------------+---------------------------------------+
| Base Foundation   | Translucent Nude Pink or Pale Alabaster|
| Accent Art        | Glossy 3D Crimson Blood Drip Smile Lines|
| Extension Shape   | Razor-Sharp Stiletto Silhouette       |
| Target Aesthetic  | Vampire Goth, Victorian Horror, Dark  |
+-------------------+---------------------------------------+
Aesthetic Blueprint and Alternative Style Notes
This design takes inspiration from classic gothic horror, dark literature, and velvet capes. The razor-sharp stiletto extension creates an aggressive, dramatic, and elongated silhouette.
A pale, porcelain-white or nude base provides a clean canvas for rich contrast. Deep burgundy-red blood droplets pool along the tips, running downward in thick beads.
Using builder gel to build raised 3D drips creates realistic, dimensional shine. The dramatic contrast feels dangerous, seductive, and undeniably high-fashion for evening gatherings.
It makes a fearless statement alongside dark velvet evening wear and silver jewelry.
Essential Materials and Polish Selection
Select a sheer alabaster foundation gel and deep, blood-red jelly polish. A crystal-clear 3D sculpting gel is necessary to create the raised dripping droplets.
You will need a rounded dotting tool to place the rounded drop heads. A fine liner brush connects the droplets back up to the French tip.
Keep a high-shine non-wipe topcoat ready to glaze the crimson blood drips. Isopropyl alcohol wipes ensure the base remains free of sticky residue before painting.
Using rich, non-shrinking gel paints keeps the edges of the drips crisp.
Step-by-Step Sculpting and Acrylic Nail Methods
- Sculpt long, razor-sharp stiletto extensions using sturdy cover-pink acrylic.
- File the edges carefully to achieve a sharp, symmetrical stiletto point.
- Paint two coats of pale alabaster gel, curing each layer completely.
- Seal the pale base with a matte topcoat to enhance background contrast.
- Dip a dotting tool into deep blood-red gel paint generously.
- Place three to four dots at varying heights across the plate.
- Connect the dots upward to the tip using your fine detailer brush.
- Fill in the tip area to form a dramatic dripping French smile.
- Layer clear 3D builder gel directly over the red drips for volume.
- Glaze the raised 3D drips with red jelly gel and glossy topcoat.
- Cure for sixty seconds to lock in the high-gloss wet blood effect.
Professional Ways to Preserve Set Durability
Sharp stiletto points are vulnerable to blunt trauma; avoid tapping tips on hard desks. Type using the flat pads of your fingers rather than the sharp extension tips.
Apply nourishing jojoba oil across the underside of the acrylic daily. Hydrating the natural underside prevents the natural bed from curling away from acrylic.
Maintain the stiletto point by gently filing away micro-catches with a glass file.
5. Acid Neon Biohazard and Slime Marbling
Acid-drenched industrial rave culture inspires this high-energy, radioactive design. It mixes vibrant chartreuse neon slime with toxic biohazard warning symbols and smoky marbling.
+-----------------------------------------------------------+
|             Acid Biohazard Style Breakdown                |
+-------------------+---------------------------------------+
| Base Foundation   | Inky Jet Black & Milky Translucent Gel|
| Accent Art        | Toxic Green Slime Swirls & Hazard Art |
| Extension Shape   | Medium Square or Tapered Coffin       |
| Target Aesthetic  | Cyber Rave, Industrial, Nu-Metal      |
+-------------------+---------------------------------------+

Aesthetic Blueprint and Alternative Style Notes
This aesthetic channels futuristic wasteland vibes, toxic chemical vats, and underground raves. Electric chartreuse and toxic green cut sharply through a shadowy black background.
Organic, swirled slime marbling creates the illusion of swirling chemical runoff in water. Hand-painted industrial hazard stencils add a structured, graphic contrast to the fluid slime.
Under blacklight or club strobes, the neon pigments glow with incredible visual intensity. It offers an energetic, bold look that celebrates modern electronic subcultures.
This set looks phenomenal with oversized utilitarian windbreakers, platform boots, and silver chains.
Essential Materials and Polish Selection
Acquire UV-reactive neon green gel, intense black art paint, and blooming gel. A fine-point detail brush is essential for painting geometric hazard triangles and circles.
Select a glowing neon pigment powder to intensify the radioactive slime center. A durable high-gloss topcoat provides the slick, wet-look finish this theme requires.
Keep pure acetone and flat clean-up brushes handy to sharpen stencil borders. Quality pigment gels ensure that the neon does not look sheer over black.
Using specialized blooming gels creates effortless, natural smoke and liquid marble blends.
Step-by-Step Sculpting and Acrylic Nail Methods
- Sculpt tapered coffin extensions using solid black and clear acrylic powders.
- Refine the shape with a 100/180 grit hand file and clean away dust.
- Paint a thin, uncured layer of clear blooming gel across accent fingers.
- Drop neon chartreuse gel onto the wet surface using a liner brush.
- Swirl the green paint into fluid, smoky slime trails and cure fully.
- Paint a solid neon green accent nail for graphic industrial artwork.
- Dip your detail brush in black gel to paint the central hazard circle.
- Paint three radiating fan blades around the circle to create the symbol.
- Add tiny hazard warning text or barcode lines along the sidewall.
- Seal the entire design with an ultra-glossy, scratch-resistant gel topcoat.
Professional Ways to Preserve Set Durability
Neon pigments can fade with prolonged sun exposure, so apply UV-blocking topcoats. UV protectants preserve the electric vibrancy of your radioactive greens across sunny weeks.
Wash your hands with mild, moisturizing hand soap to prevent skin irritation. Avoid harsh industrial solvents that can degrade the surface clarity of the topcoat.
Reapply a fresh layer of clear topcoat after two weeks to restore shine.
6. Y2K Grunge Starbursts and Airbrushed Vignette
Early 2000s alt-rock and mall goth aesthetics inspire this nostalgic, moody design. It pairs airbrushed black vignetting with metallic chrome four-point starbursts and distressed gradients.
+-----------------------------------------------------------+
|             Y2K Grunge Starburst Breakdown                |
+-------------------+---------------------------------------+
| Base Foundation   | Muted Dusty Mauve or Foggy Gray Pink  |
| Accent Art        | Airbrushed Black Halo & Chrome Stars  |
| Extension Shape   | Medium Square or Long Tapered Coffin  |
| Target Aesthetic  | Mall Goth, 2000s Alt Rock, Nu-Metal   |
+-------------------+---------------------------------------+
Aesthetic Blueprint and Alternative Style Notes
This style brings together early digital album covers, smoky eyes, and studded belts. The core feature is a dark, airbrushed aura that vignettes the nail edges.
A dusty rose or mauve center provides a soft, moody contrast to the black. Crisp, hand-painted silver chrome four-point starbursts twinkle across the smoky background effortlessly.
The faded gradient softens the harsh black borders, creating a dreamy grunge mood. It feels effortlessly nostalgic, trendy, and tailored for contemporary alt-fashion lovers.
It pairs seamlessly with low-rise cargo pants, baby tees, and chunky skate shoes.
Essential Materials and Polish Selection
You need a handheld cordless nail airbrush machine and thin black airbrush ink. Select a dusty mauve base gel and mirror silver chrome paint or powder.
Liquid latex is essential for protecting the skin around your cuticles during airbrushing. An ultra-fine striper brush allows you to paint sharp four-point star rays.
Keep an acetone-dipped brush ready for cleaning the perimeter before curing under lamps. A smoothing base coat ensures your mauve foundation blends into the vignette smoothly.
High-pigment chrome paints ensure that delicate star centers remain bright and opaque.
Step-by-Step Sculpting and Acrylic Nail Methods
- Sculpt medium square extensions using high-grade cover-mauve acrylic powder.
- File the sidewalls and straight free edge with a crisp hand file.
- Apply liquid latex around all cuticle borders to prevent overspray stains.
- Load black airbrush ink into your cordless spray compressor tool.
- Spray a soft, focused mist around the perimeter, leaving the center light.
- Peel away the protective liquid latex barrier from the skin carefully.
- Cure the airbrushed ink layer under your LED lamp for thirty seconds.
- Dip your fine striper brush into metallic silver painting gel.
- Paint a tall vertical diamond star line, crossing it with a horizontal ray.
- Add micro-dots of silver starlight around the main starburst clusters.
- Seal the entire design with a durable, high-gloss gel topcoat.
Professional Ways to Preserve Set Durability
Because airbrushed layers are ultra-thin, always cap the free edge with topcoat. Capping prevents the delicate ink from separating from the underlying acrylic base plate.
Massage vitamin-rich cuticle balm into the nail matrix every single evening. Keeping your cuticles healthy frames the airbrushed aura design cleanly and professionally.
Avoid picking at the sidewalls to maintain the sharp structure of square extensions.
7. Distressed Denim and Heavy Metal Chain Hardware
Industrial punk and heavy metal street style inspire this tactile, mixed-media manicure. It combines textured blue denim finishes with real metallic chains and chrome studs.
+-----------------------------------------------------------+
|             Distressed Denim Style Breakdown              |
+-------------------+---------------------------------------+
| Base Foundation   | Textured Washed Indigo & Faded Blue   |
| Accent Art        | Real Silver Curb Chains & Chrome Studs|
| Extension Shape   | Long Coffin or Sharp Square Edge      |
| Target Aesthetic  | Heavy Metal, Industrial Punk, Biker   |
+-------------------+---------------------------------------+

Aesthetic Blueprint and Alternative Style Notes
This design draws inspiration from vintage patched battle jackets, biker vests, and metal hardware. The indigo base mimics washed denim, complete with white distress fibers.
Real miniature silver curb chains drape across the nail plate from side to side. Tiny chrome pyramid studs punctuate the corners, adding tactile, metallic edge to the set.
The contrast between soft fabric textures and hard metal hardware creates tactile depth. It looks rugged, bold, and custom-tailored for rock concerts and motorcycle rides.
Pair this bold manicure with oversized denim jackets, leather boots, and chunky silver accessories.
Essential Materials and Polish Selection
Collect washed indigo gel, white painting paste, and clear textured embossing gel. You need miniature silver curb chain lengths and metal nail piercing studs.
A pair of precision jewelry wire cutters helps snip chains to exact lengths. A heavy-duty rhinestone glue or 3D gem gel anchors the chains firmly.
Keep a pair of curved tweezers ready to position tiny metal studs accurately. A matte topcoat gives the indigo polish its authentic cotton denim appearance.
High-grade jewelry adhesives prevent metallic hardware from snagging on delicate fabrics later.
Step-by-Step Sculpting and Acrylic Nail Methods
- Sculpt long coffin extensions using clear structural acrylic powder and forms.
- Apply two coats of washed indigo blue gel, curing each layer fully.
- Dry-brush white gel across the blue surface to create denim distress fibers.
- Seal with a soft matte topcoat to capture the realistic look of jeans.
- Apply lines of thick 3D gem gel along the lateral sidewalls.
- Use tweezers to place small silver curb chains spanning across the nail.
- Add tiny chrome pyramid studs at both anchor ends of the chain.
- Cure under the LED lamp for ninety seconds to secure the hardware.
- Float clear topcoat around the stud bases using a detailer brush.
- Cure for a final sixty seconds to ensure maximum hardware adhesion.
Professional Ways to Preserve Set Durability
When washing your hair, use a silicone scalp massager to avoid chain tangling. Scalp massagers protect delicate hardware from getting caught in wet hair strands.
Clean around the metallic chains using a soft-bristle toothbrush and soapy water. Gentle brushing removes trapped makeup or lotion, keeping the silver hardware brilliant.
Avoid exposing the chains to chlorine pools to prevent premature metal tarnishing.
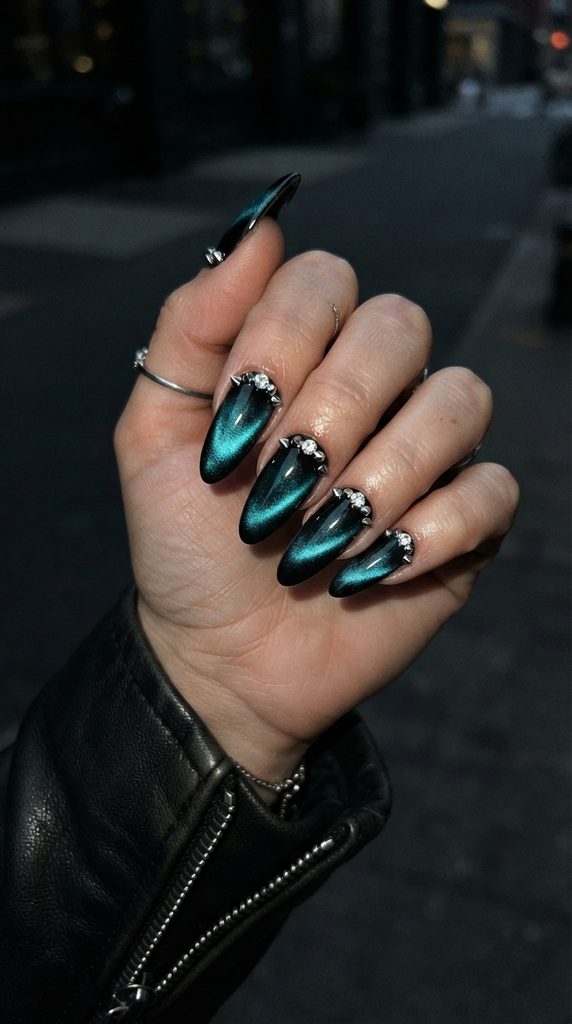
8. Spike Studded Dark Velvet Cat-Eye
Magnetic velvet polishes bring deep, moving dimensions to dark, moody color palettes. This style pairs hypnotic velvet cat-eye shimmer with punk rock cone spikes.
+-----------------------------------------------------------+
|             Spike Velvet Cat-Eye Breakdown                |
+-------------------+---------------------------------------+
| Base Foundation   | Pitch Black Base with Deep Teal Velvet|
| Accent Art        | Punk Rock Metal Cone Spikes & Rhinestones|
| Extension Shape   | Tapered Coffin or Long Almond Shape   |
| Target Aesthetic  | Glam Goth, Dark Wave, Post-Punk       |
+-------------------+---------------------------------------+
Aesthetic Blueprint and Alternative Style Notes
This aesthetic merges luxurious evening glamour with dangerous, punk-inspired metallic edge. The magnetic cat-eye particles shift under ambient lighting like molten liquid velvet fabric.
Deep teal, midnight purple, or emerald green shimmer floats over a pitch-black base. Silver cone spikes line the cuticle area, creating an aggressive, architectural frame.
The dynamic movement of the magnetic shimmer balances the sharp hardness of spikes. It is an elevated, high-glamour option for gothic galas and evening celebrations.
This set looks stunning alongside tailored black blazers, dark lipstick, and velvet chokers.
Essential Materials and Polish Selection
Prepare an opaque black base gel, deep teal magnetic cat-eye polish, and magnets. You need miniature silver metallic cone spikes and clear 3D bonding resin.
A strong rectangular neodymium magnet allows you to create fluid velvet light patterns. An applicator wax pencil helps pick up and position spikes with ease.
Keep a high-gloss topcoat nearby to seal the magnetic shimmer with glass-like shine. A fine buffer prepares the acrylic surface for seamless base gel bonding.
High-quality metal alloy spikes resist fading or chipping when exposed to daily handwashing.
Step-by-Step Sculpting and Acrylic Nail Methods
- Sculpt tapered coffin extensions using strong cover-black acrylic powder cleanly.
- Apply an opaque coat of black gel and cure for thirty seconds.
- Paint a generous, even layer of deep teal magnetic cat-eye polish.
- Hover the magnet around the sides to disperse particles into a velvet glow.
- Cure under the LED lamp immediately for sixty seconds to lock particles.
- Seal with a high-shine topcoat and cure for thirty seconds.
- Dab heavy-duty gem resin along the curved cuticle perimeter neatly.
- Use a wax pencil to place three silver cone spikes along the resin.
- Add tiny crystal rhinestones between the spikes for extra brilliance.
- Cure under the lamp for ninety seconds to anchor the metal spikes.
Professional Ways to Preserve Set Durability
Be gentle when reaching into tight coat pockets to avoid catching the spikes. Smooth pocket entry prevents accidental torque on the glued metal hardware anchors.
Apply a drop of clear topcoat around the spike bases every two weeks. This simple touch-up reinforces the bond, keeping your punk spikes firmly attached.
Hydrate your cuticles with vitamin E oil to keep the perimeter looking fresh.
9. Anatomical Bone and Skeletal Line Art
Anatomical illustrations and skeletal structures bring an intellectual, macabre vibe to alternative fashion. This design features hand-painted bone fragments and rib cages over sheer slate.
+-----------------------------------------------------------+
|             Anatomical Skeletal Style Breakdown           |
+-------------------+---------------------------------------+
| Base Foundation   | Sheer Smoky Slate or Muted Bone White |
| Accent Art        | Realistic Hand-Painted Bone Rib Cages |
| Extension Shape   | Long Tapered Coffin or Stiletto Shape |
| Target Aesthetic  | Oddities Collector, Macabre, Dark Alt |
+-------------------+---------------------------------------+

Aesthetic Blueprint and Alternative Style Notes
This design takes inspiration from vintage medical journals, oddity cabinets, and museum exhibits. Delicate bone white illustrations float over a moody, translucent smoky slate background.
Detailed spinal columns, rib cages, and finger phalanges are painted with anatomical precision. Subtle charcoal shading beneath the bones adds realistic three-dimensional depth and shadow.
The muted, desaturated color palette gives the entire manicure an antique, scholarly feel. It is a thoughtful, artistic design for lovers of unique, conversation-starting aesthetics.
It pairs beautifully with dark academic tweed overcoats, antique silver, and leather-bound journals.
Essential Materials and Polish Selection
Gather sheer smoky slate gel, opaque bone-white painting paste, and charcoal shadow gel. You will need an ultra-fine three-millimeter detailer brush for painting delicate bone joints.
A flat shading brush helps blend soft gray shadows beneath the white bones. A velvety matte topcoat provides an authentic parchment-paper texture across the set.
Keep pure isopropyl alcohol ready to thin painting gels for watercolor shading effects. High-density white art gels ensure that delicate rib lines remain crisp and bright.
High-grade detailing brushes with natural hairs give maximum control over fine anatomical lines.
Step-by-Step Sculpting and Acrylic Nail Methods
- Sculpt long coffin extensions using translucent smoky glass acrylic powder.
- File and buff the extensions smooth, wiping away all surface dust.
- Paint a sheer wash of smoky slate gel and cure for sixty seconds.
- Dip your fine detailer brush into opaque bone-white painting gel.
- Paint a central vertical spinal column with delicate branching vertebrae.
- Paint curved rib cage bones extending outward from each vertebra node.
- Dilute charcoal gel with clear base to create a translucent shadow wash.
- Paint soft shadows along the underside of each rib bone for depth.
- Add fine white highlight lines along the top edges of the bones.
- Seal the entire design with a soft-touch matte parchment gel topcoat.
- Cure for sixty seconds to lock in the authentic anatomical illustration.
Professional Ways to Preserve Set Durability
Protect the delicate matte surface by avoiding exposure to pigmented dyes or hair color. If staining occurs, gently scrub the surface with soap and a soft brush.
Apply lightweight grapeseed oil to the cuticles to keep surrounding skin supple. Well-moisturized fingers highlight the intricate, hand-painted line work beautifully.
Schedule regular infill appointments every three weeks to maintain proper structural balance.
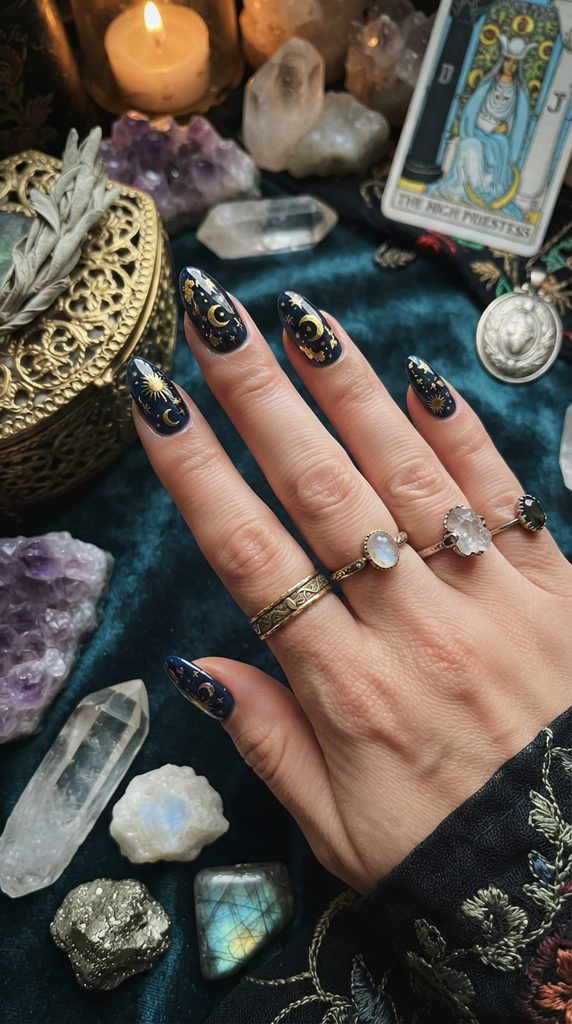
10. Whimsigoth Tarot and Celestial Foil Overlay
Whimsigoth aesthetics merge nineties gothic darkness with mystical, celestial astrology. This design combines rich midnight blue with vintage tarot motifs and distressed gold foil.
+-----------------------------------------------------------+
|             Whimsigoth Tarot Style Breakdown              |
+-------------------+---------------------------------------+
| Base Foundation   | Deep Midnight Navy & Translucent Onyx |
| Accent Art        | Distressed Gold Foil & Tarot Moons    |
| Extension Shape   | Medium Almond or Elegant Oval Shape   |
| Target Aesthetic  | Whimsigoth, Witchcore, 90s Celestial  |
+-------------------+---------------------------------------+

Aesthetic Blueprint and Alternative Style Notes
This enchanting manicure draws inspiration from celestial astrology, velvet tapestries, and antique tarot decks. Deep midnight navy jelly creates an infinite, night-sky background full of depth.
Distressed gold leaf foil sparkles across the dark base like ancient star clusters. Hand-painted golden crescent moons, suns, and mystical third eyes float over top.
The combination of deep blue, glowing gold, and celestial art feels rich and magical. It is a romantic, mystical choice for anyone who loves astrology and witchcraft aesthetics.
This set looks gorgeous alongside crushed velvet dresses, raw crystal jewelry, and lace shawls.
Essential Materials and Polish Selection
Select a deep midnight navy jelly polish, transfer foil glue, and gold leaf sheets. You will need metallic gold painting gel and a five-millimeter striping brush.
A silicone foil press tool ensures smooth, flat gold leaf adhesion without wrinkles. A high-shine, plump builder topcoat provides the glass-like encapsulation depth you need.
Keep fine tweezers handy to tear and place irregular flakes of gold foil. Quality metallic gold gels ensure that celestial sunburst rays remain sharp and opaque.
Using crystal-clear builder gels prevents the rich gold foil from oxidizing or discoloring.
Step-by-Step Sculpting and Acrylic Nail Methods
- Sculpt medium almond extensions using clear structural acrylic powder and forms.
- Paint two coats of deep midnight navy jelly gel, curing each layer.
- Dab foil transfer adhesive randomly across the sticky gel dispersion layer.
- Cure the foil glue for thirty seconds until completely clear and tacky.
- Press sheets of distressed gold leaf foil onto the tacky glue patches.
- Peel the backing away quickly, leaving weathered gold flecks on the nail.
- Dip your fine striper brush into rich metallic gold painting gel.
- Paint a vintage crescent moon with a sleeping face profile in the center.
- Add radiating celestial starbursts and tiny constellation dots around the moon.
- Cure the gold artwork under the LED lamp for sixty seconds.
- Encapsulate the entire design with a generous layer of high-gloss topcoat.
Professional Ways to Preserve Set Durability
Because this look relies on high-gloss depth, wipe nails with alcohol weekly. Cleaning removes everyday lotion residues, restoring the brilliant celestial gold shine instantly.
Avoid using acetone-based household cleaners without wearing protective cleaning gloves. Solvents can degrade the clear topcoat, dulling the encapsulated gold foil layers beneath.
Massage rosehip cuticle oil into the nail folds daily to maintain healthy elasticity.
Daily Care Methods to Preserve Your Acrylic Nail Set
Investing in a stunning alternative manicure requires consistent aftercare to maintain structural strength. Acrylic enhancements withstand daily life best when protected from excessive moisture and impact.
+-----------------------------------------------------------+
|             Daily Alternative Set Care Routine            |
+-------------------+---------------------------------------+
| Morning Habit     | Apply Jojoba Oil to Cuticles & Underside|
| Daily Task Rule   | Wear Rubber Gloves for Dishes & Cleaning|
| Evening Habit     | Massage Rich Shea Butter Hand Balm      |
| Monthly Step      | Salon Infill & Structural Rebalancing   |
+-------------------+---------------------------------------+
Protecting Extensions from Heavy Lifting and Water
Water exposure is one of the leading causes of premature acrylic lifting and bacterial growth. When water enters lifting edges, it becomes trapped against the natural plate.
Always wear protective rubber gloves when washing dishes, cleaning sinks, or gardening. Gloves prevent detergents from breaking down the chemical bond between acrylic and the bed.
Never use your extension tips to pry open cans, peel tape, or scrape surfaces. Use proper utility tools to perform daily tasks, preserving the structural integrity of extensions.
Treating your enhancements as delicate jewels guarantees they remain secure and pristine for weeks.
Nightly Hydration and Apex Rebalancing
Cold weather and indoor heating can dehydrate your natural bed, causing painful brittleness. When natural plates dry out, they curl away from rigid acrylic overlays.
Make it a nightly ritual to massage pure organic jojoba oil into cuticles. Jojoba oil molecules penetrate deeply, maintaining flexibility and preventing premature edge lifting.
Visit your professional salon every three weeks for an essential acrylic infill service. Regular fills rebalance the structural apex, preventing painful breaks as your natural enhancements grow.
Consistent aftercare ensures your bold, alternative manicure stays stunning, strong, and runway-ready.
Choosing the Best Shape for Alternative Styles
Selecting the right extension shape enhances the visual impact of your alternative artwork. Different silhouettes highlight specific subcultural aesthetics and flatter your hand proportions uniquely.
+-----------------------------------------------------------+
|             Alternative Shape Selection Matrix            |
+-------------------+---------------------------------------+
| Razor Stiletto    | Edgy, dramatic; ideal for blood drips |
| Tapered Coffin    | Sleek, modern; perfect for cyber sigils|
| Sharp Square      | Bold, retro; suits grunge plaid & Y2K |
| Tapered Almond    | Elegant, timeless; great for tarot art|
+-------------------+---------------------------------------+
Dramatic Stiletto and Coffin Silhouettes
Razor-sharp stiletto shapes create an aggressive, elongated look that commands attention in any room. They provide the ultimate dramatic silhouette for vampiric blood drips and gothic designs.
Tapered coffin shapes offer flat tips with sharp, parallel sidewalls that look sleek. They provide a generous, flat canvas for detailed cyber sigilism and chain hardware.
Both shapes elongate the fingers, adding high-fashion elegance to edgy, dark personal styling. They remain the top choices for bold, unapologetic alternative statements.
Bold Square and Almond Silhouettes
Sharp square shapes bring a bold, retro nineties energy that suits grunge plaid aesthetics. Their structured, clean horizontal lines provide balanced contrast to messy, distressed textures and piercings.
Tapered almond shapes offer natural structural strength with soft, curved, and feminine edges. They reduce the risk of snagging on delicate fabrics like velvet, lace, and knits.
Almond silhouettes work wonderfully with mystical whimsigoth themes, celestial foils, and vintage filigree. Choosing the right shape ensures your alternative manicure feels comfortable and stylish all season.
Embracing these edgy alternative designs brings fearless creativity, confidence, and rebellion to your daily style. From liquid chrome cyber sigils to vintage gothic stained glass, options are boundless. Treat your hands to an unforgettable artistic transformation and rock your aesthetic with pride.
Leave a Reply