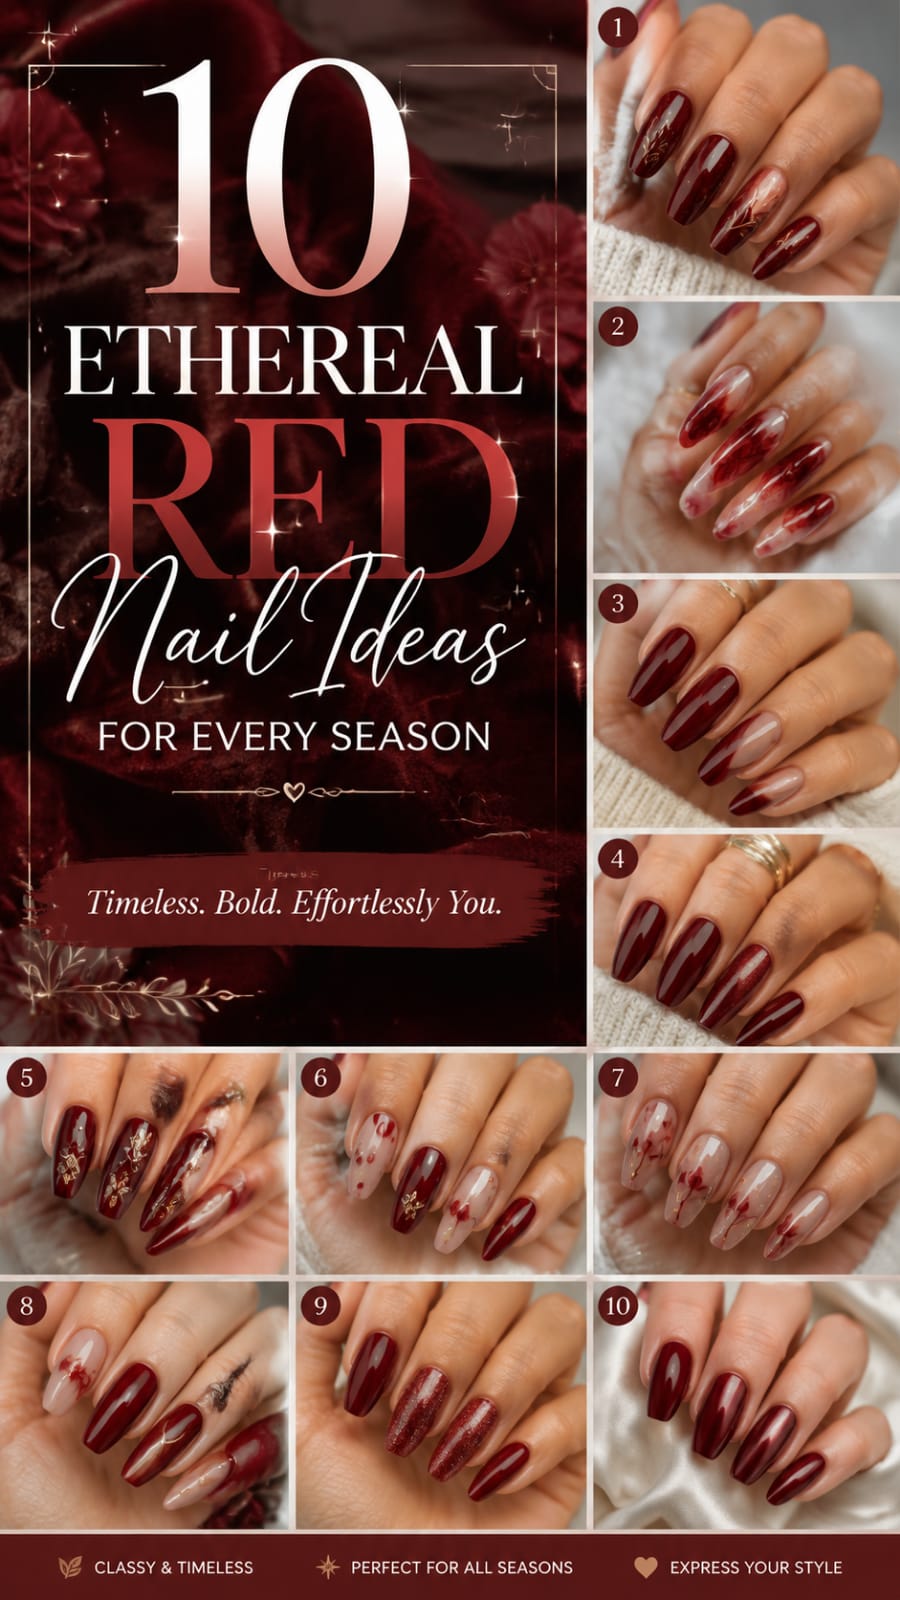
Welcome to the definitive guide for transforming classic red manicures into breathtaking, ethereal works of art. Red nail polish has always held a special place in beauty history. It symbolizes power, romance, confidence, and timeless sophistication. However, modern nail design has evolved far beyond traditional solid coatings. By combining rich red pigments with cutting-edge optical effects—such as pearlescent glazes, magnetic velvet shimmers, translucent jelly suspensions, liquid gold foils, and dimensional gel sculpting—you can achieve nail art that feels utterly dreamlike, luminous, and enchanting.
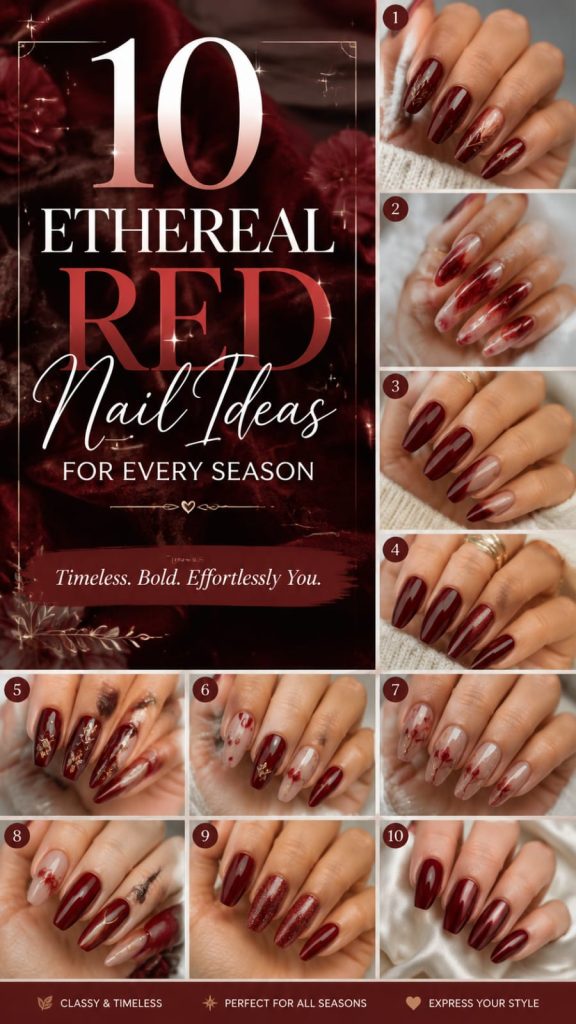
Whether you are looking for soft, blooming florals for spring, sun-drenched golden glass for summer, celestial galaxy magic for autumn, or frosted velvet shine for winter, this comprehensive handbook covers every technical detail. Each design concept in this guide is specifically crafted to balance bold color with translucent lightness. Let’s dive into additionally these ten master-level nail ideas and elevate your nail artistry for every season of the year.
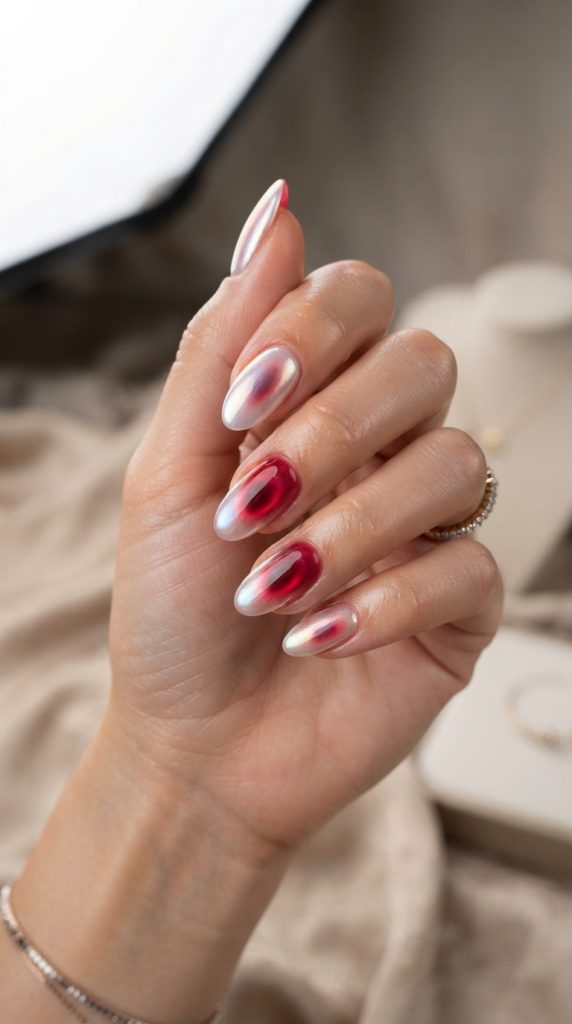
1. Translucent Cherry Jelly with Chrome Aura
Step 1: Preparing the Natural Nail Plate for Maximum Translucency
Achieving a true ethereal finish begins with flawless surface preparation. Start by gently pushing back your cuticles using a sanitized pusher, ensuring all dead skin clinging to the nail bed is carefully removed. Buff the natural surface lightly with a fine 240-grit buffer block to eliminate shine without thinning the nail plate. Cleanse the entire nail thoroughly with a lint-free wipe saturated in a 70% isopropyl alcohol and pure acetone mix to remove oils, dust, and moisture completely.
Next, apply a thin coat of dehydrator followed immediately by an acid-free primer to guarantee long-lasting gel adhesion. Choose a completely transparent, self-leveling base coat. Apply it sparingly from the cuticle down to the free edge, making sure to cap the tip to prevent future lifting. Cure this base layer under a 48W LED lamp for exactly thirty seconds. This invisible, glass-like foundation is critical because any cloudiness or texture on the natural nail will disrupt the clear, luminous depth of your sheer red jelly polish layer.
Step 2: Applying the Sheer Cherry Base Suspension
The magic of a jelly manicure lies in its high transparency and suspended color pigments. Rather than using an opaque creme polish, select a glass-like cherry jelly gel polish formula. If you do not own a pre-mixed jelly shade, you can easily create your own by mixing three drops of vibrant cherry red gel polish with ten drops of clear gel top coat on a sanitized metal palette until fully blended.
Apply the first coat of your cherry jelly mix using a flat gel application brush. Use long, smooth, continuous strokes starting two millimeters away from the cuticle line, gliding down toward the free edge. Keep the layer extremely thin to maintain high transparency. Cure for sixty seconds under your LED light. Repeat with a second ultra-thin layer if you desire a slightly deeper tint, but ensure the natural white moon of your nail bed remains subtly visible underneath. This sheer suspension creates an optical depth that reflects ambient light effortlessly.
Step 3: Stippling and Blending the Central Red Aura
An aura effect creates the illusion of a glowing energy field emanating directly from the center of your nail bed. Additionally to construct this seamless color transition, take a high-density, fine-pored cosmetic wedge sponge or a dedicated silicone nail art stamper. Place a small drop of highly pigmented, non-jelly crimson or deep ruby red gel paint onto a mixing palette. Dab the tip of your sponge or stamper lightly into the pigment, ensuring you blot off any excess paint onto a paper towel until the sponge leaves only a faint, diffused haze of color.
Press the sponge directly onto the exact center of your cured cherry jelly nail. Use gentle, bouncing, tapping motions, gradually expanding outward in concentric circles. As you work toward the outer edges of the nail plate, decrease the pressure to ensure the pigment fades smoothly into the lighter jelly background without leaving harsh lines or visible sponge textures. Cure this aura layer for thirty seconds to freeze the soft gradient in place before proceeding to the finishing steps.
Step 4: Infusing Iridescent Chrome Powder
To give your central aura a truly ethereal, light-shifting glow, you will need a ultra-fine, white iridescent chrome powder with a subtle pink or green color shift. Apply a non-wipe top coat strictly over the center aura circle and cure it for fifteen to twenty seconds so it remains slightly warm and tacky.
Additionally,Dip a soft silicone applicator brush or a clean eyeshadow applicator into a tiny amount of your iridescent chrome powder. Gently buff the powder over the central aura in small circular motions. The chrome particles will bind to the warm top coat, creating a magical, light-reflecting halo that glows whenever your hands catch natural sunlight. Carefully sweep away any loose chrome dust from the surrounding nail areas using a large, soft fan brush to keep the surrounding jelly background crisp and clean.
Step 5: Sealing and Capping with High-Gloss Gel Bulks
Additionally,The final step requires encapsulating your multidimensional artwork beneath a crystal-clear, protective shield that enhances optical clarity. Select a thick, self-leveling builder gel or a plumping, non-wipe glass top coat. Pick up a generous bead of top coat with your brush and place it near the center of the nail bed.
Gently float the brush over the surface without applying heavy downward pressure, allowing the gel to level out smoothly over the chrome powder and jelly base. Turn your finger upside down for three to five seconds prior to curing to allow gravity to pull the gel into a perfect, natural apex. Return your hand to its normal position and cure immediately under your LED lamp for a full sixty seconds. Wipe the surrounding skin with cuticle oil to restore moisture, leaving your translucent cherry jelly aura set looking plump, glossy, and ethereal.
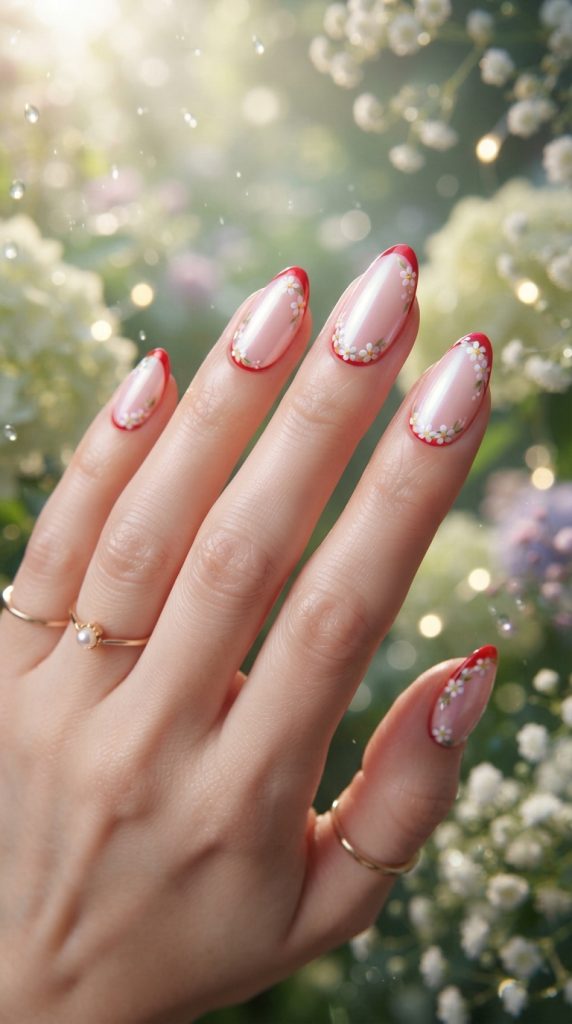
2. Pearl-Dusted Floral French Tips
Step 1: Base Application and Neutralizing the Nail Bed
Additionally to romantic floral French tip requires a clean, flawless background that hides natural nail discolorations while maintaining an airy, soft aesthetic. Begin in by prepping your nails using standard manicure protocols, ensuring the shape is filed into a delicate almond or soft square silhouette. Apply your preferred primer and clear base coat, curing for thirty seconds.
Select a semi-sheer, milky pink or soft nude builder gel that complements your skin’s undertones. Apply a thin coat over the entire nail, then place a second, slightly thicker drop near the cuticle, blending it down toward the tip to create a smooth, natural gradient. This masks any unevenness in your natural nail plate while creating a healthy, luminous canvas. Cure this background coat completely for sixty seconds under your LED lamp before attempting any fine art details.
Step 2: Mapping and Painting Precision Micro French Tips
Classic French tips can sometimes look heavy, but micro French tips keep the design delicate and contemporary. Dip a zero-gauge, long-hair liner brush into a richly pigmented strawberry-red gel paint. Wipe excess paint from the brush ferrule so only a tiny, controlled bead remains at the tip of the bristles.
Find the exact center point of your free edge and place a tiny dot to mark your guide. From the left lateral side wall, draw a sweeping, paper-thin line following the natural curve of your finger, connecting it smoothly to the center guide dot. Repeat the process from the right side wall to complete a symmetrical, ultra-thin crescent. Fill in the tip area carefully, keeping the line no wider than one to two millimeters. Repeat on all fingers and cure under your LED lamp for thirty seconds to lock the clean edge.
Step 3: Hand-Crafting Delicate Petals and Botanicals
With your micro red French tips secured, you can now layer delicate floral art along the smile line. Place tiny dots of non-wipe white gel paint onto your palette alongside a soft pastel-pink shade. Using a tiny dotting tool, place four or five microscopic dots in a tight circle directly along the boundary where your red tip meets the nude base.
Take a fine detail brush and pull the outer edge of each dot inward toward the center point to shape soft, teardrop-shaped flower petals. Add tiny green leaves or sweeping tendrils branching out from the blossoms using a light olive or sage green gel paint. To give the flowers realistic depth, use a micro dotting tool to place a pinpoint of metallic gold paint in the exact center of each bloom. Cure the hand-painted botanicals for thirty seconds.
Step 4: Buffing the Pearl-Dust Chrome Glaze
The secret to blending the distinct painted elements into a cohesive, dreamy look is applying an all-over pearl chrome glaze. Apply an even layer of non-wipe top coat across the entire nail plate, covering both the nude base and the floral French artwork. Cure for precisely fifteen seconds in a 48W lamp to achieve the ideal tacky texture required for powder adhesion.
Using a clean silicone tool, pick up a microscopic amount of white pearl chrome powder. Smooth the powder evenly across the nail from cuticle to tip using light, sweeping vertical motions. Watch as the stark white and red pigments transform under a soft, milky, light-shifting luster that mimics real mother-of-pearl. The chrome powder subdues the contrast, giving the impression that the flowers and red tips are glowing from beneath an iridescent veil.
Step 5: Capping for Longevity and Edge Protection
Because chrome powders can rub off along the free edge if not sealed correctly, the final capping step must be executed with extreme precision. Take a fine-grit buffer file and gently swipe it once along the very edge of your nail tip to remove any chrome powder clinging directly to the edge of the free plate. This creates a clean bonding surface for your top coat to adhere to the underlying gel.
Apply a layer of acid-free gel primer exclusively along the freshly exposed edge. Next, apply a generous layer of high-gloss, scratch-resistant gel top coat across the entire nail. Ensure you sweep the brush along the free edge to cap the tip completely. Cure under your LED lamp for a full ninety seconds to guarantee maximum durability, shine, and chip resistance.
3. Glass Red Ombré with Gold Leaf
Step 1: Laying a Smooth Crystal-Clear Foundation
A glass ombré design relies entirely on structural clarity to produce a three-dimensional visual effect. After performing your preliminary nail prep and cuticle cleanup, apply a clear acid-free primer over the natural nail. If you are creating extensions, build the length using crystal-clear hard gel or clear full-coverage tips to ensure zero cloudiness.
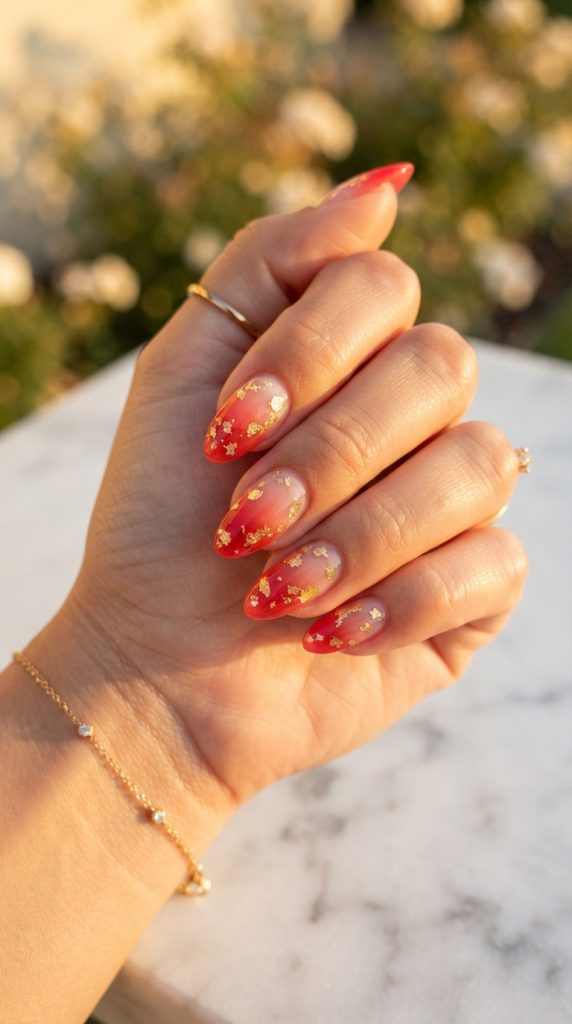
If working on natural nails, apply a clear structure gel or builder gel in a bottle to level out the nail plate completely. Cure for sixty seconds. Ensure the surface is completely smooth; if any ridges remain, wipe the tacky layer with cleanser and buff the surface lightly with a 180-grit buffer until it is perfectly flat. Wipe away all residual dust thoroughly before applying your translucent colors.
Step 2: Sponging the Glass Red Gradient
Select a bright poppy-red or fiery translucent jelly polish. Pour a small quantity onto your nail palette. Take a latex-free wedge sponge and lightly coat the flat edge with the red jelly polish. Tap the sponge onto a clean section of your palette first to remove excess polish and avoid creating large air bubbles on your nail.
Begin tapping the sponge onto the outer third of your nail bed, concentrating the richest color at the free edge. Gradually lighten your tapping pressure as you move upward toward the mid-point of the nail bed, allowing the color to feather into complete clarity before reaching the cuticle. If Cure this first gradient coat for thirty seconds. Repeat this process two to three times, building deep, rich red saturation exclusively at the tip while keeping the transition zone completely soft and seamless.
Step 3: Precision Placement of Real Gold Leaf
Gold leaf adds a luxurious, antique element to the transparent gradient. Instead of applying large, heavy sheets of foil, you want delicate, floating fragments that look as if they are suspended inside liquid glass. Using precision tweezers or a wooden cuticle stick dipped in a touch of clear gel, tear off tiny, irregular flecks of genuine gold leaf foil.
Place these gold fragments strategically along the gradient transition zone—where the sheer red jelly fades out into the clear base layer. Scatter smaller pinpoints of gold upward toward the cuticle area and cluster slightly larger pieces down toward the red tip. Press each foil piece gently onto the tacky layer of your cured jelly gel using a soft silicone color shaper, ensuring no foil edges stick up above the surface profile.
Step 4: Encapsulating artwork under Clear Builder Gel
To give the design its characteristic “glass” depth, the gold leaf and red gradient must be fully submerged beneath a thick layer of clear builder gel. Apply a slip layer of thin clear gel over the entire nail without curing it. While this layer is still wet, place a medium-sized bead of clear hard gel or builder gel directly over the center of the nail plate.
Guide the bead using a fine liner brush, dragging the clear gel over the gold leaf and red gradient toward the side walls and free edge. The wet slip layer will allow the clear gel bead to flow smoothly without creating trapped air bubbles. Allow the gel to self-level for five seconds, checking from the side profile to confirm a smooth curve across the entire nail. Cure under your LED lamp for sixty seconds.
Step 5: Final Shaping, Buffing, and High-Shine Sealing
Because encapsulating art adds thickness, you must refine the nail shape to keep the overall profile elegant and slim. Wipe away the sticky inhibition layer from the cured builder gel using a lint-free pad soaked in isopropyl alcohol. Use a 150-grit hand file to crisp up your side walls, lower lateral lines, and free edge shape.
Buff the entire surface with a 220-grit buffer until it is completely smooth, then wipe away all file dust with cleanser. Apply a coat of non-wipe glass top coat over the refined surface, ensuring total coverage from edge to edge. Cure for a final sixty seconds under your LED lamp. The result is an opulent, light-catching red glass ombré featuring gold leaf floating gracefully within.
Here is Part 2 of our definitive masterclass guide, delving into points 4 through 6 with the same extensive depth, precise technical steps, and Pinterest-ready styling advice.
4. Coral-Red Velvet Cat-Eye
Step 1: Base Coat Application and Color Palette Selection
Additionally,Creating a breathtaking velvet effect relies on picking the right foundational shades and applying a clean base layer. Start by prepping your natural nails through careful cuticle management and gentle surface buffing. Cleanse the nail bed thoroughly with alcohol to eliminate lingering oils. Apply a flexible base gel coat evenly, ensuring the free edge is capped, and cure under your 48W LED lamp for thirty seconds.
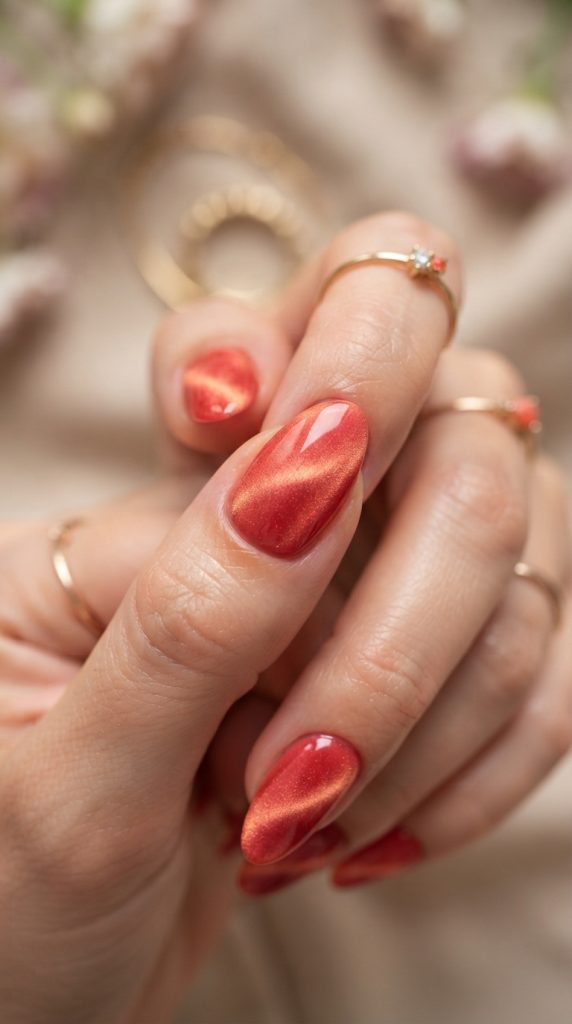
For the ultimate ethereal glow, select a magnetic cat-eye gel polish infused with a warm coral-red hue and high-density, micro-fine iron particles. The coral-red base delivers a youthful, radiant warmth that reflects natural sunlight magnificently. Apply an even, medium-density coat of this magnetic gel across the nail bed, working on one finger at a time so the magnetic particles remain fluid and moveable.
Step 2: Multi-Directional Magnetic Particle Manipulation
To transform a standard cat-eye line into a plush, multi-dimensional velvet sheen, you must move the magnetic particles across the entire nail rather than pulling them into a single crisp streak. Take a strong rectangular neodymium nail magnet and hold it perpendicular to the side wall of your nail, about two millimeters above the wet gel. Hold it steady for three to five seconds to push the metallic shimmer away from that edge toward the center.
Repeat this process along the opposite side wall, the cuticle area, and the free edge. By repelling the magnetic particles from all four outer boundaries simultaneously, the shimmering iron dust rises upward, floating evenly across the central surface of the nail bed. This dispersed cloud creates a 3D velvet texture that catches ambient light from every angle.
Step 3: Flash-Curing and Locking the Velvet Shimmer
Additionally, magnetic particles begin to settle back into the liquid gel over time, speed is essential to preserving a crisp, high-contrast velvet texture. Immediately after completing your magnetic manipulation on a finger, flash-cure the nail under a handheld mini LED light or place it inside your main lamp for ten seconds. This instantly freezes the suspended particles in place.
Proceed through the rest of your fingers individually, manipulating the particles and flash-curing each nail. Once all five fingers on one hand are complete, perform a full sixty-second cure under your main LED lamp. This locks the structural integrity of the gel matrix, ensuring the velvet shimmer remains vibrant and sharp for weeks.
Step 4: Layering Translucent Tints for Depth Enhancement
To elevate your coral-red velvet finish into something truly otherworldly, layer a sheer jelly top-tint over the cured cat-eye base. Mix a single drop of neon peach or clear strawberry jelly gel with your clear top coat on a palette. Apply a thin layer of this custom translucent mixture directly over the cured magnetic surface.
This translucent layer acts like a tinted glass lens over the suspended metallic shimmer. As light passes through the sheer top tint and bounces off the metallic particles below, it intensifies the optical depth and color saturation. Cure this custom jelly layer for thirty seconds under your LED light.
Step 5: Capping with Plumping Glass Top Coat
Finish your velvet manicure by applying a thick, self-leveling glass top coat. Place a small bead of top coat at the upper third of the nail plate, floating the brush gently downward to avoid trapping tiny air bubbles. Allow the gel to self-level naturally across the curved apex of your nail for three seconds.
Perform a final sixty-second cure under your LED lamp to seal the manicure under a scratch-resistant, mirror-like finish. Rub a nourishing vitamin E cuticle oil around the surrounding skin to restore hydration. The resulting coral-red velvet manicure shifts continuously as your hands move, mimicking touchable silk ribbon.
5. Deep Crimson Galaxy Nails
Step 1: Laying the Midnight Crimson Canvas
Cosmic galaxy nail art requires a deep, saturated backdrop to make celestial elements pop with high contrast. After completing standard nail preparation and applying a clear base coat, select an ultra-pigmented dark crimson or deep oxblood red gel polish. Apply two thin, smooth coats across the nail, curing each coat for sixty seconds under your LED lamp.
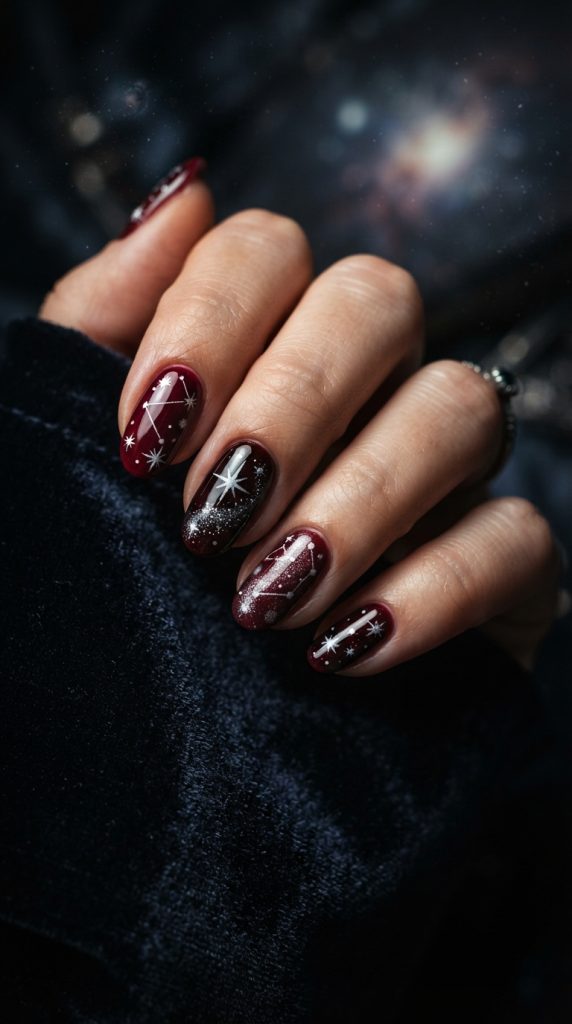
Ensure the application is completely opaque without streaks or pooling near the lateral skin folds. This dark red background serves as deep space, providing rich, moody tone variation that differentiates this ethereal look from classic black galaxy designs. Allow the base coat to cure completely before layering your starry artwork.
Step 2: Sponging Multidimensional Nebula Clouds
To build realistic interstellar nebulae, you will layer different color densities and shimmer textures. On a sanitized mixing palette, place small drops of bright ruby-red gel, vibrant violet gel, and fine silver micro-glitter polish. Cut a small, high-density cosmetic sponge into triangular wedges.
Dab the corner of a sponge wedge into the silver micro-glitter, blotting excess polish onto a paper towel. Lightly stipple the glitter diagonally across the nail bed in an organic, sweeping cloud shape. Using a fresh sponge edge, stipple the bright ruby and violet pigments around the edges of the silver glitter trail. This blending technique creates a glowing, dimensional nebula suspended over the deep crimson canvas. Cure for thirty seconds.
Step 3: Fine-Line Celestial Painting and Starburst Details
With your starry nebula foundation cured, take a zero-gauge detail liner brush and crisp white gel paint. Dip only the micro-tip of your brush into the paint to maintain ultimate control over line thickness. Paint delicate four-point starbursts along the brightest sections of your nebula trail.
Draw a vertical line tapering at both ends, crossed by a shorter horizontal line through the middle. Add tiny pinpoint dots surrounding the main starbursts using a micro-dotting tool to simulate far-off planetary systems and star dust. Keep your hand light and relaxed to ensure the white artwork remains crisp and ultra-fine. Cure for thirty seconds under your lamp.
Step 4: Applying Iridescent Cosmic Dust
To give your galaxy a dreamlike, ethereal shimmer, incorporate micro-fine iridescent dust. Apply a thin layer of non-wipe top coat over your painted starbursts and cure for fifteen seconds until slightly tacky. Dip a soft fan brush into iridescent unicorn dust powder featuring a subtle blue-to-pink color shift.
Lightly tap the fan brush above the nail bed, allowing the cosmic dust particles to sprinkle randomly over the surface like distant galaxies. Avoid buffing the powder flat; allowing the microscopic flakes to rest loosely on the tacky top coat enhances the textured, light-scattering effect. Gently brush away stray particles resting along the surrounding cuticle skin.
Step 5: Encapsulating Space under Crystal-Clear Gel
Protect your intricate celestial artwork beneath a crystal-clear layer of builder gel or plumping top coat. Applying a generous coat of clear gel levels out the multi-layered paint, glitter, and dust particles, creating a completely smooth, glass-like finish.
Float the clear top gel smoothly from cuticle to free edge, taking care to cap the tip thoroughly to seal in the fine line work. Cure under your LED lamp for a full ninety seconds. The final look delivers breathtaking visual depth, giving the impression that you are gazing straight through clear glass into an enchanted red galaxy.
6. Frosted Ruby Glaze
Step 1: Achieving an Opaque Ruby Red Base
A frosted ruby glaze design combines classic beauty with a modern, icy finish. Begin with full cuticle prep, surface dehydration, and an acid-free primer coat. Apply a high-adhesion clear base gel and cure for thirty seconds. Next, select a rich, jewel-toned ruby red creme polish.
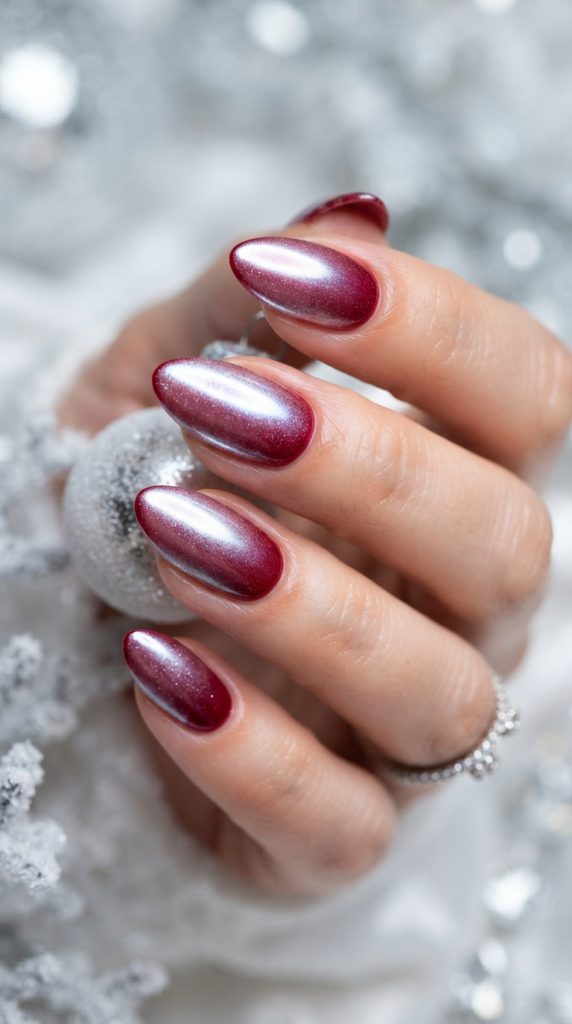
Apply two thin, even layers of this ruby shade, ensuring flawless coverage without streaks or patchiness. The richness of the red pigment beneath determines the warmth and vibrancy of the finished look. Cure each coat for sixty seconds under your 48W LED light to build a resilient, fully cured color foundation.
Step 2: Applying the Non-Wipe Curing Layer for Chrome Adhesion
The secret to achieving an even, frosted chrome sheen without grainy texture lies in the curing time of your top coat. Apply an ultra-thin, smooth layer of non-wipe gel top coat over your cured ruby base. Ensure there are no dust specs or brush strokes present in the wet coat.
Cure under your LED lamp for precisely fifteen to twenty seconds (adjust based on your lamp’s wattage). Curing for too long renders the top coat too slick for powder to stick, while under-curing will cause the chrome powder to sink into wet gel and look muddy. The surface should feel completely smooth, warm, and slightly dry with minimal residual tackiness.
Step 3: Buffing the White Mermaid Chrome Powder
Select a micro-fine white mermaid or glazed donut chrome powder featuring subtle pink and icy blue iridescence. Dip a clean silicone applicator or a soft eyeshadow sponge into a tiny amount of powder. A little powder goes a long way, so tap off any excess back into the jar.
Starting at the center of the nail, buff the powder gently into the warm non-wipe top coat using small, circular motions. Work outward toward the side walls and cuticle line. Watch as the bold ruby base transforms instantly into a frosty, light-reflecting metallic pearl. Continue buffing lightly until the surface exhibits a mirror-like finish free of visible powder specks.
Step 4: Refining the Free Edge for Maximum Chrome Durability
Because chrome powders can prone to chipping along the tips, proper edge refinement is critical before applying the final top coat. Take a fine 240-grit buffer or file and hold it at a 90-degree angle to the free edge of your nail. Gently swipe down once to remove any microscopic chrome dust adhering to the raw edge of the natural nail.
Wipe away loose dust using a dry, lint-free wipe. Apply a tiny amount of acid-free gel primer exclusively along the very edge of the free tip. This creates a sticky chemical bond that allows your sealing top coat to lock onto the underlying gel layer, preventing future peeling or flaking.
Step 5: Capping with High-Gloss Top Coat
To lock in your frosted ruby glaze, select a scratch-resistant, high-gloss non-wipe top coat. Apply a generous layer across the entire nail plate, taking care to cover the buffed chrome powder completely. Sweep the brush along the free edge to cap the tip securely.
Cure under your LED lamp for a full ninety seconds to guarantee maximum durability and liquid shine. Finish by massaging a drop of nourishing jojoba cuticle oil around the nail matrix. The end result is an icy, light-shifting ruby manicure that captures the magic of winter frost catching morning light.
7. Red Velvet Cat-Eye with Cherry Accents
Step 1: Base Coat and Selective Polish Placement
Creating a mixed-finish set that combines magnetic velvet textures with negative-space nail art requires strategic planning. Begin by preparing all ten natural nails, completing cuticle removal, dehydrating the nail plate, and applying a clear base coat. Cure under your LED lamp for thirty seconds.
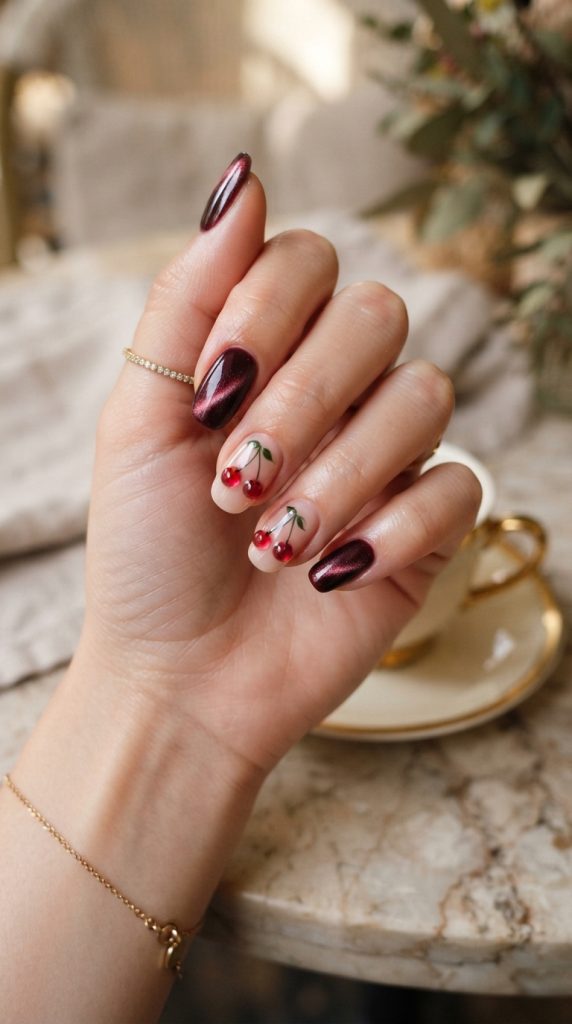
For your main accent fingers—typically the ring and middle fingers—apply a sheer, skin-complementing nude base coat to establish a clean canvas for your micro-art. For the remaining fingers, apply an even layer of dark cherry-red magnetic cat-eye polish. Keeping the accent nails neutral balances the dramatic velvet texture on the adjacent fingers.
Step 2: Custom Velvet Magnetic Dispersion
On the fingers painted with magnetic polish, hold a high-powered rectangular neodymium magnet flat above the center of the wet nail. Move the magnet slowly around the perimeter of the nail bed, pulling the iron particles toward the surface while dispersing them outward toward the edges.
This creates an all-over, luminous velvet sheen that glows from every angle rather than a sharp single streak. Flash-cure each velvet finger immediately for ten seconds using a handheld mini LED light to freeze the floating particles in place before they settle back into the liquid gel. Once all velvet nails are complete, perform a full sixty-second cure in your main lamp.
Step 3: Mapping and Painting Precision 3D Cherries
Turn your attention to the nude accent fingers. Dip a medium-sized dotting tool into a rich, highly pigmented crimson gel paint. Place two small, perfectly round dots side by side near the center or lower third of the nail bed to form the cherry bodies. Ensure the drops sit slightly raised to give the cherries a subtle three-dimensional profile.
Take a zero-gauge detail liner brush and dark forest green gel paint. Draw two paper-thin, sweeping stems extending upward from the top of each cherry, joining them together at the apex with a delicate green leaf motif. Cure this detailed artwork under your lamp for thirty seconds to lock the shapes.
Step 4: Highlighting and Adding Optical Depth
To make the hand-painted cherries pop against the nude background, dip the tip of your micro liner brush into crisp white gel paint. Add a tiny, crescent-shaped highlight mark along the upper-right edge of each cherry circle. This simple white highlight simulates a light reflection, giving the painted fruit a glossy, 3D appearance.
Apply a microscopic drop of clear builder gel directly over each cherry body using a dotting tool. Do not flatten the gel; allow it to bead up into a tiny clear dome over the red pigment. Flash-cure for ten seconds. This rounded gel dome magnifies the red pigment underneath, making the cherries look like real glass beads resting on your nail.
Step 5: Final Sealing and Texture Contrast
To preserve the distinct visual elements of this set, apply a high-gloss non-wipe top coat across all ten nails. Ensure you float the top coat smoothly over the raised cherry artwork on the accent fingers, filling in any gaps around the stems while maintaining the clean background.
Cure under your LED lamp for a full ninety seconds. Once cured, apply a drop of hydrating cuticle oil around the nail walls and massage gently. The finished design merges touchable velvet shimmer with playfulness, creating a perfectly balanced aesthetic.
8. Icy Red Sparkle Gradient
Step 1: Laying the Milky White Base Canvas
Additionally, icy sparkle gradient relies on a soft, semi-opaque background that mirrors cold winter frost. After completing standard nail prep and applying a clear base coat, select a milky white or soft translucent pink builder gel. Apply a thin slip layer across the entire nail plate, followed by a small bead placed near the upper third of the nail.
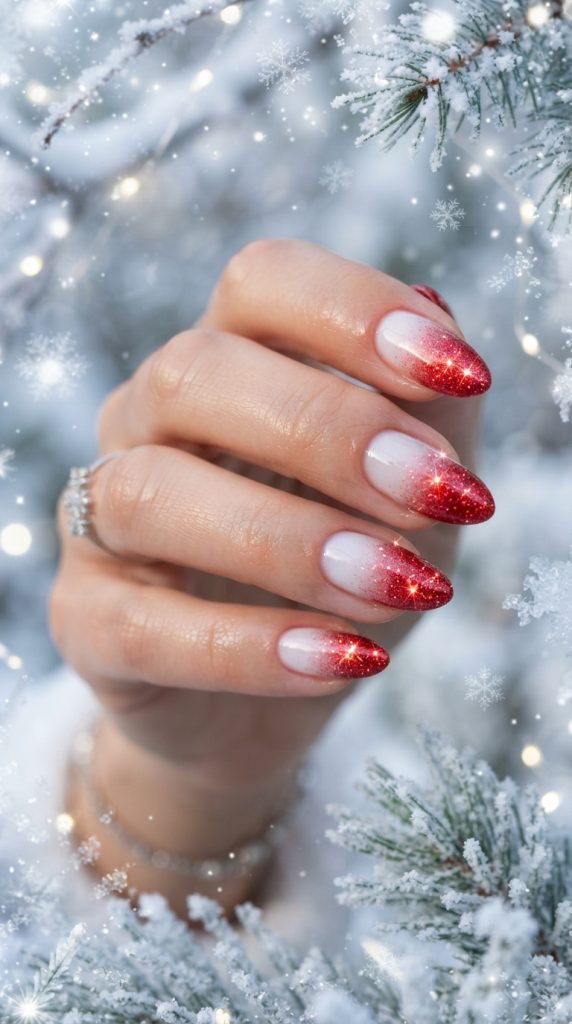
Additionally, Guide the gel downward toward the free edge using a fine liner brush, creating a smooth, level surface that subtly hides natural nail imperfections. The semi-translucent quality of the milky base provides a soft backdrop that enhances the contrast of the red glitter applied over top. Cure for sixty seconds under your LED lamp.
Step 2: Applying the Concentrated Reflective Glitter Tip
Select a high-density red reflective glitter gel polish containing micro-diamond particles that catch harsh artificial light and direct sunlight. Place a concentrated bead of this glitter gel along the free edge of your nail using a small gel brush.
Avoid spreading the glitter evenly over the entire nail; concentrate eighty percent of the shimmer along the top third of the nail tip. This heavy concentration establishes the ground point for your gradient fade, ensuring the free edge looks rich, sparkling, and fully covered.
Step 3: Feathering and Blending the Gradient Fade
To create a smooth gradient fade toward the cuticle, take a clean fan brush or a fine-bristle ombré brush. Hold the brush at a low 15-degree angle to the nail surface and gently sweep the glitter particles downward toward the mid-point of the nail bed.
Use light, flicking motions to drag individual glitter flecks lower down the nail while leaving the bulk of the pigment concentrated at the tip. This technique eliminates harsh lines, producing a soft transition that mimics falling snow. Cure the glitter gradient layer for thirty seconds under your LED light.
Step 4: Layering Iridescent Snowflake Accents
To enhance the icy theme, introduce a layer of micro-fine iridescent flakies or unicorn dust. Apply a thin layer of clear blooming gel or tacky base coat over the gradient area without curing it. Using a soft fan brush, lightly sprinkle iridescent flakes over the upper half of the nail, allowing them to stick randomly to the wet gel.
The translucent flakes catch green, violet, and gold light shifts, adding secondary depth to the red reflective glitter underneath. Cure for thirty seconds to lock the flakes into the gel matrix.
Step 5: Encapsulating and Leveling the Sparkle
Because glitter and decorative flakes leave a textured surface, you must encapsulate the design under a leveling layer of clear top coat or builder gel. Apply a generous bead of plumping, non-wipe top coat over the entire nail, floating the brush gently from cuticle to tip.
Check the side profile of the nail to confirm the top coat has completely leveled out any glitter bumps. Cure under your LED lamp for a full ninety seconds. The resulting icy red sparkle gradient delivers high-voltage shine that catches the light with every movement.
9. Rose Quartz & Red Fluid Marble
Step 1: Foundation and Color Palette Assembly
Creating a natural fluid marble design requires layering translucent jellies and opaque pigments over a wet gel base. Begin by completing standard nail prep, applying an acid-free primer, and curing a clear base coat for thirty seconds. Next, apply two coats of a pale, sheer blush pink gel polish to mimic the base tone of real rose quartz crystal. Cure for sixty seconds.
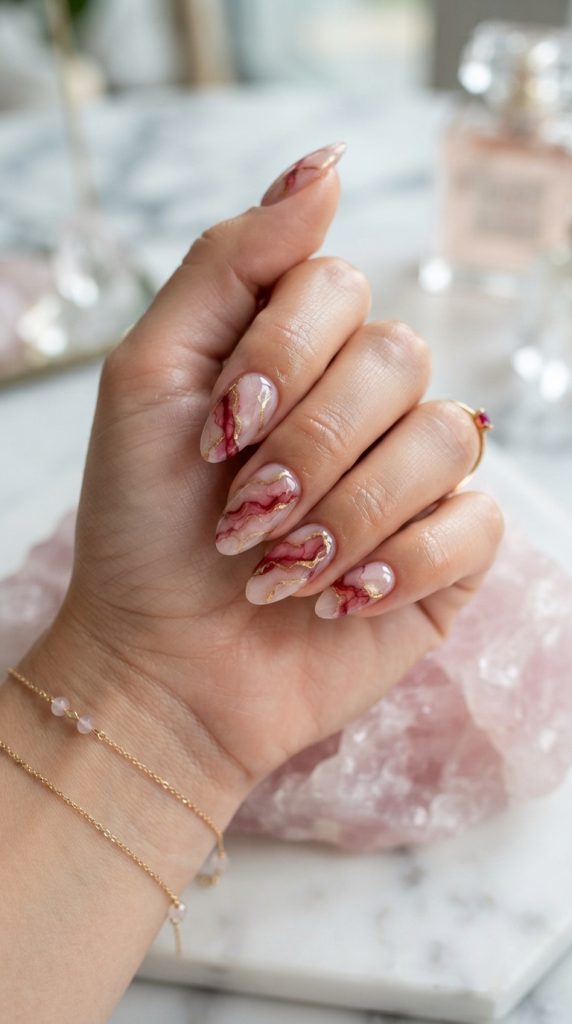
On a sanitized palette, place small, separate drops of translucent ruby red jelly polish, crisp white gel paint, and a touch of sheer peach gel. Having your colors prepared ahead of time ensures you can work quickly while your blooming gel layer remains wet and workable.
Step 2: Applying the Blooming Gel Base
Apply an even coat of clear blooming gel over your pale pink background. Do not cure this layer. Blooming gel is a specialized, low-viscosity uncured clear gel that forces any wet polish placed on top of it to disperse and spread outward organically.
Ensure the blooming gel layer is completely smooth and thin; applying too thick a layer will cause your swirled marble lines to bleed too quickly and lose their defined structure.
Step 3: Swirling Fluid Organic Veins
Dip a long, flexible striping brush into your ruby red jelly polish. Gently touch the tip of the brush to the wet blooming gel, dragging sweeping, jagged diagonal lines across the nail plate to recreate the natural fracture lines found in raw gemstones.
While the red pigment spreads outward, dip your brush into the white gel paint and trace thin, delicate accent lines directly along the inner edges of the red veins. The white and red pigments will bleed into each other softly, forming organic marble transitions. Cure immediately under your LED lamp for thirty seconds to stop the color dispersion once you are happy with the pattern.
Step 4: Tracing Metallic Mineral Deposits
Real quartz crystals often feature tiny metallic mineral inclusions trapped within their layers. Take a zero-gauge detail brush and liquid gold chrome gel paint. Trace ultra-fine, razor-thin lines along the fractures where the marble veins meet the translucent background.
Keep your application light and irregular, placing tiny metallic flecks along some sections while leaving other areas smooth. This metallic detailing adds a high-end, jewelry-like feel to the stone pattern. Cure under your LED light for thirty seconds.
Step 5: Capping with a Plumping Gemstone Finish
To give the marble artwork authentic stone depth, encapsulate the entire design beneath a thick, self-leveling builder gel or plumping top coat. Apply a generous bead of top coat near the center of the nail, allowing it to level out naturally across the arch.
Turn your hand upside down for three seconds prior to curing to allow gravity to pull the gel into a smooth apex. Return to normal position and cure under your LED lamp for a full ninety seconds. The final result looks like a polished piece of natural rose quartz stone.
10. Minimalist Crimson Foil Strokes
Step 1: Base Application and Matte Prep
A minimalist mixed-texture design relies on dramatic contrast between a flat, non-reflective background and glossy, raised artwork. Start by preparing your natural nails, applying an acid-free primer, and curing a clear base coat for thirty seconds. Apply two coats of an opaque, neutral nude gel polish that matches your skin’s natural undertones, curing each coat for sixty seconds.
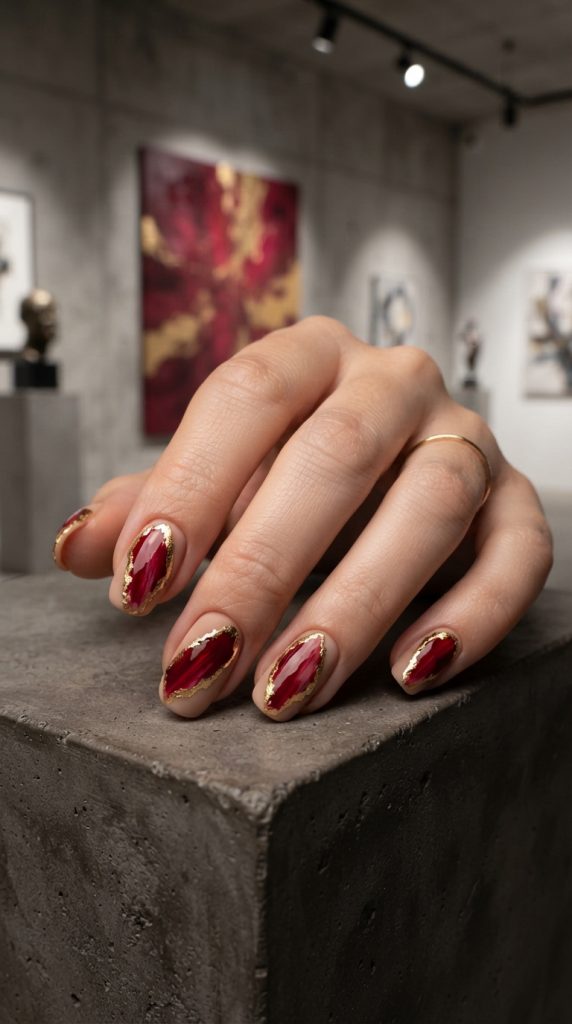
Apply a high-grade, velvety matte top coat over the cured nude polish. Ensure the application is smooth and completely covers the nail bed without leaving shiny streaks. Cure for sixty seconds, then wipe the surface thoroughly with a lint-free pad soaked in isopropyl alcohol to remove all residual oils.
Step 2: Painting Organic Crimson Art Strokes
Dip a medium-sized flat gel brush or a square-ended art brush into an opaque, deep crimson red gel polish. Wipe excess paint from one side of the brush ferrule so only one flat edge holds pigment.
Place the brush onto the matte nude surface at a 45-degree angle. Press down firmly, then drag the brush diagonally across the nail in a single, confident stroke, relaxing your pressure at the end to taper the mark. Allow the edges of the stroke to look raw and textured. Paint one or two strokes per nail, leaving plenty of negative space. Cure for thirty seconds.
Step 3: Pressing Foil Accents
To give the painterly strokes an elevated edge, incorporate metallic gold transfer foil. Apply a thin line of foil transfer glue along one edge of your painted crimson stroke using a fine detail brush. Cure the transfer glue under your lamp for thirty seconds until it becomes completely clear and tacky.
Cut a small strip of metallic gold transfer foil. Press the matte side of the foil firmly onto the tacky glue line using a silicone tool or your thumb. Rub firmly for five seconds, then peel the foil strip away in a quick motion. The gold foil will transfer cleanly onto the sticky edge, leaving a bright metallic outline along the red stroke.
Step 4: Selective Gloss Capping
To preserve the eye-catching contrast between the matte background and the art strokes, apply your final top coat selectively. Dip a fine detail brush into a high-gloss non-wipe top coat. Carefully paint the gloss coat only over the raised crimson stroke and its gold foil edge, taking care not to spill any shiny gel onto the surrounding matte nude background.
This selective coating creates a dual-texture finish where the glossy red art appears to rest on top of a soft suede base. Cure under your LED lamp for sixty seconds.
Step 5: Final Inspection and Skin Hydration
Inspect the finished set under a good light source to ensure the contrast between the matte background and the glossy, foiled artwork remains crisp. Apply a light drop of cuticle oil to the surrounding skin, keeping it away from the nail plate to maintain the velvety matte texture. This minimalist crimson foil design offers a chic, gallery-ready look that feels modern and refined.
Leave a Reply