
Autumn brings a distinct shift in fashion trends, personal styling, and seasonal craft rituals. As October approaches, planning your festive jewelry collection becomes an exciting creative priority. Handcrafting bespoke halloween earrings with polymer clay allows you to express your imagination with charm and artisanal flair.

Polymer clay has revolutionized modern handmade jewelry through its versatility, lightweight comfort, and endless color mixing potential. You can blend custom autumn palettes, stamp delicate floral textures, and sculpt miniature seasonal icons effortlessly. The cured material remains remarkably durable, ensuring your favorite wearable art pieces last for years.
Whether you favor minimalist dangling ghosts, terracotta jack-o’-lanterns, or celestial moons, clay provides the ideal medium. Modern jewelry enthusiasts appreciate the blend of clean Scandinavian minimalism with playful holiday motifs. Handcrafted earrings also make thoughtful, stylish gifts for friends, family members, and coworkers during the festive season.
Executing professional-grade clay jewelry requires understanding proper conditioning, precision cutting, oven curing, and assembly methods. Mastering these fundamental techniques guarantees strong, smooth, and lightweight earrings that turn heads at every gathering.
Explore ten fun, stylish polymer clay earring ideas designed to elevate your autumn accessory rotation. Each section covers aesthetic blueprints, required tools, step-by-step crafting methods, and essential assembly ways.
1. Dainty Translucent Ghost Dangles with Gold Stars
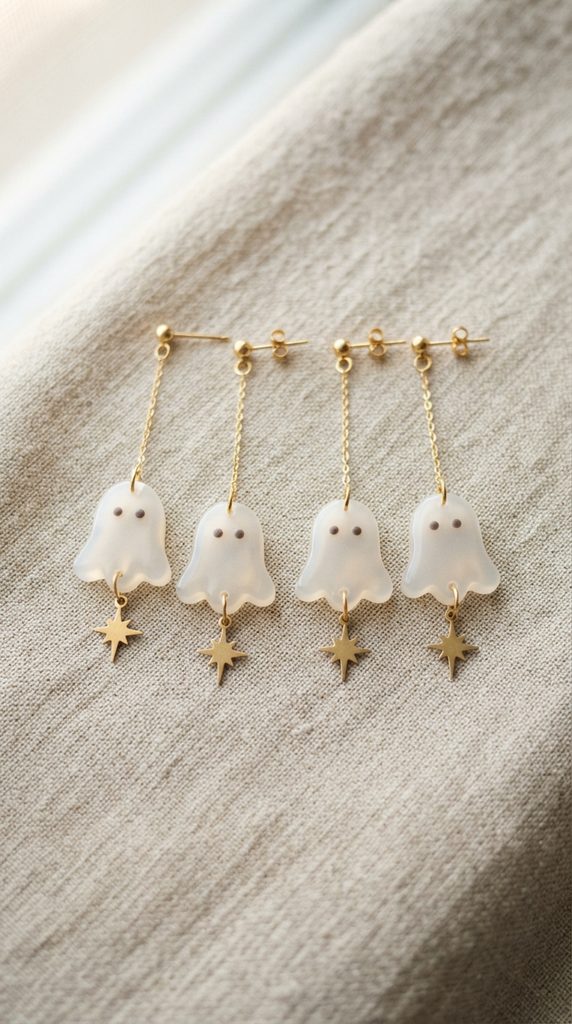
This design combines whimsical floating spectral shapes with modern translucent clay and sparkling gold stars. It offers an elegant approach that flatters casual sweaters and evening party dresses alike.
+-----------------------------------------------------------+
|             Translucent Ghost Dangles Profile             |
+-------------------+---------------------------------------+
| Core Material     | Translucent & Bleached White Clay     |
| Metallic Accents  | Raw Brass Star Charms & Jump Rings    |
| Earring Style     | Two-Tier Articulated Dangle           |
| Aesthetic Mood    | Minimalist Spooky, Celestial Elegance |
+-------------------+---------------------------------------+
Aesthetic Blueprint and Design Harmony
This concept draws inspiration from minimalist Nordic illustrations and dreamy celestial art. Blending pure white clay with translucent clay creates an ethereal, ghostly porcelain appearance.
A tiny raw brass four-point star charm hangs gracefully from the base of each ghost. When worn, the brass charms catch ambient candlelight, creating dynamic, shimmering movement near the neck.
The wavy, fluid silhouette of the ghost replaces harsh edges with soft, organic curves. It feels elevated, feminine, and delightfully festive without looking bulky or overwhelming.
Essential Supplies and Clay Selection
- Translucent polymer clay block.
- Opaque bleached white polymer clay.
- 3D-printed miniature ghost clay cutter.
- 10mm raw brass four-point starburst charms.
- 6mm hypoallergenic stainless steel ball-post studs.
- 5mm 18k gold-plated open jump rings.
- Two pairs of smooth flat-nose jewelry pliers.
- Manual acrylic clay roller or pasta machine.
Crafting Steps for Stunning halloween earrings
- Condition equal portions of translucent and white clay until soft and pliable.
- Roll the clay blend through a pasta machine on setting three.
- Place the smooth clay sheet flat onto a clean ceramic tile.
- Press the ghost cutter firmly through the clay to form shapes.
- Lift the cutter gently and remove surrounding excess clay scrap.
- Use a 1.2mm needle tool to pierce a hole near the bottom.
- Smooth rough perimeter edges gently with an alcohol-moistened cotton swab.
- Bake the ghosts on the ceramic tile at 275°F for thirty minutes.
- Allow the cured clay pieces to cool completely inside the oven.
- Sand rough back edges lightly with 600-grit wet sandpaper.
- Attach a brass star charm to the bottom hole using a jump ring.
- Glue hypoallergenic ball-post studs to the top back with jewelry adhesive.
Professional Ways to Assemble and Preserve Finish
Use strong two-part epoxy or UV resin to secure metal stud posts to the clay backs. Mechanical embedding ensures posts never snap off during daily wear.
Wipe the finished earrings with a damp microfiber cloth to remove dust and fingerprints. Clean surfaces preserve the soft, velvety satin luster of the translucent clay.
Store finished earrings on dedicated earring cards away from direct sunlight and heat.
2. Terracotta Textured Pumpkin Studs with Leaf Accents
Terracotta pumpkin studs bring earthy autumn warmth and botanical texture to everyday outfits. This design combines rich cinnamon-orange clay with delicate hand-stamped leaf vein details.
+-----------------------------------------------------------+
|             Terracotta Pumpkin Studs Profile              |
+-------------------+---------------------------------------+
| Core Material     | Terracotta Orange & Olive Green Clay  |
| Metallic Accents  | Titanium Flat-Pad Hypoallergenic Studs|
| Earring Style     | Single-Tier Low-Profile Stud          |
| Aesthetic Mood    | Harvest Warmth, Cozy Farmhouse Chic   |
+-------------------+---------------------------------------+

Aesthetic Blueprint and Earthy Charm
This look channels crisp autumn harvests, cozy flannel blankets, and artisanal pottery. The muted terracotta tone provides an understated alternative to neon orange.
Delicate carved ridges across the pumpkin face create realistic, touchable three-dimensional depth. A miniature olive-green leaf and curled vine accent the top stem beautifully.
The compact stud silhouette makes this design practical for active school and workdays. It pairs seamlessly with chunky knit scarves, denim jackets, and warm spiced lattes.
Essential Supplies and Clay Selection
- Terracotta orange polymer clay.
- Muted olive green polymer clay.
- Deep chocolate brown polymer clay.
- 15mm rounded pumpkin outline clay cutter.
- Dual-ended ball stylus and needle carving tool.
- 8mm titanium flat-pad ear stud posts with silicone backs.
- Oven-safe silicone baking mat.
- Acrylic rolling pin with thickness guide rings.
Step-by-Step Clay Modeling Methods
- Condition the terracotta clay thoroughly by kneading between warm palms.
- Roll the terracotta clay out to a uniform 3mm thickness.
- Cut two identical circular pumpkin shapes using your clay cutter.
- Use a rounded ball stylus tool to indent vertical ribbed groves.
- Roll tiny teardrop shapes of olive green clay for leaves.
- Flatten the green teardrops and score delicate leaf veins with a needle.
- Roll a tiny brown clay cylinder to form the rustic top stem.
- Press the stem and leaf firmly onto the top pumpkin crest.
- Smooth all connection seams using a soft silicone blending tool.
- Bake on a silicone mat at 275°F for thirty-five minutes.
- Allow the baked studs to cool completely to room temperature.
- Adhere the titanium flat-pad posts to the backs using liquid clay and bake.
Professional Ways to Assemble and Preserve Finish
Bake metal stud posts directly into the clay using liquid polymer clay for a permanent bond. This eliminates messy glue lines and creates a durable, professional finish.
Apply a light coat of matte water-based varnish over the cured pumpkins. The matte sealer protects delicate carved ridges from makeup stains and natural skin oils.
Keep the studs organized in a velvet-lined jewelry tray to prevent scratches.
3. Gothic Black Cat Silhouette Hoops
Black cats are timeless icons of midnight folklore, ancient mystery, and October romance. This design suspends sleek black clay cat silhouettes inside polished raw brass geometric hoops.
+-----------------------------------------------------------+
|             Gothic Black Cat Hoops Profile                |
+-------------------+---------------------------------------+
| Core Material     | Velvet Matte Obsidian Black Clay      |
| Metallic Accents  | 30mm Raw Brass Teardrop Hoops         |
| Earring Style     | Suspended Geometric Charm Hoop        |
| Aesthetic Mood    | Vintage Gothic, High-Fashion Witchy   |
+-------------------+---------------------------------------+

Aesthetic Blueprint and Dark Elegance
This aesthetic pays homage to vintage storybook witches, nocturnal felines, and art deco geometry. The deep obsidian black clay absorbs light, creating a velvety silhouette.
Suspending the miniature cat charm inside a shiny brass hoop creates dynamic framing. As you move, the cat swings independently, catching light from every angle.
Pointed triangular ears and an arched tail give the feline silhouette instant recognition. It offers an elevated, stylish statement suitable for evening concerts and masquerade galas.
Essential Supplies and Clay Selection
- Matte finish obsidian black polymer clay.
- 30mm raw brass teardrop or circular hoop frames.
- 18mm miniature black cat silhouette clay cutter.
- Hypoallergenic gold-plated leverback earring hooks.
- 4mm gold-plated brass open jump rings.
- Micro hand drill with 1mm drill bit.
- Flat-nose and round-nose jewelry pliers.
- Soft jewelry polishing cloth for brass care.
Crafting Steps for Stunning halloween earrings
- Condition black clay until smooth, working on clean ceramic glass.
- Roll the clay through a pasta machine on setting four.
- Press the cat cutter firmly into the black clay sheet.
- Carefully peel away surrounding scrap clay from the tile.
- Smooth the pointed cat ears using a silicone blending tool.
- Use a 1mm needle tool to create a clean top hanging hole.
- Bake the black cat cutouts at 275°F for thirty minutes.
- Allow the pieces to cool completely before handling.
- Buff the edges with a soft denim cloth to create a satin sheen.
- Connect the top hole of the cat to the interior hoop loop.
- Secure the brass teardrop hoop to a gold leverback earring hook.
- Inspect all jump ring closures to ensure there are no gaps.
Professional Ways to Assemble and Preserve Finish
Polish the raw brass hoops with jewelry polishing paste before final assembly. A bright, polished frame creates maximum contrast against the dark black cat charms.
Ensure all jump rings are closed with a tight flush seam using two pliers. Flush seams prevent the lightweight clay charms from slipping off during wear.
Store the earrings in sealed anti-tarnish bags to keep the brass bright.
4. Speckled Candy Corn Modern Geo Arches
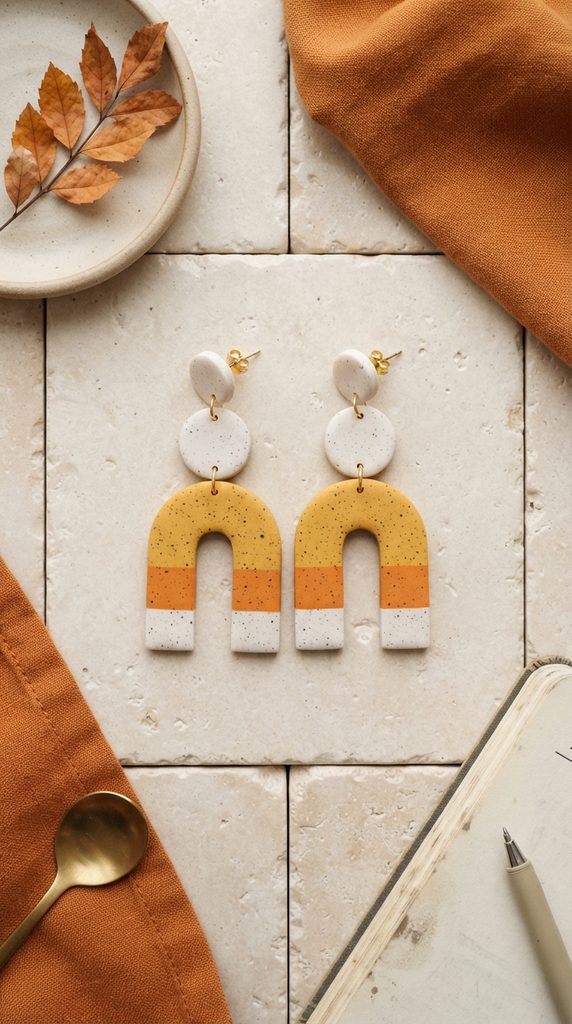
Candy corn brings nostalgic sweet memories to crisp October afternoons and festive parties. This design elevates the classic candy into chic, speckled geometric statement arches.
+-----------------------------------------------------------+
|             Candy Corn Geo Arches Profile                 |
+-------------------+---------------------------------------+
| Core Material     | Marigold Yellow, Warm Orange, White   |
| Metallic Accents  | 14k Gold-Filled Ball Stud Connectors  |
| Earring Style     | Two-Piece Modern Geometric Arch Drop  |
| Aesthetic Mood    | Retro Chic, Playful Graphic Pop       |
+-------------------+---------------------------------------+
Aesthetic Blueprint for Chic halloween earrings
This design modernizes traditional Halloween candy colors through contemporary Scandinavian geometry. Incorporating natural granite specks into the clay softens the bright yellow and orange tones.
The top stud consists of a rounded vanilla-white clay dome. An open-bottom arch dangles beneath, featuring crisp horizontal stripes of marigold and pumpkin orange.
The clean geometric silhouette transforms a playful theme into a stylish runway accessory. It pairs wonderfully with neutral trench coats, turtleneck sweaters, and modern loafers.
Essential Supplies and Clay Selection
- Marigold yellow polymer clay with granite specks.
- Warm pumpkin orange polymer clay.
- Marshmallow white polymer clay.
- Multi-size rainbow arch clay cutter set.
- 12mm round circle clay cutter for stud toppers.
- Stainless steel surgical post studs with butterfly scrolls.
- 6mm gold-plated open jump rings.
- Rigid tissue blade for slicing straight clay stripes.
Step-by-Step Clay Modeling Methods
- Condition yellow, orange, and white clay blocks separately.
- Roll each color into flat sheets of equal 3mm thickness.
- Use a tissue blade to cut straight, uniform horizontal clay strips.
- Align the white, orange, and yellow strips side-by-side cleanly.
- Roll a roller over the seams gently to fuse the colors together.
- Press the geometric arch cutter through the tri-color striped sheet.
- Cut two solid white circles to serve as the top ear studs.
- Pierce connection holes at the top of arches and bottoms of studs.
- Bake all pieces on a flat ceramic tile at 275°F for thirty-five minutes.
- Allow clay components to cool fully inside the turned-off oven.
- Connect the striped arches to the white stud toppers using jump rings.
- Secure the metal ear posts to the back of the stud toppers.
Professional Ways to Assemble and Preserve Finish
Sand the striped seams with wet 800-grit sandpaper for an ultra-smooth finish. Wet sanding eliminates minor surface ridges, making the color transitions look painted on.
Coat the front of the arches with a thin layer of liquid clay and cure. Liquid clay cures into a protective shield that resists dirt and dust.
Clean the earrings with mild soapy water if they gather makeup powder.
5. Celestial Witchy Broom and Moon Phase Drops
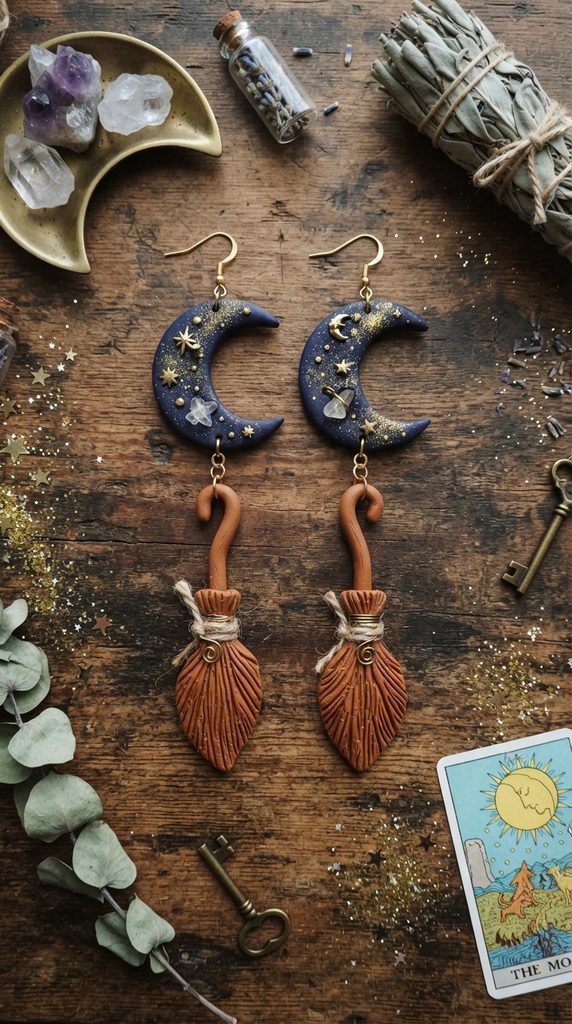
Witchcraft lore celebrates midnight skies, ancient herbal brooms, and glowing crescent moons. This design pairs textured clay crescent moons with hand-sculpted rustic broom charms.
+-----------------------------------------------------------+
|             Witchy Broom & Moon Drops Profile             |
+-------------------+---------------------------------------+
| Core Material     | Midnight Indigo & Raw Sienna Clay     |
| Metallic Accents  | Raw Brass Star Stamping & Wire Wraps  |
| Earring Style     | Multi-Tier Articulated Statement Drop |
| Aesthetic Mood    | Esoteric Magic, Dark Academia         |
+-------------------+---------------------------------------+
Aesthetic Blueprint and Mystic Storytelling
This enchanting concept draws inspiration from dark academia, celestial astrology, and midnight grimoires. The top tier features a deep midnight-indigo crescent moon dusted with gold mica.
A detailed rustic clay broom charm dangles beneath the moon on brass wire. Tiny scores along the broom bristles create realistic straw textures.
The combination of deep indigo, earthy sienna, and sparkling gold creates dramatic contrast. It delivers an intellectual, artistic statement perfect for October poetry readings and gatherings.
Essential Supplies and Clay Selection
- Midnight indigo blue polymer clay.
- Raw sienna and tan polymer clay.
- Gold metallic cosmetic mica powder.
- Crescent moon clay cutter (25mm height).
- 24-gauge half-hard gold craft wire.
- Soft makeup brush for applying mica shimmer.
- Fine needle carving tool for texturing broom straw.
- Gold-plated hypoallergenic ear wires with ball accents.
Crafting Steps for Stunning halloween earrings
- Condition midnight indigo clay and roll out to 3mm thickness.
- Cut two crescent moon shapes using your precision cutter.
- Dust the moon surfaces lightly with gold mica powder using a brush.
- Roll a small cylinder of tan clay to form a 20mm broomstick handle.
- Shape a small cone of raw sienna clay to form the broom bristle head.
- Score vertical texture lines along the sienna cone using a needle tool.
- Attach the textured bristle head firmly to the tan clay broom handle.
- Wrap a piece of gold craft wire around the bristle joint for accent.
- Pierce connection holes at the top and bottom tips of the moons.
- Bake moons and brooms on a tile at 275°F for thirty-five minutes.
- Allow pieces to cool completely before beginning hardware assembly.
- Connect brooms to moons using jump rings and attach ear wires.
Professional Ways to Assemble and Preserve Finish
Seal mica powder on the crescent moons with a clear water-based gloss glaze. Sealing prevents sparkling gold pigments from rubbing off onto fingers during wear.
Use round-nose pliers to make secure wire loops on the broom handles. Tight wire wraps provide structural strength that resists bending during active movement.
Store the earrings on a hanging jewelry stand to prevent wire deformation.
6. Glow-in-the-Dark Skeletal Ribcage Statement Drops
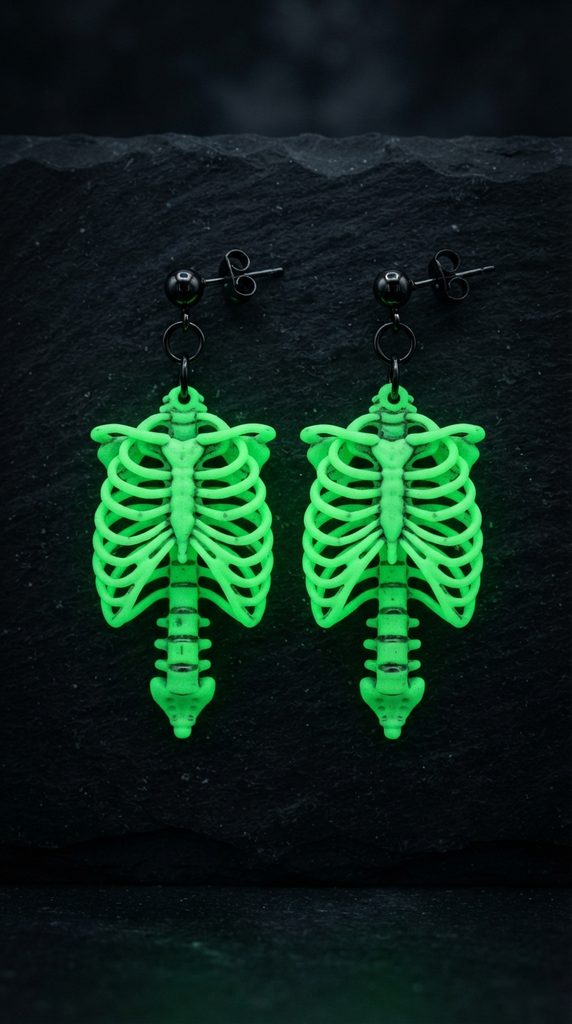
Skeletal anatomy captures the eerie, macabre romance of Halloween with striking contrast. This design features delicate skeletal ribcages crafted from high-performance glow-in-the-dark clay.
+-----------------------------------------------------------+
|             Glow-in-the-Dark Skeleton Profile             |
+-------------------+---------------------------------------+
| Core Material     | Luminescent Glow-in-the-Dark Clay     |
| Metallic Accents  | Gunmetal Black Jump Rings & Studs     |
| Earring Style     | Intricate Open-Work Statement Drop    |
| Aesthetic Mood    | Spooky Party Fun, Nighttime Drama     |
+-------------------+---------------------------------------+
Aesthetic Blueprint for Chic halloween earrings
This design explores anatomical illustrations, vintage science museums, and nightlife excitement. Under natural daylight, the clay appears as an elegant, creamy off-white porcelain tone.
When exposed to darkness or blacklight, the skeletal ribcages glow with intense neon green. The intricate open-work cutouts between the ribs keep the statement earrings exceptionally lightweight.
Gunmetal black metal hardware provides an edgy, industrial contrast against the luminous clay. It is a show-stopping conversation starter for evening haunted house visits and dance parties.
Essential Supplies and Clay Selection
- Phosphorescent glow-in-the-dark polymer clay.
- Precision skeletal ribcage metal stamping cutter.
- Fine-tip craft scalpel or hobby knife with sharp blade.
- Gunmetal black 6mm flat-pad ear studs.
- Gunmetal black 5mm open jump rings.
- UV blacklight flashlight for charging luminescence.
- Ceramic baking tile with parchment paper liner.
- High-grit wet/dry sanding sheets (1000 grit).
Step-by-Step Clay Modeling Methods
- Condition the glow-in-the-dark clay thoroughly on a clean surface.
- Roll the clay through your pasta machine on setting three.
- Dust the clay surface lightly with cornstarch to prevent cutter sticking.
- Press the detailed ribcage cutter firmly into the clay sheet.
- Use a sharp scalpel blade to remove negative space clay between ribs.
- Pierce a 1.2mm hanging hole through the top vertebrae bone.
- Smooth outer bone ridges with an alcohol-soaked cotton bud carefully.
- Bake the delicate ribcages at 275°F for thirty-five minutes on tile.
- Let the pieces cool slowly inside the oven to prevent thermal shock.
- Wet-sand the back surface with 1000-grit paper for a silky feel.
- Connect the ribcages to gunmetal ear studs using jump rings.
- Test the glow by charging the earrings under a UV flashlight.
Professional Ways to Assemble and Preserve Finish
Handle uncured open-work clay pieces with a flexible blade to prevent stretching. Preserving delicate rib proportions ensures symmetrical, balanced earrings after baking.
Bake glow-in-the-dark clay on the lower oven rack covered with a foil tent. The foil tent prevents direct heat elements from yellowing the white clay surface.
Charge the earrings under direct sunlight or UV light before evening outings.
7. Pastel Lilac and Mint Creepy Cauldron Bubbles
Pastel Halloween palettes offer a sweet, whimsical alternative to traditional dark themes. This design features miniature lilac witch cauldrons overflowing with shimmering mint and pearl bubbles.
+-----------------------------------------------------------+
|             Pastel Cauldron Bubbles Profile               |
+-------------------+---------------------------------------+
| Core Material     | Pastel Lilac, Mint Green, Pearl White |
| Metallic Accents  | Silver-Plated Hypoallergenic Huggie Hoops|
| Earring Style     | Dimensional Sculpted Dangle Charm     |
| Aesthetic Mood    | Pastel Goth, Whimsical Storybook Magic|
+-------------------+---------------------------------------+
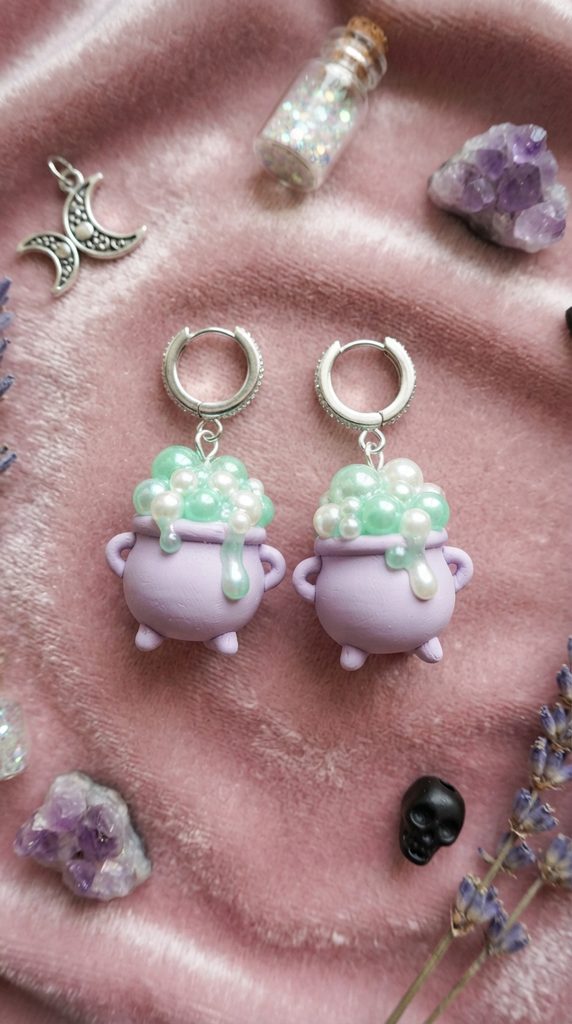
Aesthetic Blueprint and Playful Storytelling
This look draws inspiration from pastel goth fashion, magical candy shops, and friendly witches. A soft lavender-lilac cauldron provides a gentle, feminine base for the design.
Translucent mint-green and iridescent pearl clay spheres cluster together over the cauldron rim. The clustered bubbles create touchable three-dimensional texture that catches ambient light.
The pastel color scheme pairs effortlessly with cozy pink cardigans and vintage floral dresses. It brings a cheerful, imaginative mood to casual school days and weekend brunches.
Essential Supplies and Clay Selection
- Pastel lilac polymer clay.
- Translucent mint-green polymer clay.
- Shimmering pearl white polymer clay.
- 20mm cauldron outline clay cutter.
- Ball stylus tools in 2mm, 4mm, and 6mm diameters.
- Silver-plated brass huggie hoop earring findings.
- Clear UV resin and mini UV curing lamp.
- 4mm silver open jump rings and chain nose pliers.
Crafting Steps for Stunning halloween earrings
- Condition pastel lilac clay and roll out to 3.5mm thickness.
- Cut two cauldron silhouettes using your outline cutter.
- Roll tiny balls of mint and pearl clay in varied miniature sizes.
- Cluster the tiny clay balls along the top rim of the cauldrons.
- Press the balls gently onto the lilac base using a ball stylus.
- Add two small clay handles to the sides of each cauldron.
- Pierce a 1.2mm hole through the top central bubble cluster.
- Bake the sculpted cauldrons at 275°F for thirty-five minutes.
- Allow the pieces to cool completely before adding gloss glaze.
- Apply a drop of clear UV resin over the bubbles for wet shine.
- Cure the resin under a UV lamp for two minutes until rock hard.
- Attach the cauldrons to silver huggie hoop earrings with jump rings.
Professional Ways to Assemble and Preserve Finish
Apply UV resin exclusively to the bubble clusters to create a dual-finish effect. The contrast between the matte cauldron and glossy bubbles adds professional dimension.
Ensure the connection hole is free of excess resin before UV curing. Clear holes prevent hardware snagging and allow the charms to swing freely.
Clean resin-coated areas with a soft optical lens wipe to remove fingerprints.
8. Gothic Vampire Coffin with Velvet Red Roses
Vampire lore captures dark romance, Victorian estates, and aristocratic gothic drama. This design pairs matte black clay coffin silhouettes with sculpted blood-red velvet roses.
+-----------------------------------------------------------+
|             Vampire Coffin & Rose Profile                 |
+-------------------+---------------------------------------+
| Core Material     | Obsidian Black & Rich Crimson Clay    |
| Metallic Accents  | Antique Bronze Filigree Connectors    |
| Earring Style     | Long Victorian Statement Drop         |
| Aesthetic Mood    | Aristocratic Gothic, Romantic Horror  |
+-------------------+---------------------------------------+

Aesthetic Blueprint for Chic halloween earrings
This dramatic design evokes classic gothic literature, midnight crypts, and Victorian mourning jewelry. The sleek black coffin silhouette provides an imposing, structured background canvas.
A hand-sculpted crimson rose with tiny green leaves rests gracefully in the coffin center. The blood-red rose creates an alluring focal point against the matte black surface.
Antique bronze hardware enhances the vintage, historic feel of the statement earrings. It pairs exquisitely with crushed velvet dresses, lace chokers, and dark berry lipsticks.
Essential Supplies and Clay Selection
- Velvet matte black polymer clay.
- Rich crimson red polymer clay.
- Forest green polymer clay.
- Coffin-shaped clay cutter (35mm height).
- Miniature silicone petal veining tool.
- Antique bronze flat-pad earring studs with scrolls.
- Antique bronze 5mm open jump rings.
- Liquid polymer clay for bonding delicate petals.
Step-by-Step Clay Modeling Methods
- Condition black clay and roll out to a uniform 3mm thickness.
- Cut two identical coffin shapes using your metal cutter.
- Bevel the coffin edges slightly using a flexible smoothing blade.
- Roll five tiny crimson clay balls to form individual rose petals.
- Flatten each red ball into a thin petal and curl into a rosebud.
- Layer additional petals around the center to create a blooming rose.
- Shape two miniature green leaves and score veins with a needle tool.
- Dab a drop of liquid clay onto the coffin center to anchor the rose.
- Press the rose and leaves firmly onto the liquid clay spot.
- Pierce a top hanging hole and bake on a tile at 275°F for 35 minutes.
- Let the intricate pieces cool slowly inside the turned-off oven.
- Connect the coffin charms to antique bronze stud findings securely.
Professional Ways to Assemble and Preserve Finish
Use liquid clay to create a chemical bond between delicate rose petals and the base. Chemical bonding prevents sculpted flower components from detaching over time.
Dust a touch of dark charcoal chalk pastel into petal crevices for depth. Shading enhances the realistic, three-dimensional drama of the tiny blooming roses.
Store the earrings in a rigid jewelry box to protect sculpted petals from crushing.
9. Modernist Abstract Spiderweb Arch Dangles
Abstract modernist jewelry transforms holiday icons into sleek, architectural fashion statements. This design features laser-sharp white spiderweb tracery silkscreened across matte black arches.
+-----------------------------------------------------------+
|             Abstract Spiderweb Arch Profile               |
+-------------------+---------------------------------------+
| Core Material     | Velvet Matte Black Polymer Clay       |
| Metallic Accents  | 18k Gold-Plated Half-Moon Stud Tops   |
| Earring Style     | Two-Piece Modern Architectural Drop   |
| Aesthetic Mood    | Modernist Art, Contemporary Graphic   |
+-------------------+---------------------------------------+

Aesthetic Blueprint and Contemporary Elegance
This concept merges contemporary fine art aesthetics with delicate natural cobweb architecture. A sleek, open arch silhouette frames silkscreened spiderweb lines with razor-sharp precision.
The high-contrast pairing of stark white acrylic paint on deep black clay looks editorial. Gold-plated half-moon stud tops add warm metallic luxury to the upper earlobe.
The clean geometric proportions make this design wearable for gallery openings and festive dinners. It offers a subtle, sophisticated nod to spooky season without looking like a costume.
Essential Supplies and Clay Selection
- Premium obsidian black polymer clay.
- Reusable spiderweb mesh silkscreen stencil.
- White heavy-body acrylic craft paint.
- Flexible plastic silkscreen squeegee card.
- Modern geometric arch clay cutter set.
- 18k gold-plated half-moon stud earring findings.
- 5mm gold-plated brass open jump rings.
- Water bath container for cleaning silkscreens immediately.
Crafting Steps for Stunning halloween earrings
- Condition black clay and roll through a pasta machine on setting three.
- Place the black clay sheet flat onto a clean ceramic tile.
- Lay the spiderweb silkscreen shiny-side down onto the clay surface.
- Burnish the screen gently with your fingers to eliminate air bubbles.
- Apply a line of white acrylic paint across the top screen border.
- Drag the squeegee card downward at a 45-degree angle firmly.
- Peel the silkscreen away slowly to reveal the printed web design.
- Submerge the silkscreen in water immediately to clean paint from mesh.
- Allow the white acrylic paint on the clay to dry completely for ten minutes.
- Cut arch shapes from the patterned clay using your geometric cutter.
- Pierce top connection holes and bake on the tile at 275°F for thirty minutes.
- Connect the cured arches to gold half-moon stud toppers with jump rings.
Professional Ways to Preserve Set Durability
Wash acrylic silkscreens immediately after printing to prevent dried paint clogs. Clean mesh stencils produce crisp, razor-sharp detail lines on future clay slabs.
Seal the dried acrylic web print with an ultra-matte water-based varnish. The protective varnish shields delicate paint lines from everyday friction and scratches.
Clean the gold stud toppers periodically with a polishing cloth to maintain shine.
10. Whimsical Candy Monster Eye Trio Drops
Monster eyes bring playful cartoon energy, vivid colors, and quirky charm to holiday jewelry. This design stacks three multi-colored monster eyes into an articulated dangling totem.
+-----------------------------------------------------------+
|             Candy Monster Eye Totem Profile               |
+-------------------+---------------------------------------+
| Core Material     | Neon Lime, Electric Pink, Chartreuse  |
| Metallic Accents  | Stainless Steel Ball Studs & Rings    |
| Earring Style     | Three-Tier Articulated Totem Drop     |
| Aesthetic Mood    | Y2K Pop Art, Playful Quirky Fun       |
+-------------------+---------------------------------------+
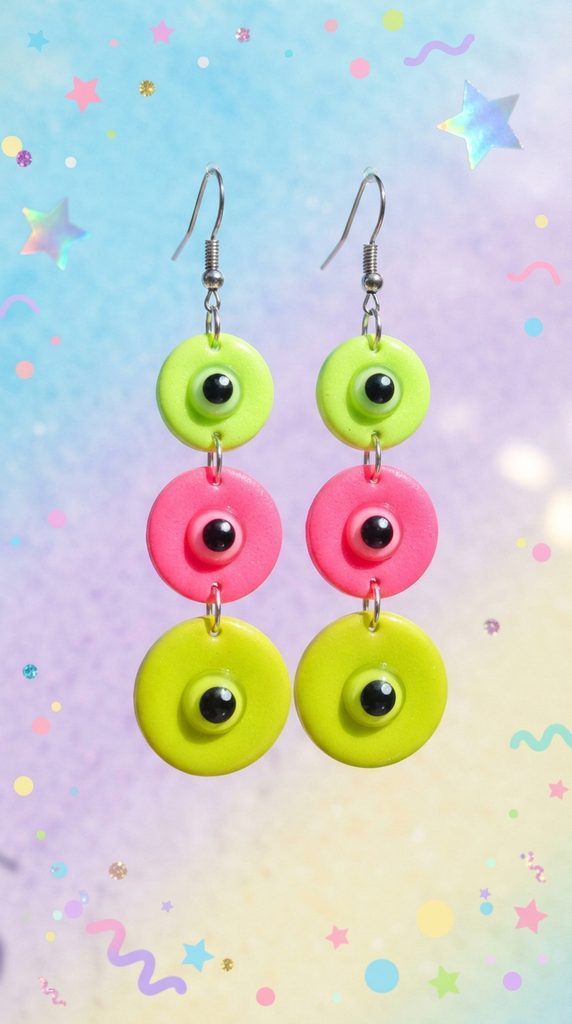
Aesthetic Blueprint for Chic halloween earrings
This high-energy design takes inspiration from Y2K pop art, cartoon monsters, and candy packaging. Three articulated clay circles stack vertically, creating lively, swinging movement with every step.
Each circle features a different vibrant candy shade: neon lime green, electric pink, and chartreuse. A glossy eye with a focused black pupil sits in the center of each colorful tier.
The articulated jump ring connections allow the three tiers to sway independently. It delivers a fun, lighthearted statement that brings instant smiles at festive celebrations.
Essential Supplies and Clay Selection
- Neon lime, electric pink, and chartreuse clay.
- Opaque bleached white and jet black clay.
- Circle clay cutter set in 12mm, 16mm, and 20mm sizes.
- Stainless steel ball-post earring studs.
- Stainless steel 5mm open jump rings.
- Ultra-fine 1mm ball stylus tool.
- Clear high-gloss liquid varnish or UV resin.
- Flat-nose jewelry pliers for link assembly.
Step-by-Step Clay Modeling Methods
- Condition neon lime, electric pink, and chartreuse clay blocks.
- Roll each neon color out to a uniform 3mm thickness.
- Cut a 12mm pink circle, a 16mm lime circle, and a 20mm chartreuse circle.
- Roll tiny white clay balls and flatten them into eye scleras on each circle.
- Place tiny black clay dots in the center of each white circle for pupils.
- Add a microscopic white speck to each pupil to simulate light reflection.
- Pierce top and bottom connection holes through each circular tier.
- Bake the stacked eye components at 275°F for thirty-five minutes on tile.
- Allow all clay pieces to cool slowly inside the turned-off oven.
- Apply a drop of clear gloss glaze over each eye to create wet shine.
- Link the three graduated circles together using stainless steel jump rings.
- Attach the top 12mm circle to a stainless steel ball-post stud.
Professional Ways to Assemble and Preserve Finish
Double-check connection hole alignment before baking to ensure tiers hang straight. Centered holes guarantee the three-tiered eye totem dangles with balanced vertical symmetry.
Use stainless steel hardware for multi-tier earrings to prevent metal tarnishing. Durable steel links withstand continuous kinetic movement without bending or breaking.
Store articulated earrings flat on cards to prevent jump rings from tangling.
Essential Clay Conditioning, Curing, and Baking Guide
Mastering polymer clay fundamentals ensures your handcrafted earrings remain strong, flexible, and break-resistant. Follow these scientific best practices to achieve professional-grade results every time.
+-----------------------------------------------------------+
|             Master Clay Baking Reference Matrix           |
+-------------------+---------------------------------------+
| Conditioning Step | Knead until clay bends without cracking|
| Oven Verification | Independent oven thermometer required |
| Temperature Rule  | Strict 275°F (135°C) for Sculpey Premo |
| Baking Duration   | 35-45 minutes per 1/4-inch thickness   |
| Cooling Protocol  | Cool slowly inside oven to room temp  |
+-------------------+---------------------------------------+
Thorough Conditioning and Air Bubble Removal
Proper conditioning aligns the internal plasticizer polymers, ensuring the clay bakes strong and flexible. Unconditioned clay remains brittle after baking, leading to snaps along thin earring edges.
Fold and pass clay through a manual pasta machine twenty times before cutting. Pass clay through folded edge first to push trapped air bubbles out smoothly.
If clay feels overly soft or sticky, leach it between sheets of printer paper. The paper absorbs excess plasticizer oils within thirty minutes, restoring workable clay texture.
Well-conditioned clay cuts cleanly with razor-sharp edges that require minimal post-bake sanding.
Accurate Temperature Control and Oven Safety
Never rely on your home oven’s built-in digital dial to maintain accurate baking temperatures. Home ovens frequently spike twenty degrees higher, scorching delicate white and pastel clays instantly.
Place an independent metal oven thermometer directly beside your ceramic baking tile. Verify the internal temperature reaches a steady 275°F before placing clay pieces inside.
Bake your clay components on smooth ceramic tiles lined with unbleached parchment paper. The tile retains uniform heat, while parchment prevents shiny flat spots on clay backs.
Cover your pieces with an aluminum foil tent to shield clay from direct radiant heat.
Professional Assembly, Sanding, and Hardware Guide
Elevating handmade clay charms into luxury boutique jewelry requires professional finishing and assembly. Strategic sanding, secure post attachment, and quality hardware ensure long-lasting customer satisfaction.
+-----------------------------------------------------------+
|             Earring Finishing & Assembly Matrix           |
+-------------------+---------------------------------------+
| Edge Refinement   | Wet sand with 400, 600, and 1000 grit |
| Post Attachment   | Liquid clay bake-in or two-part epoxy |
| Jump Ring Seam    | Twist open sideways; close flush seam |
| Hardware Standard | 304 Stainless Steel or 14k Gold-Filled|
+-------------------+---------------------------------------+
Wet Sanding and Edge Polishing Techniques
Always wet-sand polymer clay pieces submerged in a shallow bowl of warm water. Water prevents fine clay dust particles from becoming airborne while preventing sandpaper clogging.
Progress through 400-grit, 600-grit, and 1000-grit sandpaper sheets sequentially for satin smoothness. Sanding removes micro-imperfections, cutter seam lines, and fingerprints from the clay perimeter effortlessly.
Dry the sanded pieces thoroughly with a lint-free microfiber towel before hardware assembly. Finish by buffing dry clay edges briskly against a piece of raw denim.
Denim buffing creates a smooth, professional satin sheen across unglazed clay surfaces.
Choosing Hypoallergenic Hardware and Secure Post Anchors
Always choose nickel-free, hypoallergenic findings like 304 stainless steel, titanium, or gold-filled brass. Hypoallergenic metals ensure your earrings remain safe and comfortable for sensitive earlobes.
When attaching metal stud posts, avoid standard instant super glues that turn brittle. Use a two-part marine epoxy or embed the post directly behind a baked liquid clay patch.
When opening jump rings, always twist the ends sideways rather than pulling outward. Twisting preserves the circular structural integrity of the ring, ensuring a tight, flush closure.
Quality hardware craftsmanship guarantees your festive creations endure years of joyful holiday celebrations.
Crafting bespoke halloween earrings with polymer clay brings boundless creativity, festive joy, and personal style to autumn. From ethereal floating ghosts to architectural spiderweb arches, possibilities are limitless. Pick up your favorite clay blocks, fire up your oven, and enjoy handcrafting your own spooky jewelry collection.
Leave a Reply