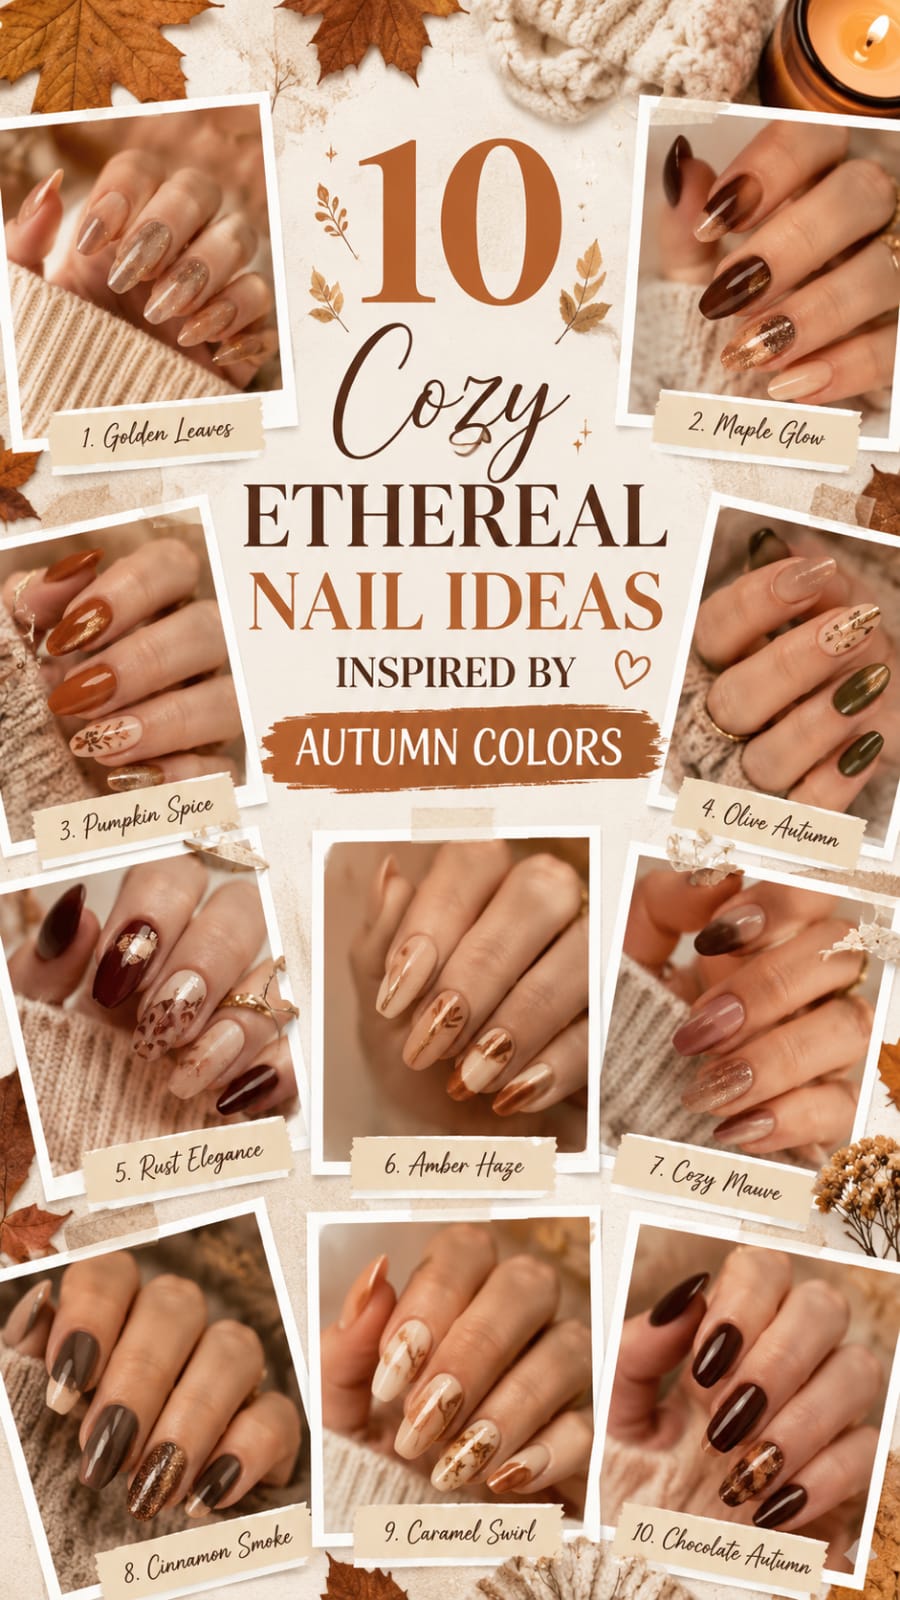
Autumn brings a distinct shift in mood, daily style, and beauty aesthetics. As the crisp air rolls in, rich earth tones begin to dominate our seasonal wardrobes. Exploring new nail ideas allows you to celebrate this comforting transition with elegance and creativity.
The ethereal trend embraces soft textures, glowing finishes, and delicate details. When combined with autumnal palettes, the results feel both grounded and magical. You can easily elevate your self-care routine by adopting modern manicures that highlight seasonal beauty.
Rich amber tones, misty forest greens, and glowing copper finishes define this aesthetic. These designs move beyond flat polish to offer multi-dimensional depth and shine. Every set reflects the cozy atmosphere of holding a warm drink beside the fireplace.
Beauty enthusiasts everywhere are leaning toward subtle nail artistry that feels effortless yet sophisticated. Whether you prefer minimalist accents or intricate chrome finishes, autumn palettes offer limitless artistic versatility. Exploring fresh nail ideas is the perfect way to welcome falling leaves and sweater weather.
Below, you will find ten detailed, dreamy manicure concepts inspired by autumn landscapes. Each section breaks down aesthetic inspirations, required supplies, preparation methods, and maintenance advice. Let these concepts guide your next seasonal salon appointment or creative weekend at home.
1. Misty Amber Glass Glaze
Amber glass represents one of the most enchanting aesthetics of the fall season. It captures the translucent beauty of golden sunlight filtering through falling foliage. This design utilizes sheer, jelly-like layers to achieve a glowing, multi-dimensional aesthetic on your hands.
+-----------------------------------------------------------+
|               Misty Amber Glass Breakdown                 |
+-------------------+---------------------------------------+
| Base Style        | Jelly Amber & Translucent Ochre       |
| Finish Effect     | High-Gloss Glass Jelly                |
| Complementary Tone| Warm Terracotta, Cream Sweaters       |
+-------------------+---------------------------------------+

Aesthetic Inspiration and Color Theory
The core idea behind this set comes from vintage apothecary bottles and fossilized tree resin. It balances the warmth of burnt orange with the transparency of morning dew. Light passes directly through the polish, creating a natural glow across your fingertips.
This approach ensures the manicure never looks too heavy, flat, or opaque. Instead, it maintains an ethereal, cloud-like quality that pairs seamlessly with knit sweaters. The balance of depth and transparency gives the entire look a luxurious, bespoke finish.
Amber tones complement warm undertones in the skin, making hands look radiant and healthy. By utilizing negative space and translucency, the nail bed retains a luminous appearance. It evokes memories of quiet walks through sunlit forests blanketed in golden leaves.
Furthermore, this look adapts effortlessly across various lighting environments throughout the day. In direct sunlight, it glows like polished gemstones; under ambient indoor lighting, it appears deep and moody. It remains a versatile choice for anyone who loves understated elegance.
Essential Materials and Polish Selection
To execute this manicure properly, you need a high-quality sheer amber jelly polish. If you do not own jelly polish, mix clear topcoat with deep orange lacquer. A sheer honey shade and an ultra-reflective topcoat complete the essential formula.
Using high-shine builder gels will provide the plump, glass-like thickness required. Prepare a fine detail brush if you wish to add subtle golden swirls. Having these supplies ready guarantees a clean application process from start to finish.
Invest in a reliable lint-free wipe and pure isopropyl alcohol for surface preparation. Proper cleansing ensures your gel layers bond securely without premature peeling. A sturdy LED curing lamp with consistent wattage ensures optimal curing across all layers.
Quality builder gels also help reinforce fragile natural nails while providing beautiful volume. Choose formulas that self-level smoothly to prevent unwanted ridges or lumps. Clean tools and premium products make achieving professional results simple and enjoyable.
Step-by-Step Application Technique
- Begin by prepping the cuticles and applying a strengthening, clear base coat.
- Apply one thin, uniform layer of your sheer jelly amber polish.
- Cure the initial coat completely before applying a second sheer layer.
- Concentrate a tiny drop of deeper brown jelly along the center.
- Blend the edges softly using a clear blending brush.
- Seal the entire design with a generous layer of high-shine topcoat.
Professional Styling and Longevity Care
This manicure pairs beautifully with neutral knitwear, golden rings, and soft wool scarves. The translucent finish ensures that natural nail growth remains barely visible over time. It creates an understated, polished look suitable for both office days and cozy weekends.
To maintain that glass-like shine, apply nourishing cuticle oil twice daily without fail. Avoid exposing your hands to harsh household detergents without wearing protective rubber gloves. Reapply an extra layer of clear topcoat every four days to prevent chipping.
Keep your hands hydrated by carrying a pocket-sized tube of rich shea butter cream. Hydrated skin highlights the radiant, polished finish of your amber glass manicure. Treat your nails gently to enjoy this warm seasonal aesthetic for weeks.
2. Frosted Spiced Chai Shimmer
Spiced chai brings to mind comforting coffee shop visits during breezy autumn afternoons. This style incorporates milky nude foundations with micro-fine pearl shimmer. It provides a velvety, frosted sheen that catches ambient light whenever your hands move.
+-----------------------------------------------------------+
|             Frosted Spiced Chai Breakdown                 |
+-------------------+---------------------------------------+
| Base Style        | Milky Chai Nude with Pearl Dust       |
| Finish Effect     | Soft Velvet Frosted Chrome            |
| Complementary Tone| Cashmere Beige, Cinnamon, Ivory       |
+-------------------+---------------------------------------+

Aesthetic Inspiration and Color Theory
The visual inspiration comes from frothy cinnamon foam resting on freshly brewed tea. By blending soft vanilla tones with hints of nutmeg, we create quiet luxury. The shimmer remains extremely fine, creating a soft glow rather than harsh glitter.
This neutral foundation flatters every skin tone by enhancing natural warmth. It acts as an understated canvas that effortlessly bridges cozy casualwear and evening elegance. The frosted surface keeps the aesthetic modern, airy, and undeniably chic.
The magic lies in how subtle shifts in angle transform the color. What appears as a soft nude in shadow reveals a shimmering veil in daylight. It brings a peaceful, calming aesthetic that complements the slower pace of autumn.
Pairing creamy neutrals with micro-pearl powder ensures a timeless appeal. This design avoids loud trends in favor of refined, understated beauty. It represents the quintessential cozy aesthetic for chilly autumn mornings.
Essential Materials and Polish Selection
Collect a milky beige polish, a cinnamon-toned nude, and pearl chrome powder. A soft silicone applicator is ideal for rubbing the fine pigment evenly. You will also need a non-wipe gel topcoat to secure the powder.
Ensure your LED or UV curing lamp works at full power. Low curing times can cause chrome powders to look cloudy instead of bright. Investing in fine-milled powders guarantees an ethereal, mirror-like pearl effect across every nail.
Select a base polish with strong self-leveling properties to prevent streaking. High-pigment formulas require fewer coats, keeping the overall nail enhancement slim and natural. Keep a soft dusting brush nearby to sweep away stray chrome particles.
A quality cuticle pusher and gentle buffer help prepare the nail bed seamlessly. Smooth preparation allows the frosted chrome to sit evenly across the entire surface. Premium ingredients ensure a salon-quality finish directly from home.
Step-by-Step Application Technique
- File the nails into a soft oval or almond shape.
- Apply a thin layer of milky beige base and cure completely.
- Add a second coat mixed with a drop of warm cinnamon.
- Paint on a non-wipe gel topcoat and cure for thirty seconds.
- Gently buff the pearl chrome powder across each nail plate.
- Dust away excess particles using a fluffy makeup brush.
- Finish with a final layer of glossy topcoat to protect.
Professional Styling and Longevity Care
Frosted chai nails look stunning alongside cream-colored cashmere and textured wool garments. Minimalist silver or rose gold jewelry highlights the multi-tonal pearl reflection. The look remains timeless, making it suitable for any formal autumn gathering.
Protect the chrome edges by capping the free edge thoroughly during topcoat application. Keep your hands hydrated with rich shea butter creams after washing. Gentle hand care ensures the pearlescent finish stays vibrant for multiple weeks.
Avoid using abrasive cleaning pads that could scratch the delicate chrome seal. Massage organic jojoba oil around the nail beds every night before sleeping. Consistent care preserves the frosty, radiant finish through all your seasonal adventures.
3. Golden Hour Velvet Cat-Eye
Autumn sunsets produce a warm, golden glow across the evening sky. Velvet cat-eye polishes capture this fleeting magic using tiny magnetic particles. When manipulated correctly, the magnetic shimmer floats across the nail like liquid silk.
+-----------------------------------------------------------+
|            Golden Hour Velvet Breakdown                   |
+-------------------+---------------------------------------+
| Base Style        | Warm Honey & Molten Bronze            |
| Finish Effect     | 3D Dimensional Magnetic Velvet        |
| Complementary Tone| Camel Coats, Suede, Gold Jewelry      |
+-------------------+---------------------------------------+

Aesthetic Inspiration and Color Theory
This design channels the golden hour glow when shadows stretch across amber fields. The combination of bronze pigments and yellow-gold shimmer creates incredible depth. Moving your fingers produces a moving wave of light across each nail.
Unlike standard glitter, magnetic polish creates a continuous, smooth surface of illumination. It gives the impression of crushed velvet fabric wrapped over the fingertip. This luxurious texture feels perfect for crisp evening outings and holiday celebrations.
The warmth of the bronze base provides grounding contrast against the floating golden particles. It captures the essence of glowing embers and low autumn sunbeams. This dynamic interaction creates an ethereal, high-end effect without requiring complex nail art skills.
Because the shimmer shifts with every gesture, your hands remain captivating in every setting. It provides an elevated alternative to traditional metallic polishes. The finished result feels rich, cozy, and distinctly autumnal.
Essential Materials and Polish Selection
You will need a premium magnetic gel polish in a warm bronze-gold tone. A strong neodymium cylinder magnet is essential to manipulate the fine particles. A rich, opaque caramel base polish helps intensify the underlying colors.
Keep a bottle of high-gloss gel topcoat nearby to seal everything. A reliable cuticle remover and buffer will prepare the nail surface properly. Having quality tools ensures crisp magnetic movement without unwanted particle dispersion.
Ensure your magnetic tool has sufficient strength to pull particles quickly. Weak magnets can lead to muddy patterns that lack distinct light lines. Using dedicated nail art magnets guarantees sharp, precise control over the velvet effect.
Invest in a dependable cleansing wipe to remove any residual sticky dispersion layers. High-quality gel systems ensure that the magnetic particles remain locked in place forever. Proper equipment makes mastering this advanced technique easy and enjoyable.
Step-by-Step Application Technique
- Shape the nails and clean away surface oils with alcohol.
- Apply a neutral caramel base coat and cure thoroughly.
- Paint a generous layer of the magnetic golden gel polish.
- Hold the magnet under the finger to push particles upward.
- Move the magnet around the side edges to create velvet.
- Immediately cure the nail under your lamp to lock particles.
- Apply your protective topcoat and cure for sixty seconds.
Professional Styling and Longevity Care
Pair this luminous manicure with structured camel trench coats and suede ankle boots. Chunky gold rings complement the metallic undertones of the magnetic velvet finish. The dynamic movement of the shimmer makes it an instant conversation starter.
To preserve the velvet look, avoid using your fingernails to open containers. Apply daily nail strengtheners if you are working with natural nail lengths. Regular conditioning prevents the gel layers from lifting away from the edges.
Protect your manicure by applying a hydrating hand serum before venturing outdoors. Cold weather can dry out the nail perimeter, causing micro-lifting around the base. Dedicated daily hydration ensures that your magnetic set remains flawless and shiny.
4. Smoked Sage and Ghostly Botanicals
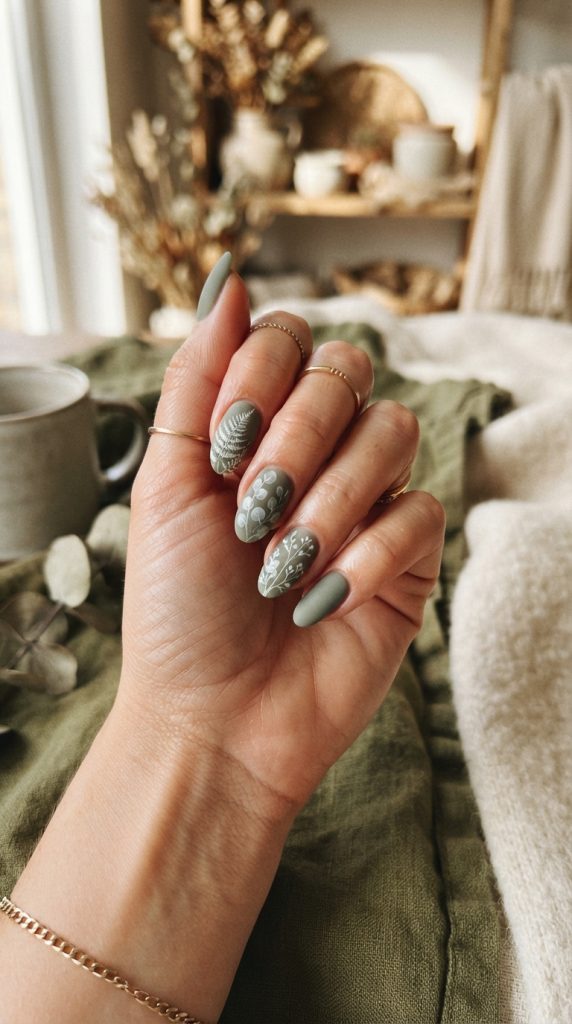
Forest floors take on a mysterious, muted appearance as autumn deepens. Smoked sage combines pale earthy greens with gray undertones for an ethereal mood. Delicate botanical art floating across the surface mimics pressed leaves found outdoors.
+-----------------------------------------------------------+
|           Smoked Sage Botanicals Breakdown                |
+-------------------+---------------------------------------+
| Base Style        | Muted Earthy Sage & Translucent Cream |
| Finish Effect     | Matte Velvet or Satin Botanicals      |
| Complementary Tone| Olive Green, Oatmeal, Forest Moss     |
+-------------------+---------------------------------------+
Aesthetic Inspiration and Color Theory
The palette takes inspiration from dried eucalyptus, mossy bark, and morning fog. Sage green acts as a soft alternative to traditional dark autumn tones. The smoky base creates a calming, natural atmosphere across your hands.
Semi-sheer botanical elements add artistic elegance without overwhelming the simple background. The overall look feels vintage, reminiscent of historic botanical field guides. It is a thoughtful choice for nature lovers seeking unique seasonal concepts.
The contrast between smoky sage and delicate cream creates an airy silhouette. It evokes quiet mornings spent walking through misty woodlands surrounded by evergreens. The botanical accents feel organic, romantic, and completely one-of-a-kind.
By keeping the green tone desaturated, the design remains neutral and sophisticated. It coordinates beautifully with earthy autumn palettes and cozy textures. This artistic manicure brings a piece of the autumn forest directly to your fingertips.
Essential Materials and Polish Selection
Select a creamy, muted sage green polish and a sheer milky white. You will also need an ultra-fine nail art brush for painting botanicals. White and dark olive acrylic paints or gel liners work best for artwork.
A matte topcoat gives the finished look a modern, velvety paper texture. Keep a small dish of acetone nearby to clean your detail brushes. Precision tools make painting delicate leaf veins much easier.
Choose highly pigmented gel paints that do not run during detailed brushwork. Standard polishes dry too quickly on the brush, making fine lines difficult. Gel liners give you unlimited working time to perfect each leaf curve.
Prepare a damp lint-free wipe for quick palette cleanups between color mixes. Having organized tools creates a smooth, stress-free painting environment. Quality brushes with fine synthetic bristles yield the crispest botanical artwork.
Step-by-Step Application Technique
- Prepare the nail bed and apply an adhesive base coat.
- Paint two thin layers of smoked sage polish, curing between.
- On accent nails, apply a sheer milky white base layer.
- Dip your detail brush into dark olive gel for stems.
- Paint delicate leaf silhouettes cascading downward along the sidewall.
- Add tiny white highlight dots along the leaf centers.
- Finish with a velvety matte topcoat for a soft effect.
Professional Styling and Longevity Care
This botanical design looks exceptional alongside chunky knit sweaters and linen accessories. It complements earthy wardrobe palettes including taupe, cream, and forest olive. The matte finish adds an editorial touch to everyday fall outfits.
Matte finishes can attract stains, so clean them gently with alcohol wipes. Avoid prolonged contact with highly pigmented foods like berries or turmeric. Keeping hands clean ensures your botanical artwork stays crisp and vibrant.
Apply a lightweight botanical cuticle oil infused with lavender or tea tree. Regular moisture maintains the soft look of the surrounding skin without disrupting the matte finish. Protect your artwork from scratches by handling items with care.
5. Ethereal Maple Aura Gradients
Aura manicures continue to captivate beauty enthusiasts with their glowing, circular gradients. Translating this style for autumn requires blending warm maple reds with soft creams. The glowing center mimics the radiant warmth of autumn fires burning bright.
+-----------------------------------------------------------+
|              Maple Aura Gradient Breakdown                |
+-------------------+---------------------------------------+
| Base Style        | Creamy Oat Base with Burnt Maple Core |
| Finish Effect     | Soft Airbrushed Radiant Aura          |
| Complementary Tone| Crimson, Rust Orange, Camel Wool      |
+-------------------+---------------------------------------+

Aesthetic Inspiration and Color Theory
The visual effect relies on smooth color blending radiating from the center. It mirrors the changing colors of a maple leaf turning from yellow to crimson. The soft edges create a mystical halo on each individual nail plate.
This gradient design softens vibrant red tones, making them wearable for daily activities. It balances dramatic seasonal color with calming negative space around the cuticles. The resulting aesthetic feels both modern, creative, and undeniably dreamy.
The fiery crimson center radiates outward into calming cream, creating energy and balance. It represents the warmth of the hearth against the chill of autumn nights. The soft transition gives your manicure an otherworldly, airbrushed elegance.
Because the gradient is diffused, it flatters hands of all sizes and shapes. It adds visual length to the nail bed by drawing the eye inward. This radiant aura effect is perfect for making a bold yet refined statement.
Essential Materials and Polish Selection
You need a handheld nail airbrush tool or a soft makeup sponge. Prepare a neutral oat-colored base polish and a rich burnt maple shade. Liquid latex protects the skin surrounding your cuticles during airbrushing.
A smoothing ridge-filling base coat ensures the gradient blends seamlessly without streaks. Keep a high-gloss topcoat ready to blend the pigment particles together. Having the correct blending tools is the secret to a flawless aura.
If using an airbrush, ensure your gel polishes are properly thinned. Specialized airbrush gel formulas prevent nozzle clogs and uneven splatters. For sponge techniques, use dense cosmetic sponges for seamless pigment transfer.
Keep pure acetone and a precise cleanup brush ready for skin cleanup. Cleaning the perimeter before curing ensures crisp, professional borders. Quality supplies make creating ethereal aura gradients quick and effortless.
Step-by-Step Application Technique
- Apply base coat and two layers of oat polish.
- Apply liquid latex to the skin around each finger.
- Dispense burnt maple gel into your airbrush reservoir tool.
- Gently spray a focused circle in the center of the nail.
- Build the intensity gradually by spraying multiple fine mist layers.
- Peel away the protective latex barrier from the skin.
- Seal with a high-shine topcoat to unify the gradient.
Professional Styling and Longevity Care
Aura nails are a fantastic complement to modern streetwear and tailored overcoats. They pair effortlessly with warm leather jackets and cozy knitted beanies. The glowing crimson centers provide a welcome pop of color on gloomy days.
Maintain the smooth appearance by keeping your nail surfaces protected from scratches. Massage a hydrating cuticle balm around the nail edges every night. Proper maintenance prevents premature peeling along the delicate airbrushed layers.
Reapply a glossy topcoat after seven days to refresh the radiant center. Avoid using abrasive hand scrubs directly over the finished nail surface. Gentle, mindful habits keep your glowing aura looking salon-fresh for weeks.
6. Copper Leaf and Pearlescent Quartz
Natural mineral formations provide endless visual interest during the autumn months. This manicure merges the translucent glow of rose quartz with warm copper flakes. The metallic foil floats between layers of milky polish for a layered stone effect.
+-----------------------------------------------------------+
|           Copper Quartz Mineral Breakdown                 |
+-------------------+---------------------------------------+
| Base Style        | Translucent Quartz & Warm Copper Foil |
| Finish Effect     | Multi-Layered Semi-Precious Stone     |
| Complementary Tone| Rosewood, Dusty Mauve, Copper Rings   |
+-------------------+---------------------------------------+

Aesthetic Inspiration and Color Theory
The look draws inspiration from natural quartz veins shot through with raw metals. The pale, milky base keeps the overall mood light and ethereal. Meanwhile, the copper inclusions provide that quintessential warmth associated with falling leaves.
By sandwiching foil between sheer polish layers, the design gains real visual depth. It avoids looking like flat surface glitter, mimicking polished semi-precious gemstones. The combination of minerals and metallic highlights feels luxurious and unique.
The cool undertones of translucent quartz balance the fiery warmth of copper flakes. This contrast creates a harmonious balance reminiscent of frosted autumn stones. It captures light from multiple angles, creating an enchanting, dimensional glow.
Wearing mineral-inspired designs connects your beauty routine to natural earth elements. The subtle marbling adds bespoke character, ensuring no two nails look identical. It is an elevated style that feels both organic and high-fashion.
Essential Materials and Polish Selection
Gather sheer milky pink polish, loose copper leaf sheets, and tweezers. A fine dotting tool helps tear and position the delicate foil pieces. You will also need a clear builder gel to encapsulate the foil.
A glass file helps shape the natural free edge cleanly before application. Ensure your copper leaf is cosmetic grade to prevent discoloration when cured. Proper encapsulation requires a self-leveling builder gel with medium viscosity.
Select builder gels with crystal-clear clarity to avoid any yellow undertones. High-clarity formulas allow the metallic copper to shine through brightly. Keep precision tweezers clean to handle delicate foil sheets without tearing prematurely.
A palette knife or flat brush helps smooth down foil edges flatly. Ensuring no jagged metal edges poke through builder gel prevents premature snagging. High-grade materials guarantee a smooth, glass-like gemstone finish.
Step-by-Step Application Technique
- Prep the nail surface and apply a bonding base coat.
- Paint one layer of sheer quartz pink and cure lightly.
- Use tweezers to place small, torn flakes of copper foil.
- Apply a thin layer of builder gel over the foil.
- Add a few faint, wispy white mineral lines using a brush.
- Float a final layer of milky pink over the design.
- Cap with an ultra-glossy topcoat and cure fully.
Professional Styling and Longevity Care
This manicure pairs beautifully with soft mauve knitwear, silk blouses, and rose-gold jewelry. Its gemstone appearance makes it an ideal option for formal events or weddings. The subtle shimmer ensures it never looks overpowering with daily outfits.
Because this technique involves building layers, maintain structural balance by filing side walls straight. Apply nourishing nail oils to keep the underlying nail strong and flexible. Regular care keeps the encapsulated foil sparkling bright without lifting.
Avoid filing down the nail tips after encapsulation to prevent breaking the seal. If you experience rough edges, gently buff them smooth and apply topcoat. Protecting the encapsulated layers ensures maximum durability and high-gloss beauty.
7. Misty Blackberry French Minimalist
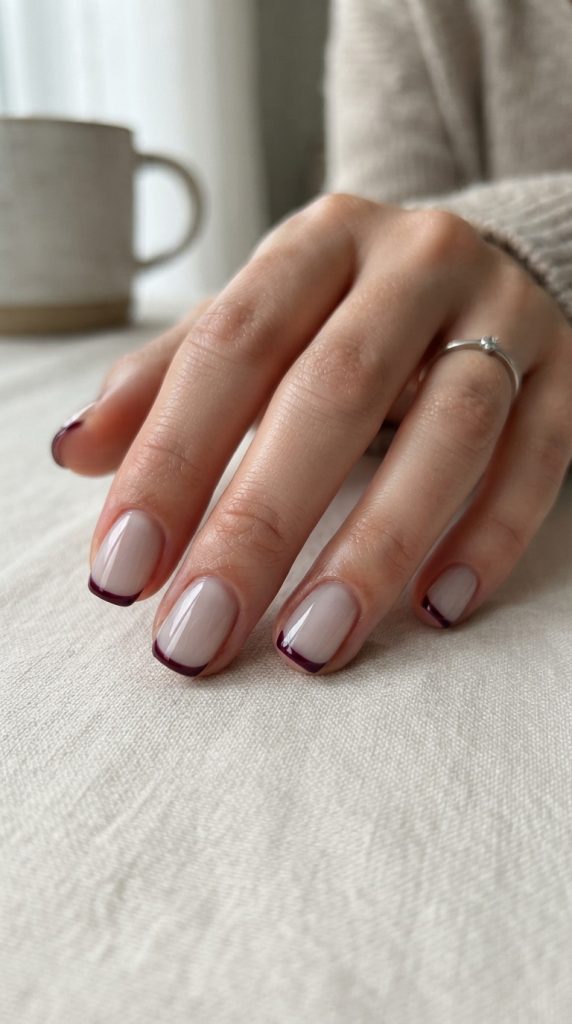
The traditional French manicure receives an autumn transformation with deep, moody hues. Replacing white tips with sheer blackberry creates an understated, vampy appearance. A misty, sheer base keeps the overall design looking light and modern.
+-----------------------------------------------------------+
|            Misty Blackberry French Breakdown              |
+-------------------+---------------------------------------+
| Base Style        | Sheer Fog Base with Deep Plum Smile   |
| Finish Effect     | Micro-French Ultra-Glossy Tip         |
| Complementary Tone| Plum, Charcoal Gray, Deep Burgundy    |
+-------------------+---------------------------------------+
Aesthetic Inspiration and Color Theory
The palette is inspired by wild blackberries ripening on misty morning walks. Deep plum and bordeaux shades evoke a cozy, slightly moody seasonal atmosphere. Using an ultra-thin smile line preserves a clean, minimalist silhouette.
The translucent gray-nude base adds an ethereal haze across the natural nail plate. This softens the contrast between the dark tip and the bare nail. The result is a refined, chic look suitable for any setting.
The pairing of sheer mist and deep wine creates a sophisticated visual dialogue. It embraces the dark romance of late autumn while remaining light and wearable. The narrow tip design flatters both short and extended nail shapes.
By focusing the deep color along the very tip, hands appear elongated and slender. This modern French style brings a subtle edge to classic beauty routines. It provides an effortless way to wear dark autumnal colors daily.
Essential Materials and Polish Selection
You will need a sheer smoky-nude base polish and deep blackberry gel. A long, thin striper brush is critical for creating crisp, precise smile lines. A cleanup brush dipped in acetone fixes any uneven lines instantly.
Choose a long-wearing, scratch-resistant gel topcoat for the final seal. A gentle buffing block helps create a smooth base without ridge lines. High-pigment liners ensure your thin French lines remain completely opaque.
Look for precision striper brushes with bristles between nine and eleven millimeters. Longer bristles allow you to pull smooth curves across the nail tip easily. Shorter brushes can cause jittery lines and uneven thickness along smile lines.
Keep high-purity acetone in a dappen dish for quick brush corrections. Clean tools allow you to sculpt razor-sharp micro-tips effortlessly. Investing in dedicated liner gels prevents colors from bleeding into the misty base.
Step-by-Step Application Technique
- Shape nails into a refined square or short almond shape.
- Apply a transparent smoky-nude base coat and cure completely.
- Dip your thin striper brush into the blackberry polish.
- Trace a delicate micro-line across the free edge tip.
- Curve the line gently down toward the lateral nail folds.
- Clean up any imperfections with your acetone cleanup brush.
- Seal the entire nail plate with a glossy topcoat.
Professional Styling and Longevity Care
This micro-French style looks effortlessly cool with oversized tailored blazers and chunky scarves. It matches seamlessly with rich plum lipsticks and minimalist leather tote bags. The subtle tip adds sophisticated color without dominating your overall style.
Keep the tips pristine by avoiding direct impacts against hard surfaces. Reapply a layer of clear topcoat every few days to protect tips. Hydrate cuticles with jojoba oil to maintain a clean salon look.
Wear gloves when performing household chores to avoid tip wear and micro-chipping. Dark tips show wear more noticeably than lighter tones, requiring mindful care. Consistent hydration keeps the dark edges crisp and glossy throughout the season.
8. Celestial Cider Chrome Starlight
As autumn nights grow longer, clear skies reveal bright, twinkling constellations. This concept combines a warm cider-toned base with delicate, hand-painted celestial stars. A fine chrome glaze over the top gives the entire look a cosmic glow.
+-----------------------------------------------------------+
|           Celestial Cider Starlight Breakdown             |
+-------------------+---------------------------------------+
| Base Style        | Warm Apple Cider with Golden Glaze    |
| Finish Effect     | Mirror Chrome & Micro-Painted Stars   |
| Complementary Tone| Mustard Yellow, Rust, Navy Blue       |
+-------------------+---------------------------------------+

Aesthetic Inspiration and Color Theory
Warm apple cider, cinnamon sticks, and starry autumn nights inspire this concept. The rich, golden-brown foundation provides warmth and grounding energy. Hand-painted white stars add a magical, whimsical touch across the glossy surface.
The golden chrome glaze binds all the elements together into one cohesive finish. It catches ambient light, mimicking the gentle sparkle of distant stars. This design feels playful yet elevated, perfect for dreamers and creatives.
The golden-brown base evokes cozy evening gatherings around outdoor bonfires. Crisp white star accents introduce an ethereal, celestial element to warm autumn tones. The reflective chrome sheen creates a smooth, liquid-like mirror across the nails.
This manicure captures the crisp clarity of autumn skies after twilight falls. It balances rustic comfort with celestial magic, offering a truly unique aesthetic. It is an inspiring option for those who love whimsical details.
Essential Materials and Polish Selection
Prepare a warm spiced cider base color and an ultra-fine detailer brush. You will need opaque white gel paint for tracing delicate celestial stars. A gold-toned chrome powder adds that quintessential reflective autumn sheen.
A non-wipe topcoat is necessary to secure the chrome powder properly. Keep a silicone applicator tool handy for smooth powder buffing. High-quality art gel guarantees that your star points remain crisp and sharp.
Choose white art gel with zero dispersion layer for the cleanest star designs. These specialized paints do not smudge when coated with final topcoats. A fine dotting tool helps place perfect micro-dots for distant galaxies.
Ensure your gold chrome powder is ultra-fine to prevent a gritty texture. Smooth chrome powder creates a liquid mirror effect that enhances the underlying cider tone. Quality pigments make hand-painted stars pop with celestial brightness.
Step-by-Step Application Technique
- Apply base coat and two coats of warm cider polish.
- Apply non-wipe topcoat and cure for thirty seconds.
- Buff golden chrome powder lightly across the entire surface.
- Dust away excess powder and cure for another thirty seconds.
- Use your detail brush to paint delicate four-point stars.
- Add tiny white micro-dots around the stars for constellations.
- Seal your artwork with a final layer of protective topcoat.
Professional Styling and Longevity Care
Celestial cider nails look stunning alongside rich navy wool, mustard sweaters, and gold jewelry. They add an eye-catching, artisanal touch to your favorite seasonal outfits. The combination of chrome and star art stands out in any lighting.
Avoid filing the free edge after applying chrome to prevent chipping. Keep your hands well-moisturized with lightweight, non-greasy hand lotions throughout the day. Gentle care will keep the celestial artwork looking fresh and flawless.
Protect the painted stars by applying two thin layers of topcoat if needed. Double-capping the free edge ensures the chrome powder does not peel at tips. Daily hand massages keep the skin glowing alongside your starry nails.
9. Cashmere Tortoiseshell and Mother-of-Pearl
Tortoiseshell patterns are a staple of autumn fashion, from eyewear to accessories. Blending this classic print with mother-of-pearl accents creates an airy, romantic twist. The juxtaposition of deep amber spots and glowing pearl finishes feels balanced and refined.
+-----------------------------------------------------------+
|         Cashmere Tortoiseshell Breakdown                  |
+-------------------+---------------------------------------+
| Base Style        | Honey Jelly Tortoise & Pearl Shimmer  |
| Finish Effect     | Glossy Layered Resin & Iridescence    |
| Complementary Tone| Brown Suede, Cream Knits, Pearl Rings |
+-------------------+---------------------------------------+
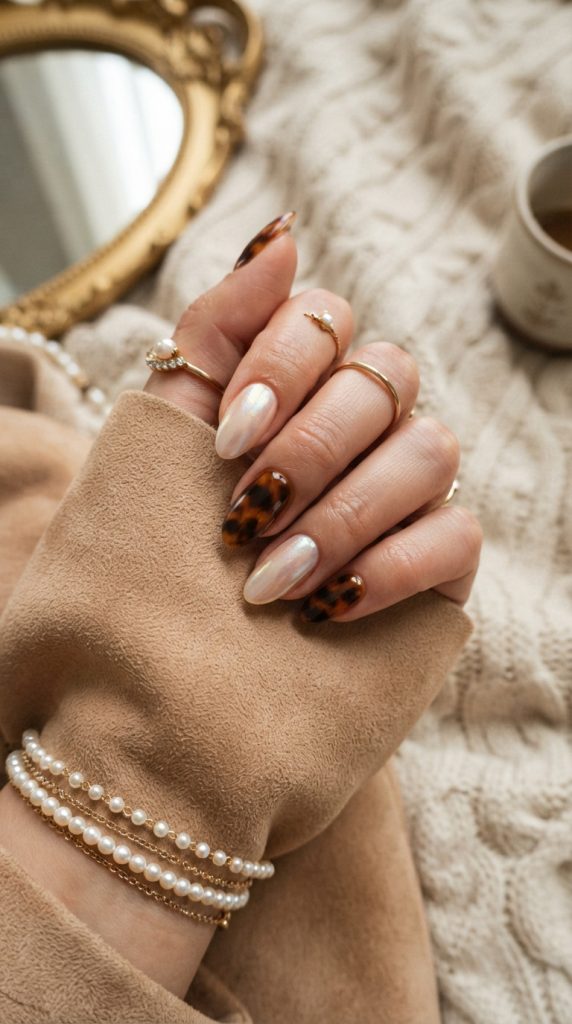
Aesthetic Inspiration and Color Theory
The aesthetic combines the warmth of polished resin with the softness of sea pearl. Rich caramel, deep espresso, and golden honey create the classic tortoiseshell layers. The shimmering mother-of-pearl accent nails keep the overall set light and ethereal.
This combination avoids the heavy feeling of a full set of dark nails. It brings modern balance by contrasting graphic animal print with smooth iridescence. It is a sophisticated, versatile option for any autumn wardrobe.
The natural warmth of tortoiseshell print pairs effortlessly with glowing iridescent accents. It feels reminiscent of vintage jewelry boxes filled with heirloom treasures. The translucent jelly layers create incredible depth that invites closer inspection.
Alternating between bold pattern and pearlescent minimalism keeps the manicure dynamic. It flatters every outfit by incorporating both deep neutrals and luminous highlights. This timeless design remains a favorite for classic autumn styling.
Essential Materials and Polish Selection
You will need sheer yellow-amber jelly polish, dark chocolate gel, and black gel. For the accent nails, choose an iridescent mother-of-pearl shimmering lacquer. A soft blending brush will help soften the dark spots for a resin look.
A quality topcoat is essential to build that signature plump finish. Keep alcohol wipes nearby to clean brushes between color blending. High-pigment browns ensure your tortoiseshell spots look realistic and authentic.
Ensure your amber jelly polish has balanced transparency without looking cloudy. Transparent formulas allow deeper chocolate layers to float naturally within the resin. A soft flat gel brush helps blend spot borders seamlessly.
Select mother-of-pearl polishes with multi-tonal shifts including pink, gold, and green. These complex undertones tie the pearlescent nails directly into the warm tortoiseshell palette. Having the right tools guarantees a cohesive, luxurious result.
Step-by-Step Application Technique
- Apply base coat to all nails and cure completely.
- On accent nails, apply two coats of mother-of-pearl polish.
- On remaining nails, apply a coat of sheer amber jelly.
- Dab irregular spots of dark chocolate gel across the wet amber.
- Blend the edges of the spots softly to create depth.
- Apply another thin layer of amber jelly over the spots.
- Add a few smaller black dots and seal with topcoat.
Professional Styling and Longevity Care
Wear this chic design alongside soft brown suede jackets and oversized cream sweaters. Pearl jewelry and tortoiseshell hair clips complement the manicure seamlessly. It is an elevated aesthetic that transitions effortlessly from day to night.
Maintain the high-gloss shine by wiping your nails with alcohol occasionally. Apply daily cuticle oils to keep the skin around your nails soft. Proper hydration prevents the multiple gel layers from lifting at the corners.
Avoid harsh scrubbing pads that can dull the resin-like high-gloss finish. Reapply topcoat after ten days to restore the deep dimensional shine. Caring for the cuticle area keeps the pattern looking immaculate for weeks.
10. Morning Frost Terracotta Swirls
Early autumn mornings often bring a delicate layer of frost over sun-baked earth. This design translates that crisp moment using rich terracotta bases and frosted abstract swirls. The contrast between warm clay and cool silver creates dynamic visual interest.
+-----------------------------------------------------------+
|         Morning Frost Terracotta Breakdown                |
+-------------------+---------------------------------------+
| Base Style        | Warm Terracotta Clay & Misty White    |
| Finish Effect     | Dimensional Chrome Abstract Swirls    |
| Complementary Tone| Rust Red, Charcoal, Silver Accents    |
+-------------------+---------------------------------------+
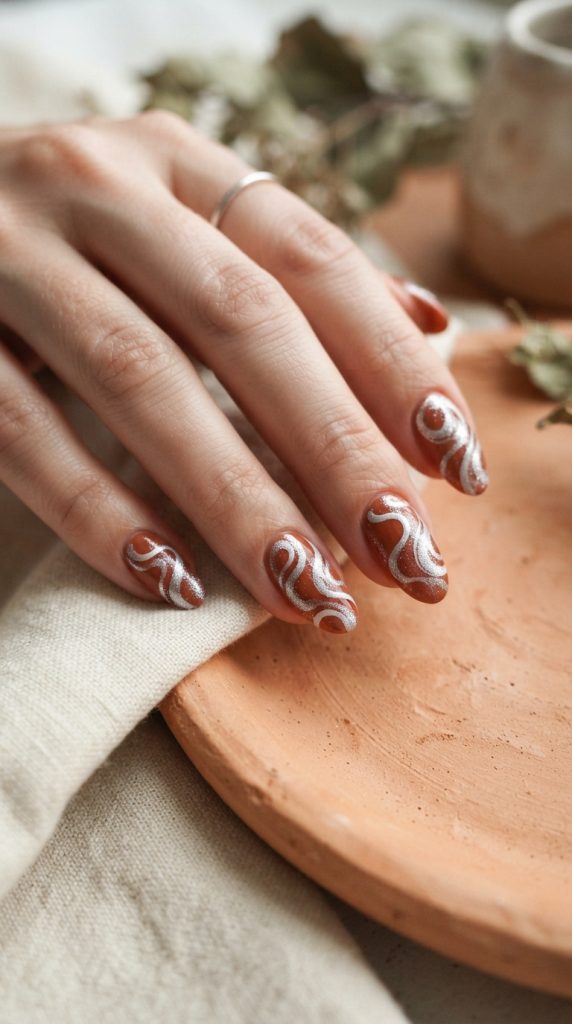
Aesthetic Inspiration and Color Theory
Sun-baked clay pots touched by freezing autumn mist inspire this creative look. The terracotta base provides an earthy, grounded foundation of warm orange-brown. The sweeping frosted swirls mimic cold morning breezes moving across the landscape.
Abstract line work allows each nail to look unique while maintaining cohesion. The combination of warm earth and cool frost captures the essence of autumn weather. It offers a fresh, contemporary approach to seasonal negative space nail art.
The warmth of rich clay grounds the manicure, offering deep seasonal comfort. Meanwhile, the raised silver swirls introduce a modern, sculptural touch of coolness. This visual contrast feels energetic, creative, and undeniably sophisticated.
Flowing abstract curves elongate the nail bed and soften square or round shapes. The metallic texture catches light dramatically with every movement of your hand. It represents a bold, artistic take on cozy fall aesthetics.
Essential Materials and Polish Selection
Select a creamy terracotta polish, sheer white liner gel, and silver chrome powder. You need an ultra-thin striper brush to paint fluid, organic abstract swirls. A 3D builder gel helps create raised, textured swirls if desired.
Have a non-wipe topcoat ready to make the chrome powder adhere properly. Clean lint-free wipes and alcohol ensure precise application throughout the process. Quality liner gels provide clean, sharp lines that do not run.
Choose 3D sculpting gels with thick, non-slumping consistency for defined swirls. Formulas that hold their shape allow you to paint intricate curves without pooling. A dedicated chrome applicator prevents silver powder from staining the terracotta base.
Keep a matte topcoat on hand if you want a velvety terracotta foundation. The contrast between matte base and 3D chrome swirls looks exceptionally chic. Investing in quality art gels ensures clean lines that stay raised.
Step-by-Step Application Technique
- Prep nails and apply an adhesive, smoothing base coat.
- Apply two thin coats of creamy terracotta polish, curing each.
- Dip your striper brush into clear 3D builder gel.
- Paint flowing, abstract swirls sweeping across the nail bed.
- Cure the raised swirls under your lamp for thirty seconds.
- Buff silver chrome powder exclusively over the raised swirls.
- Seal the entire design with a durable, high-gloss topcoat.
Professional Styling and Longevity Care
Terracotta swirl nails look incredible alongside charcoal overcoats and chunky wool scarves. Silver rings and accessories highlight the chrome finish of the abstract swirls. The modern, artistic vibe makes it a standout choice for style enthusiasts.
Protect the raised 3D swirls by avoiding harsh abrasives and manual picking. Regularly massage nourishing cuticle creams into the nail matrix for optimal health. Consistent care keeps your textured manicure looking fresh and polished for weeks.
Clean between raised ridges with a soft manicure brush during hand washing. Keeping the 3D grooves free of lotion buildup preserves their bright metallic shine. Mindful hand habits ensure your textured swirls remain crisp and secure.
Tips for Long-Lasting Autumn Manicures
Achieving a gorgeous manicure is only half the journey; maintaining it requires consistent care. Autumn weather brings dry air and sudden temperature shifts that can dehydrate your hands. Developing a healthy daily routine protects both natural nails and artificial enhancements.
+-----------------------------------------------------------+
|             Daily Autumn Nail Care Checklist              |
+-------------------+---------------------------------------+
| Morning           | Apply Hydrating Cuticle Oil           |
| Afternoon         | Reapply Rich Shea Butter Hand Cream   |
| Evening           | Massage Cuticle Balm Before Sleep     |
| Weekly            | Reapply Clear Protective Topcoat      |
+-------------------+---------------------------------------+
Preventing Dehydration and Brittleness
Cold autumn winds strip moisture away from your skin and nail beds quickly. Make it a habit to apply pure jojoba oil around your cuticles twice daily. Jojoba oil molecules are small enough to penetrate deeply and restore natural flexibility.
Wear warm gloves when spending extended periods outdoors in cool temperatures. Protecting your hands from direct wind exposure prevents premature cracking and peeling. Well-hydrated nails remain resilient against accidental bends and daily wear.
Keep a bottle of cuticle oil at your desk and another by your bedside. Applying oil frequently reinforces the lipid barrier of your nails and skin. Supple cuticles prevent painful hangnails and keep manicures looking fresh.
Incorporate overnight hydration treatments once a week using thick balms and cotton gloves. Deep moisturizing overnight restores lost elasticity and prevents natural nail delamination. Consistent moisture habits are the foundation of beautiful seasonal hands.
Protecting Your Manicure from Everyday Wear
Always wear protective rubber gloves when washing dishes or handling household cleaners. Harsh chemicals and prolonged water exposure weaken nail adhesives and polish bonds. Treating your nails as jewels rather than tools preserves their structural integrity.
Avoid using your fingertips to scrape labels, pry open cans, or press stiff buttons. Use the pads of your fingers or proper tools to handle everyday tasks. Small behavioral changes significantly extend the lifespan of your seasonal manicures.
Keep your nail edges smooth by gently filing away micro-catches immediately. Rough edges can snag on knitwear and cause peeling if left unaddressed. Use fine-grit glass files to seal the keratin layers smoothly.
Apply an extra layer of protective topcoat every five to seven days. Refreshing the top seal protects pigments from UV fading and minor surface scratches. Simple preventative measures keep your autumn sets looking pristine for weeks.
Choosing the Best Shape and Length
Selecting the right nail shape enhances the beauty of your autumn colors. Different shapes highlight specific design elements and flatter your hands uniquely. Consider your daily lifestyle and maintenance preferences when choosing your preferred shape.
+-----------------------------------------------------------+
|             Nail Shape Selection Matrix                   |
+-------------------+---------------------------------------+
| Almond            | Elongates fingers, ideal for swirls   |
| Oval              | Classic, natural, great for cat-eye   |
| Short Square      | Low maintenance, perfect for French   |
| Squoval           | Versatile, balances modern and soft   |
+-------------------+---------------------------------------+
Elegant Almond and Oval Shapes
Almond and oval shapes elongate the fingers and create a soft, feminine silhouette. They provide ample surface area for intricate gradients, cat-eye effects, and botanical art. The curved edges reduce the risk of snagging on chunky knit sweaters.
These shapes work exceptionally well with medium to long natural nails or extensions. They complement the ethereal, flowing aesthetic of autumn styles beautifully. Almond shapes remain a favorite choice for sophisticated, modern seasonal aesthetics.
The tapered contour guides the eye outward, creating an elegant visual line. It softens wider nail beds and gives hands a graceful, refined presence. Oval shapes provide similar elongation while offering slightly more natural structural strength.
When styling almond nails, focus detailed artwork toward the center or tip. This layout emphasizes the graceful taper of the free edge. Almond and oval silhouettes remain timeless foundations for dreamy seasonal manicures.
Practical Short Square and Squoval Shapes
Short square and squoval shapes offer exceptional durability for active, busy lifestyles. They provide a clean, modern canvas that suits minimalist designs and micro-French tips. Short lengths are less prone to breakage and require minimal daily maintenance.
This practical style looks exceptionally chic when paired with rich, opaque autumn tones. The crisp edges add a structured, editorial contrast to soft fall knits. Choosing the right shape ensures your manicure feels comfortable and stylish all season long.
Squoval shapes combine the clean lines of square nails with softened, rounded corners. This prevents sharp edges from catching on delicate fabrics like cashmere or silk. It offers maximum comfort for keyboard typing and everyday tasks.
Short lengths also highlight the high-gloss shine of jelly and chrome finishes. They provide an understated, clean appearance that fits seamlessly into professional work environments. Practical shapes prove that short manicures can be just as ethereal and stylish.
Embracing these ethereal autumn styles brings warmth, creativity, and elegance to your daily routine. From translucent amber glazes to shimmering celestial stars, seasonal palettes offer endless inspiration. Treat your hands to a cozy seasonal refresh that celebrates the beauty of autumn.
Leave a Reply